
IKEA MOPPE Drawers Makeover
I have been in a huge reading and booktok obsession lately and it has caused my bookshelf to grow over the past few months. It was definitely in need of a good dusting, reorganizing, and styling. And one large item I keep stored on my bookshelves in my bedroom is a mini drawer unit that I use to organize makeup products. So as I updated the look of my shelves, I also wanted to give this basic plywood product a makeover of it’s own.
So I’m back with another IKEA hack today! And this is a hack for the very popular and useful IKEA organizational product, the MOPPE.

You’ll find a side-by-side before and after of the mini drawer unit below! I love what a functional and inexpensive product this is. It can be used in so many parts of the house, like for office organization, toiletries, a coffee/tea station, or even kid’s toy storage. And because it comes in an untreated wood material, it is the perfect option for painting or decorating to really make it your own.
Follow along below to see how I turned this boring set of drawers into a fluted wood decor piece!
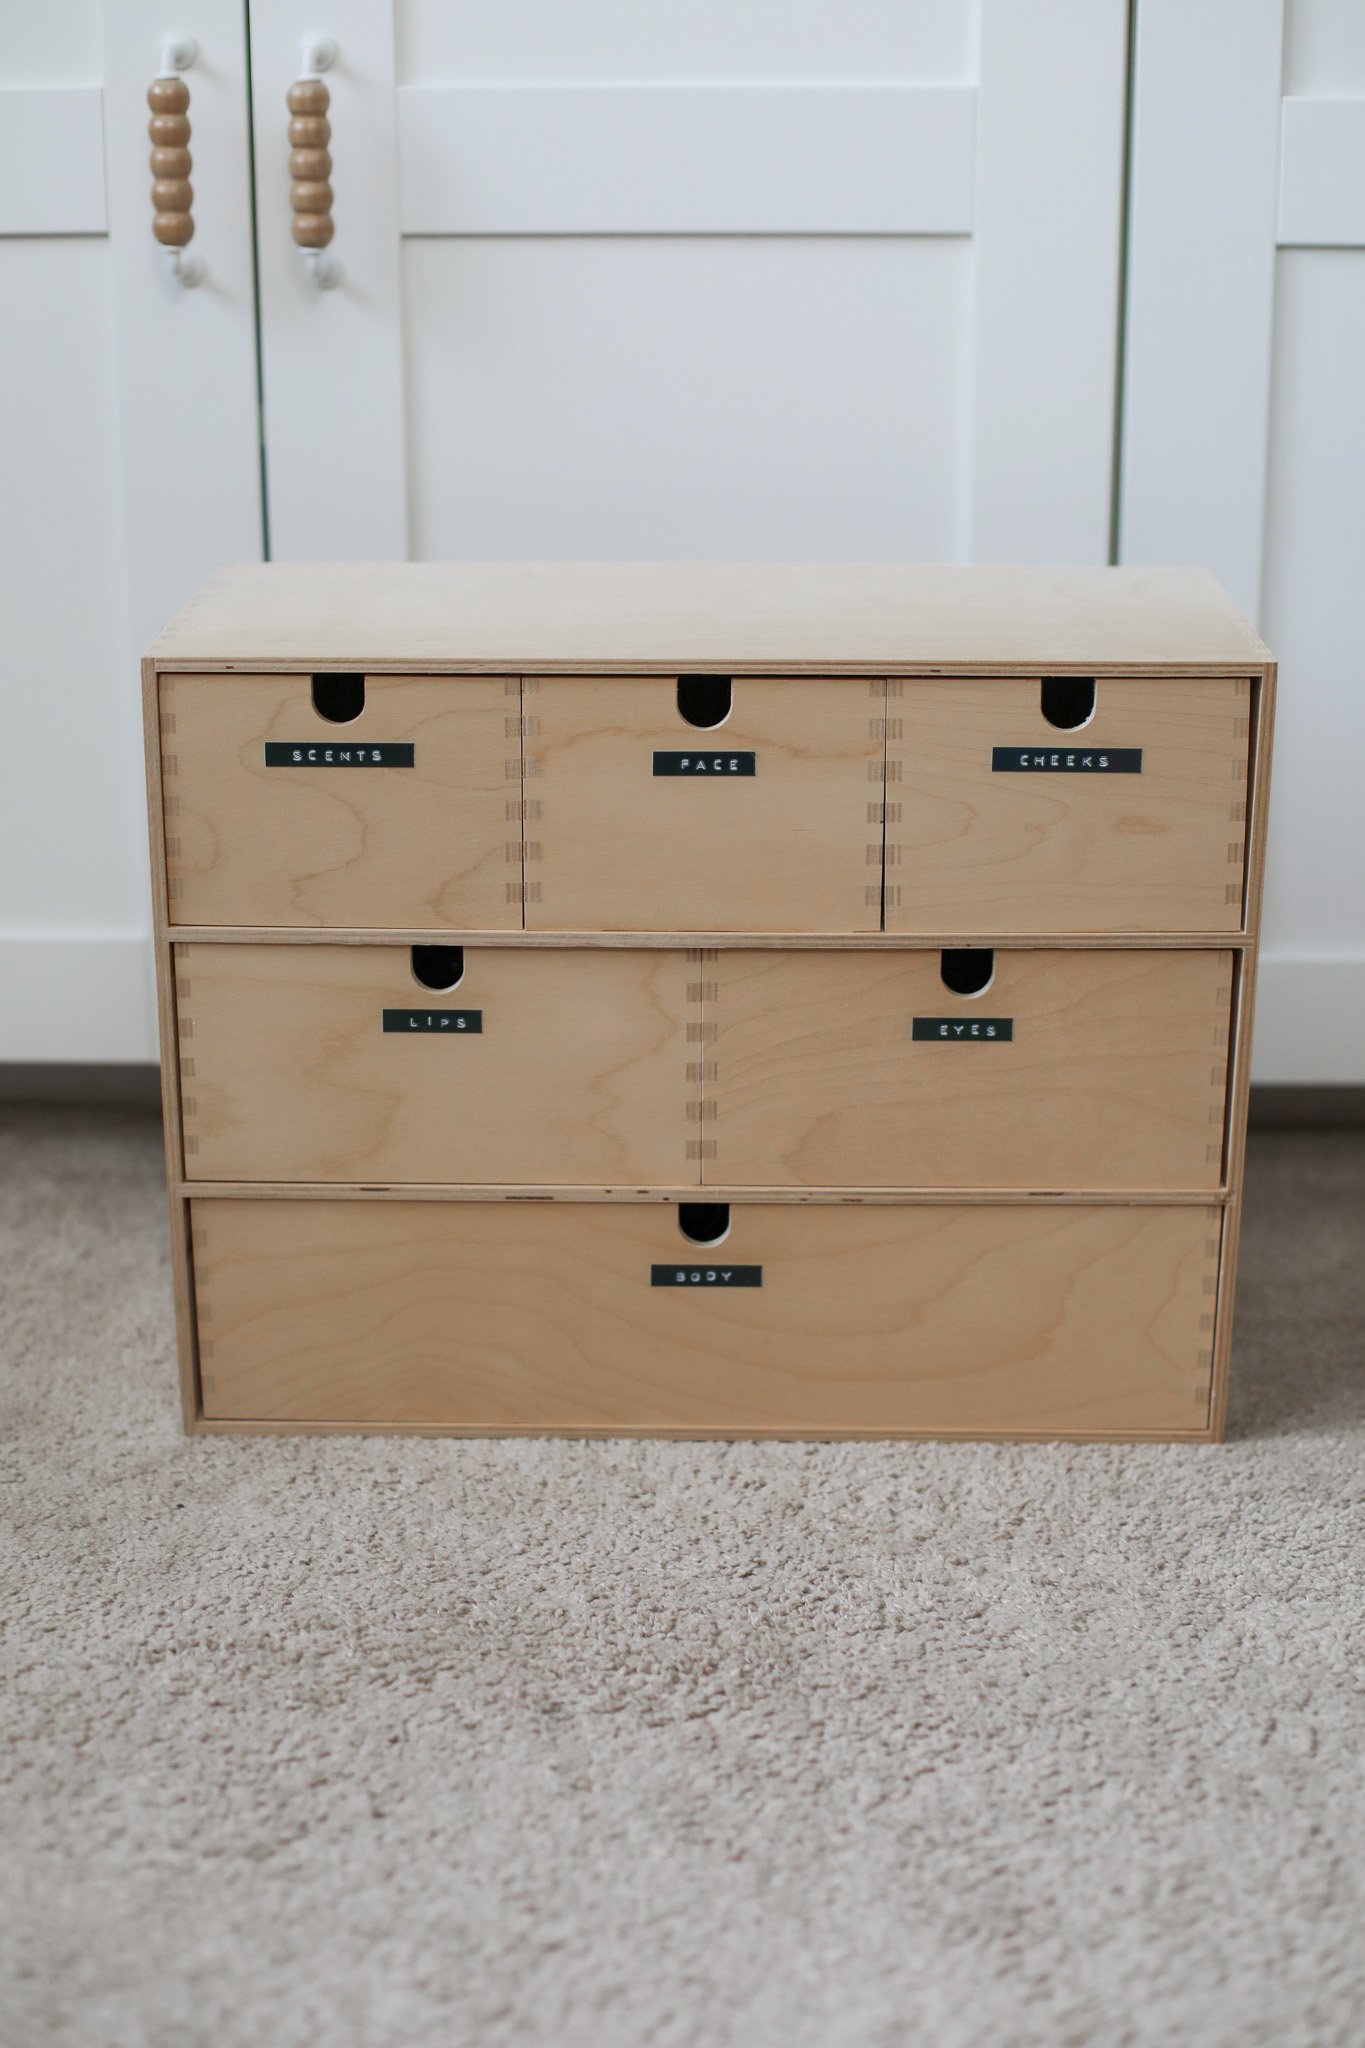
BEFORE

AFTER
Affiliate disclosure: This post may contain affiliate links. When you buy from these links, I may earn a small commission, at no additional cost to you. As an Amazon Associate, I may earn commissions from qualifying purchases from Amazon.com. Thank you for your support!
HOW TO MAKEOVER THE IKEA MOPPE MINI STORAGE CHEST
Supplies:
IKEA Moppe mini storage chest
Wood craft sticks (4”)
X-Acto knife
Safety glasses
Masking tape
Metal ruler
Sharp scissors
Sand paper (220 grit)
Painter’s tape
Drawer pulls (I used this type!)
Drill & various drill bits
Paint (I used an 8oz sample can of Behr’s Candied Yams)
Paint brush and roller brush
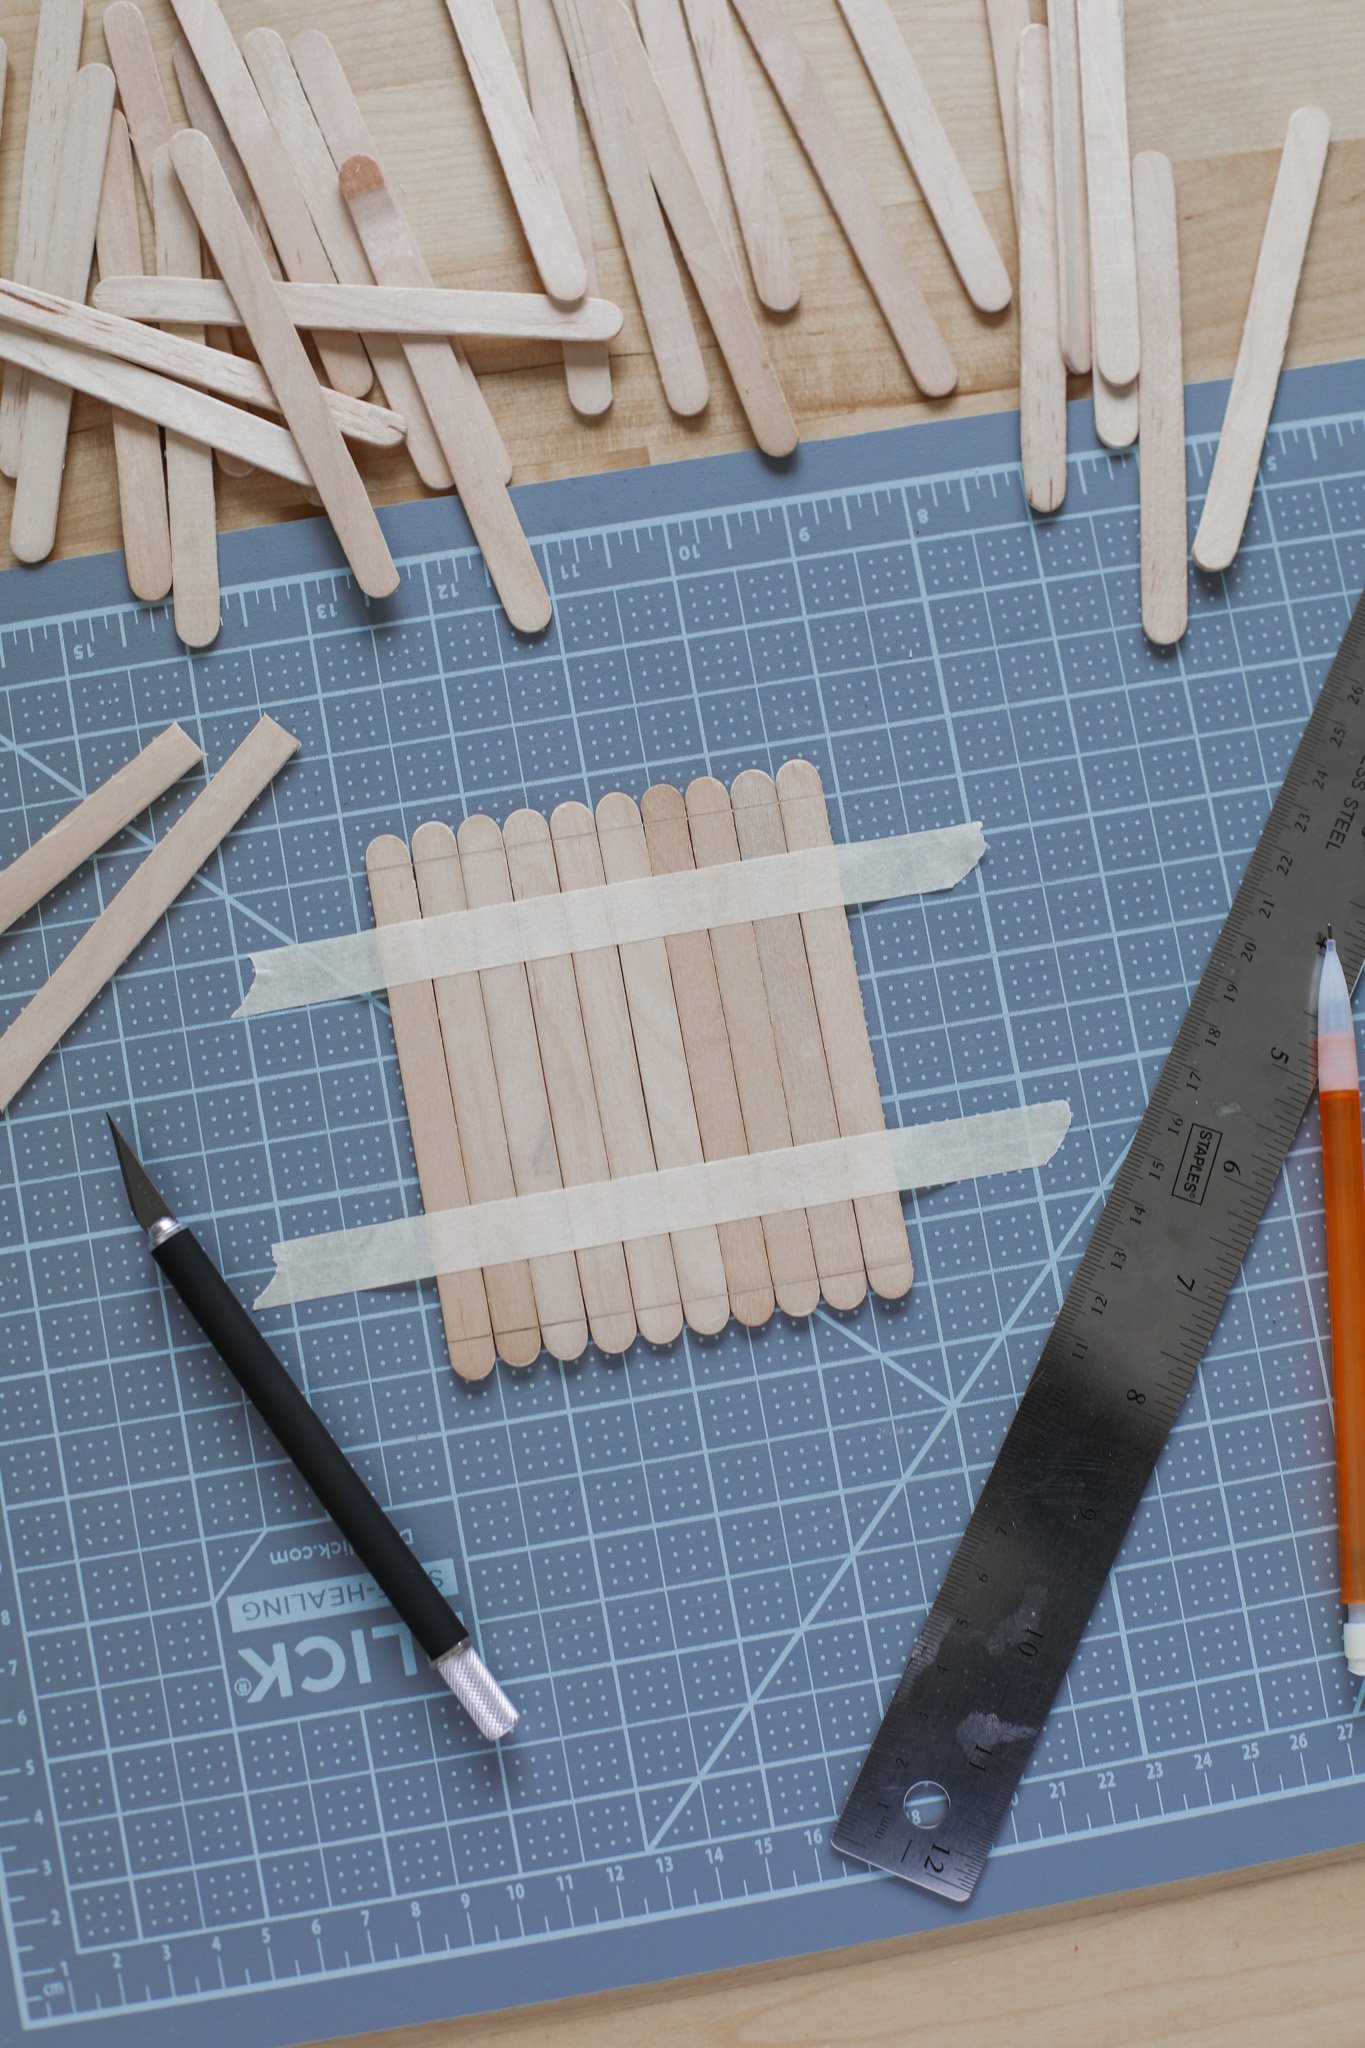
STEP 1: So I was determined to do my own little wood working makeover in my apartment without the use of any major power tools (besides a drill). So for this fluted wood project, I decided to use a common craft item, popsicle sticks!
To begin, you will need to cut your wood popsicle sticks to the correct height of the drawers. The sticks will need to be cut to 3-13/16” length. Start by picking out the most clean & uniform looking sticks. I worked with about 10 at a time. Tape them to a cutting surface to keep them in place. Then use a ruler to measure out the 3-13/16” height and mark with a pencil. You will want to remove both rounded ends of the popsicle stick. So once you have both markings, position your metal straight-edge ruler on top of the sticks and use your x-acto knife to score a cut in the popsicle sticks along your pencil marks.
Now, you should be able to go in with a pair of really sharp scissors and follow that score line to cut each popsicle stick to size. **Be sure to wear a pair of safety glasses while cutting the sticks because I found that the excess wood would fly off as I was cutting.
Repeat this process until you have at least 108 popsicle sticks of this size cut. I would recommend doing some extra too just in case you need them.
STEP 2: Next, you will need to give the ends of these wood sticks a light sanding to get rid of any sharp edges and to make the surface smoother.
While you’re in the process of sanding these popsicle sticks, go ahead and give the surface of all your MOPPE drawers a light sanding as well. Keep in mind we are going to be using the BACK side of the drawers since we do not want the little cut out notch that is on the front of the drawers. So go ahead and turn all your drawers facing backwards. You will also want to sand the outside surfaces of the MOPPE storage chest too since we will be painting this as well.

STEP 3: Now it is time to glue on your sticks. I found it easier to start with the smaller sized drawers, so use a small line of wood glue to adhere the sticks to the backside of the drawer fronts. Try to work slowly and carefully, making sure your craft sticks are neatly lined up in a straight pattern. Leave a tiny space between each stick to give the fluted design (it’s about the size of the width of a popsicle stick if you want to use that as a guide). You will glue on a total of 12 sticks to each of the 3 small drawers.
For the second row of drawers, I wanted to make sure all the fluted wood sticks were going to match up, so I set my completed top drawers on the table and then tried to line up the next row of sticks to match. The medium size drawer fronts will need a total of 18 sticks each.
And then repeat this with the large bottom drawer, this drawer will need a total of 36 sticks.
Use some painter’s tape to tape down the completed sticks while the wood glue dries overnight.
*Note: this is why it is important to pick very straight and uniform looking popsicle sticks from the beginning because if they are slightly mishapen or bending, they will not stick down flat on the drawer front.

STEP 4: Now it is time to drill the holes for your drawer pulls. You can use any type of small drawer pull for this step. I loved these vintage-looking ring pull handles.
Use a ruler to measure the center point of each drawer and mark this with a pencil. Tape down a piece of painter’s tape to try to keep the wood from splitting as you drill your hole.
I found it helpful to start with a small pilot hole and work up to the drill bit size needed to fit my particular drawer pulls. I started with a 5/64” drill bit for the pilot hole, then moved up to a 1/8”, then 3/16”, then 7/32”.
Test to make sure the hole will fit your hardware and then set the hardware aside to attach after painting. Give the drawer front another sanding to smooth any wood damaged by the drilling.
Repeat on all your drawer fronts. I did two holes in the largest drawer to match the medium sized drawers above it.

STEP 5: Paint! Use a piece of painter’s tape to make a clean edge on the sides of your drawers — I only wanted to paint the drawer front, not all the surfaces. Use a small paint brush to get into all the cracks and then a small roller brush to give the top fluted surface a smooth coat.
Use your roller brush to paint the outer box of the chest as well.
Repeat with a second coat of paint on all pieces and set aside to dry overnight.
STEP 6: Since this set of drawers was going to be opened and closed fairly frequently, I wanted to give it a protective seal. So take your painted drawers and chest outside and spray a light, even coat of clear satin spray paint. Repeat with a second coat on all surfaces and allow to dry overnight.

STEP 7: Now comes the fun part, time to assemble! Install your hardware and put all your drawers back in place. Now the drawers are ready to use!
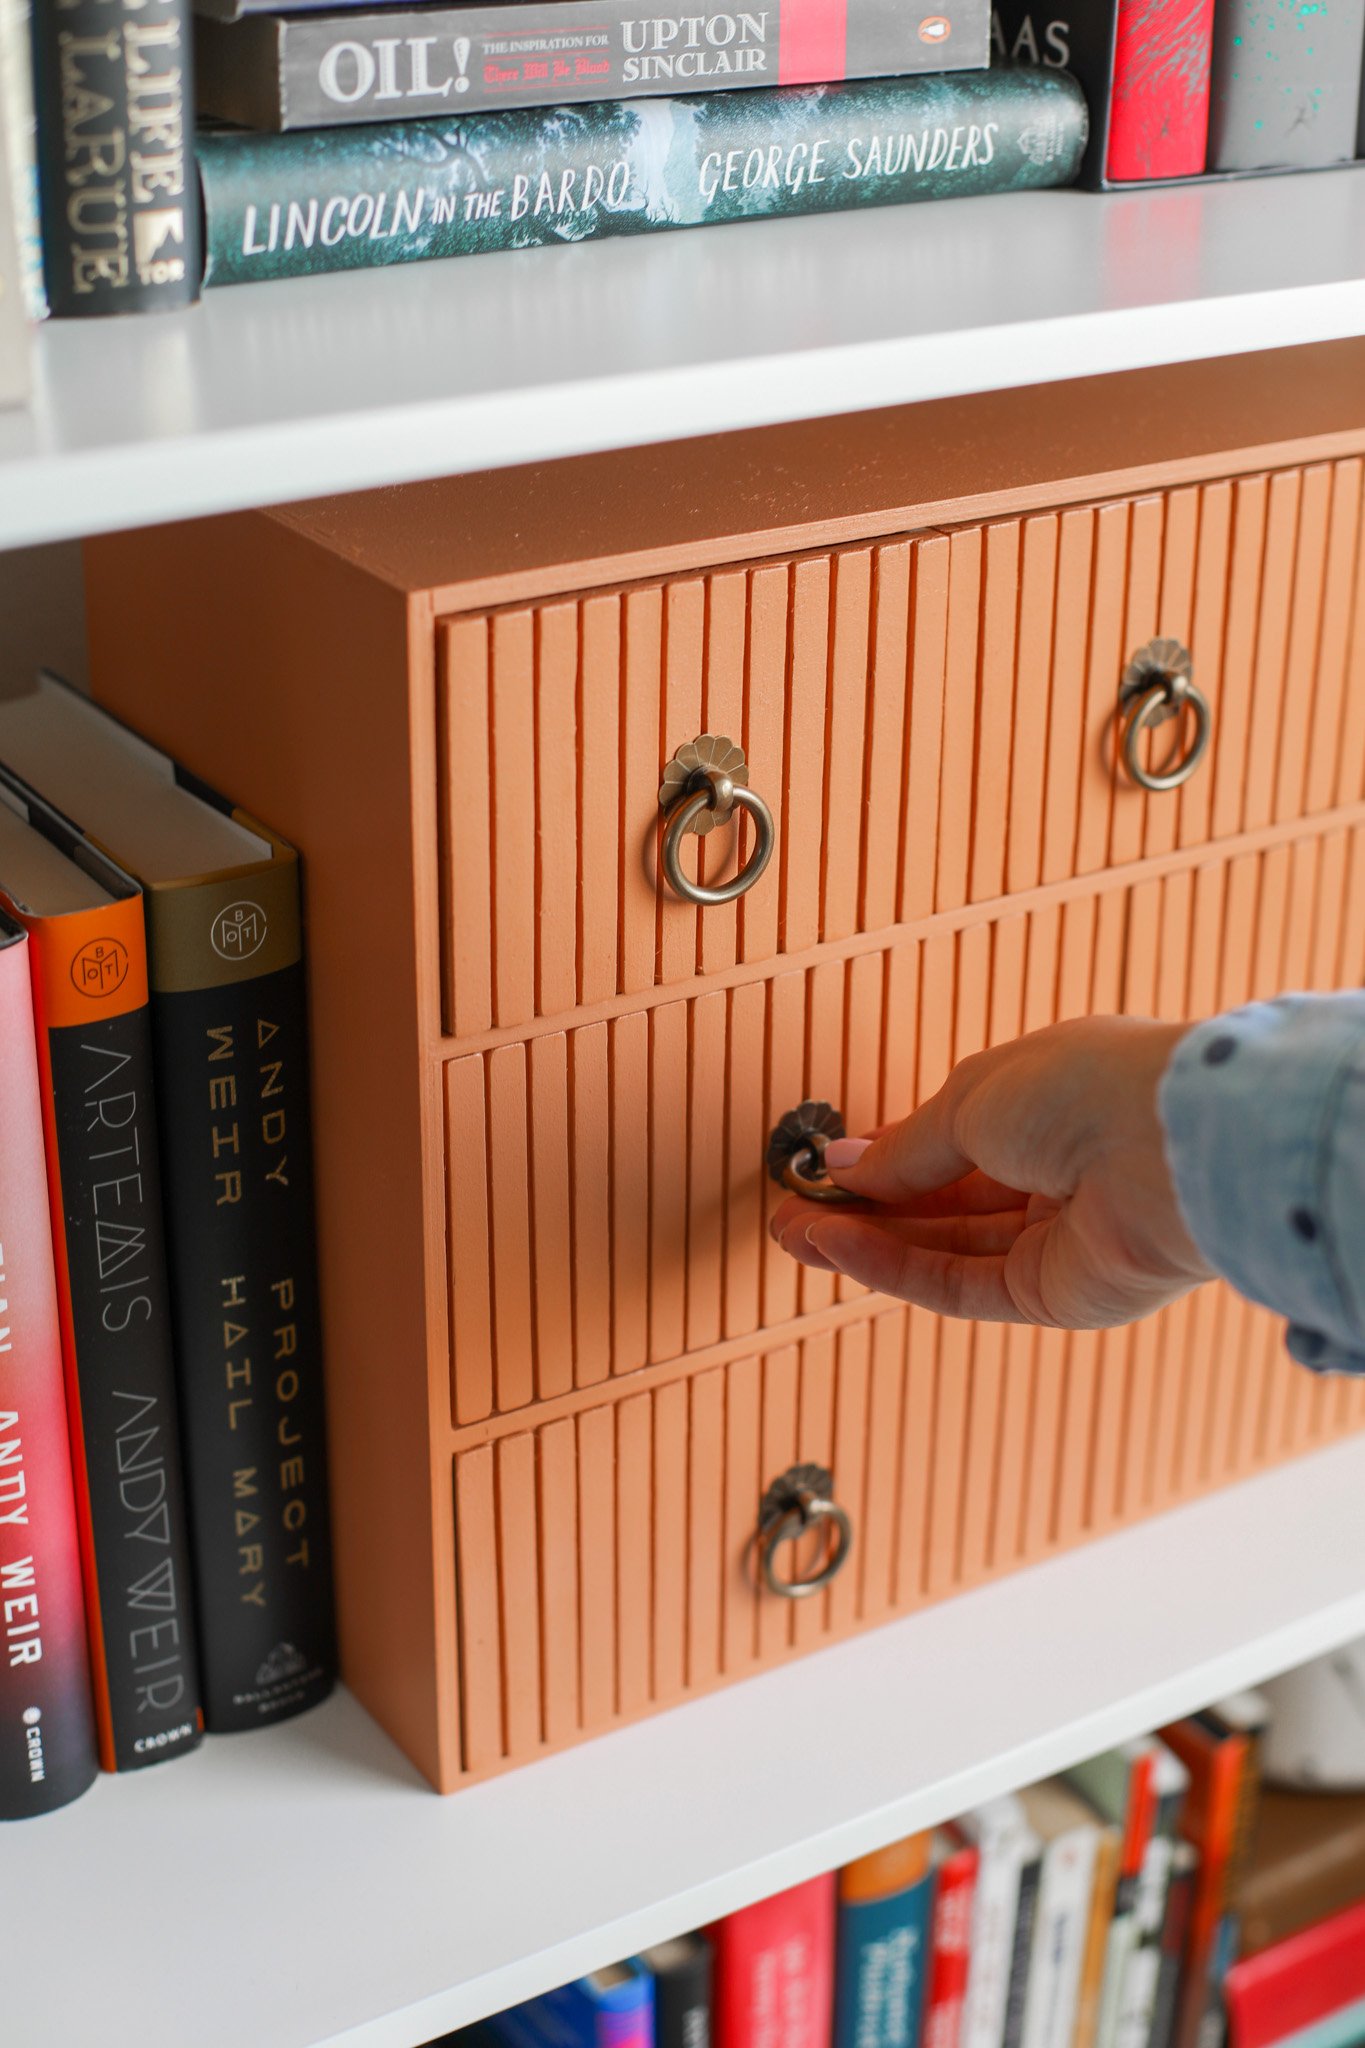
I love how this drawer unit turned out! It looks like a bespoke piece of home decor that you could buy at Anthropologie or something, and it really only cost $29 at IKEA (+ materials, supplies, and your time).
If you love a good IKEA hack like I do, check out some of our other blog posts!
How to Tile a Serving Tray (DIY IKEA FRUKTSKAL Hack)
DIY Desk Flip Calendar (IKEA LERBODA Frame Hack)
DIY Dorm Decor: A Tabletop Makeup Mirror (IKEA SMARRA Hack)
Embellished Christmas Basket (IKEA RISATORP Hack)
Have you found any cool new pieces at IKEA lately??
xo Rachael

