
IKEA Rast Nightstand Hack
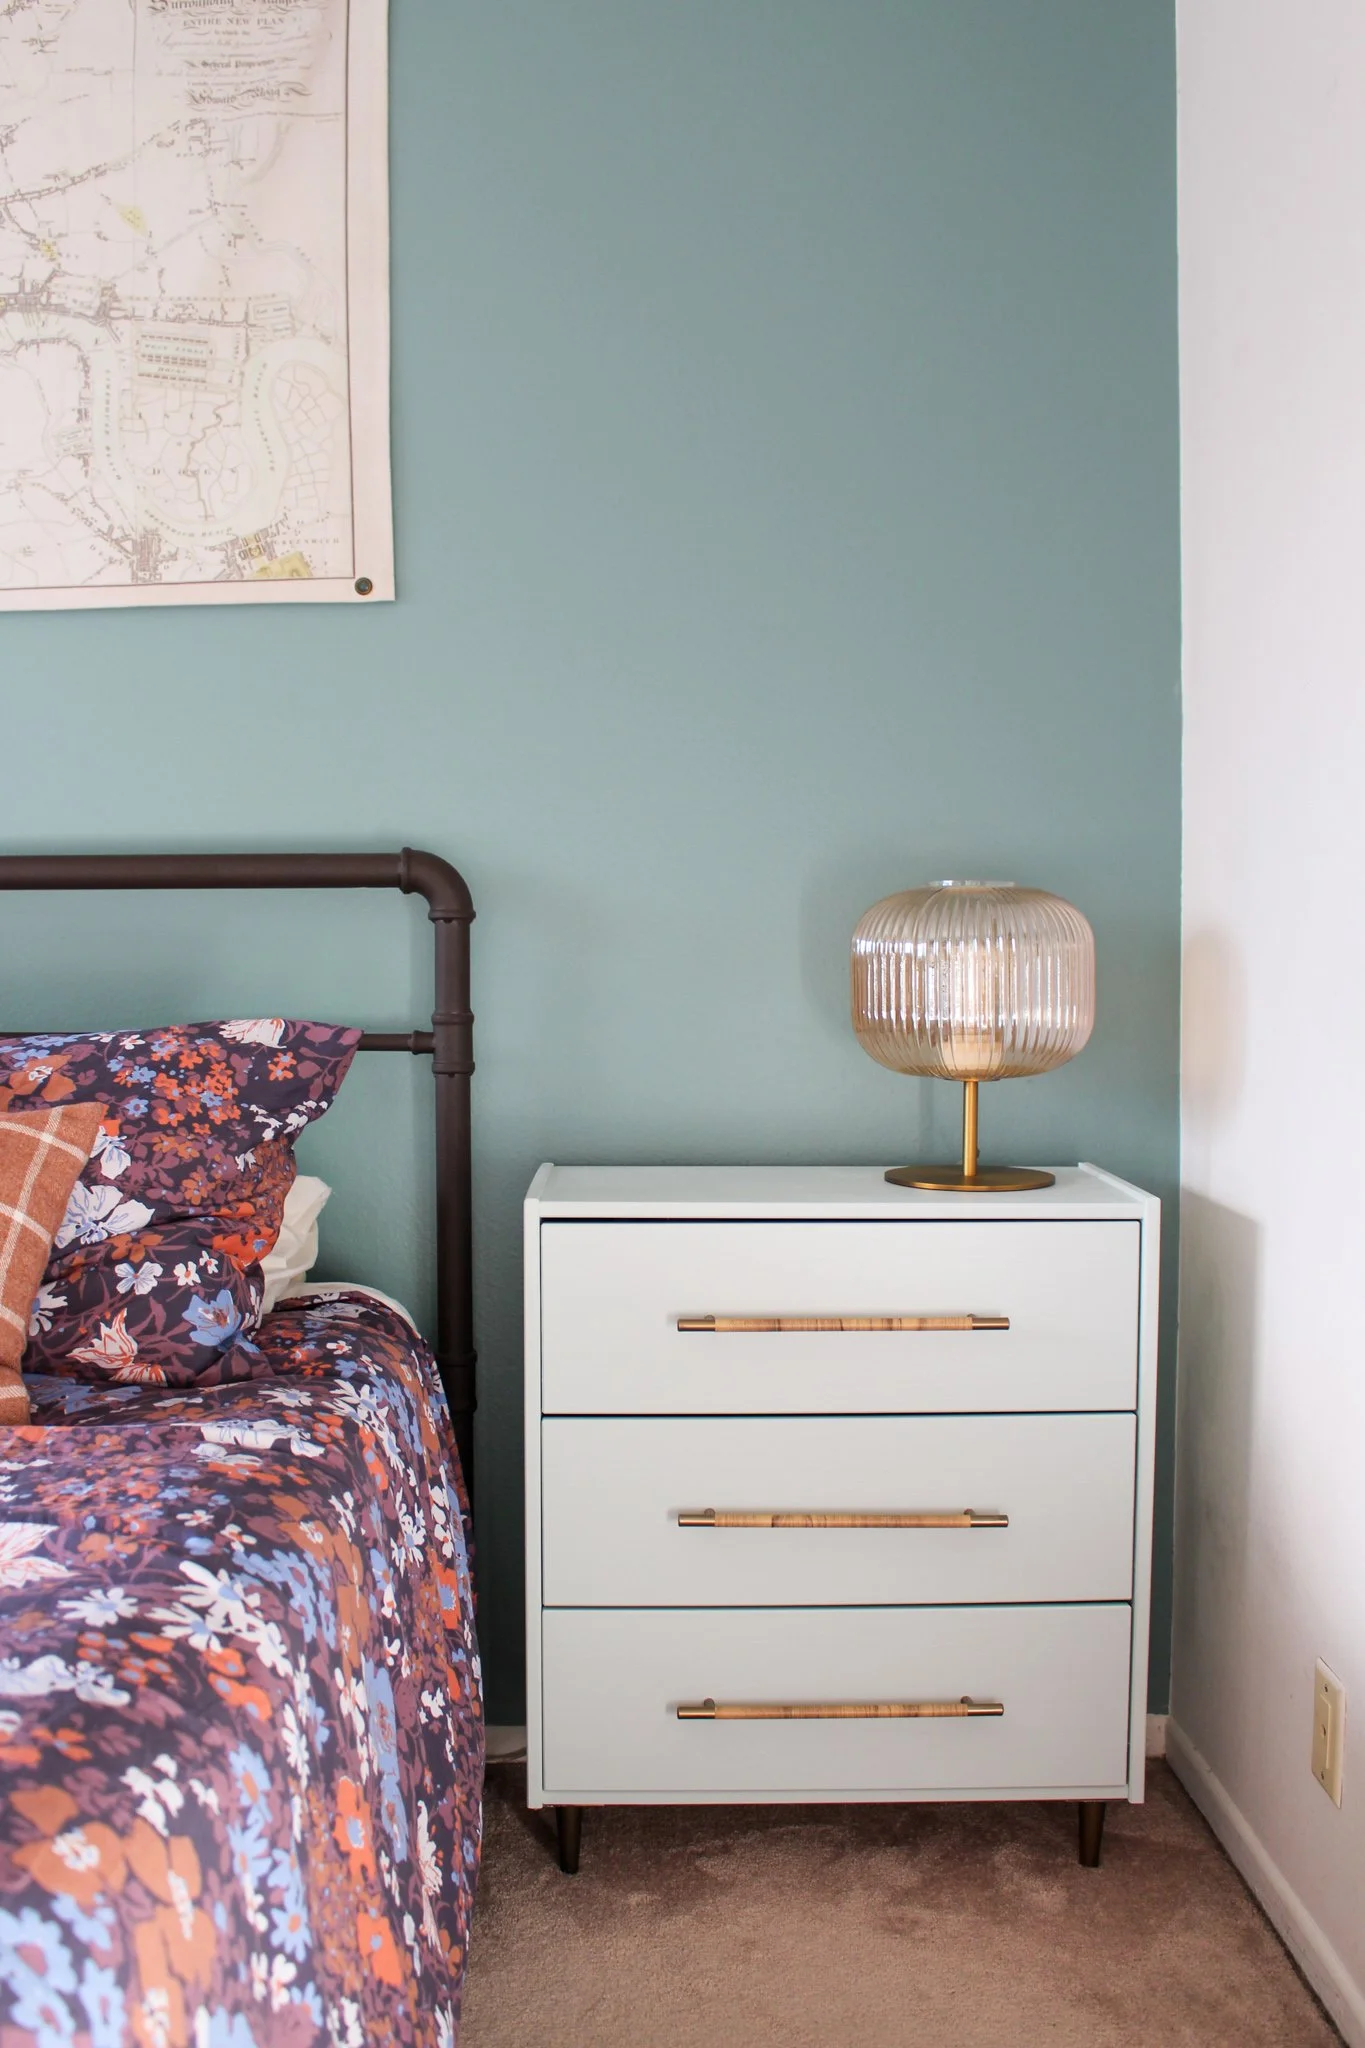
We’re back with another IKEA hack! I know the RAST Dresser has been hacked a million times all across the internet, but I was recently redecorating my bedroom and came across a Pinterest image of a nightstand that I fell in love with…until I saw the $1500 price tag. So I set off to create a similar dupe for much much less, using everyone’s favorite IKEA hackable product. Check it out below!
Affiliate disclosure: This post contains several affiliate links. As an Amazon Associate, I may earn commissions from qualifying purchases from Amazon.com. Thank you for your support!


DIY IKEA RAST NIGHSTAND HACK
You will need:
Pencil
Ruler
Drawer pulls with screws
Tapered furniture legs
Drill (with various sizes of drill bits)
Putty knife
Fine grit sandpaper
Rag
Drop cloth or tarp
Paint - I used Behr’s Breezeway in a satin sheen (I was able to use just two sample size 8 oz cans)
Mini roller & tray
Paint brush
Hammer
Contact paper (optional)
STEP 1: Open your IKEA box and identify all the dresser components. Find the two side pieces and lay them out on the ground with the line of holes at the top. Measure 2.5 inches from the bottom of both sheets of wood and draw a line across.
**NOTE: There may be newer or older versions of the RAST dresser so these measurements will be for my current (May 2022) version of the dresser. If you’re unsure, go ahead and build the dresser first according to the IKEA instructions, but do not attach the toe kick piece. Hold this piece flat face down directly under the bottom of the last drawer (where we will be attaching it) and draw your line directly below the toe kick piece of wood. Now disassemble your dresser frame (you can keep the drawers assembled at this point) and continue below.

STEP 2: Use a saw to cut off the wood at the line. We used a jigsaw, but a circular saw or table saw would probably work best for a nice even cut.
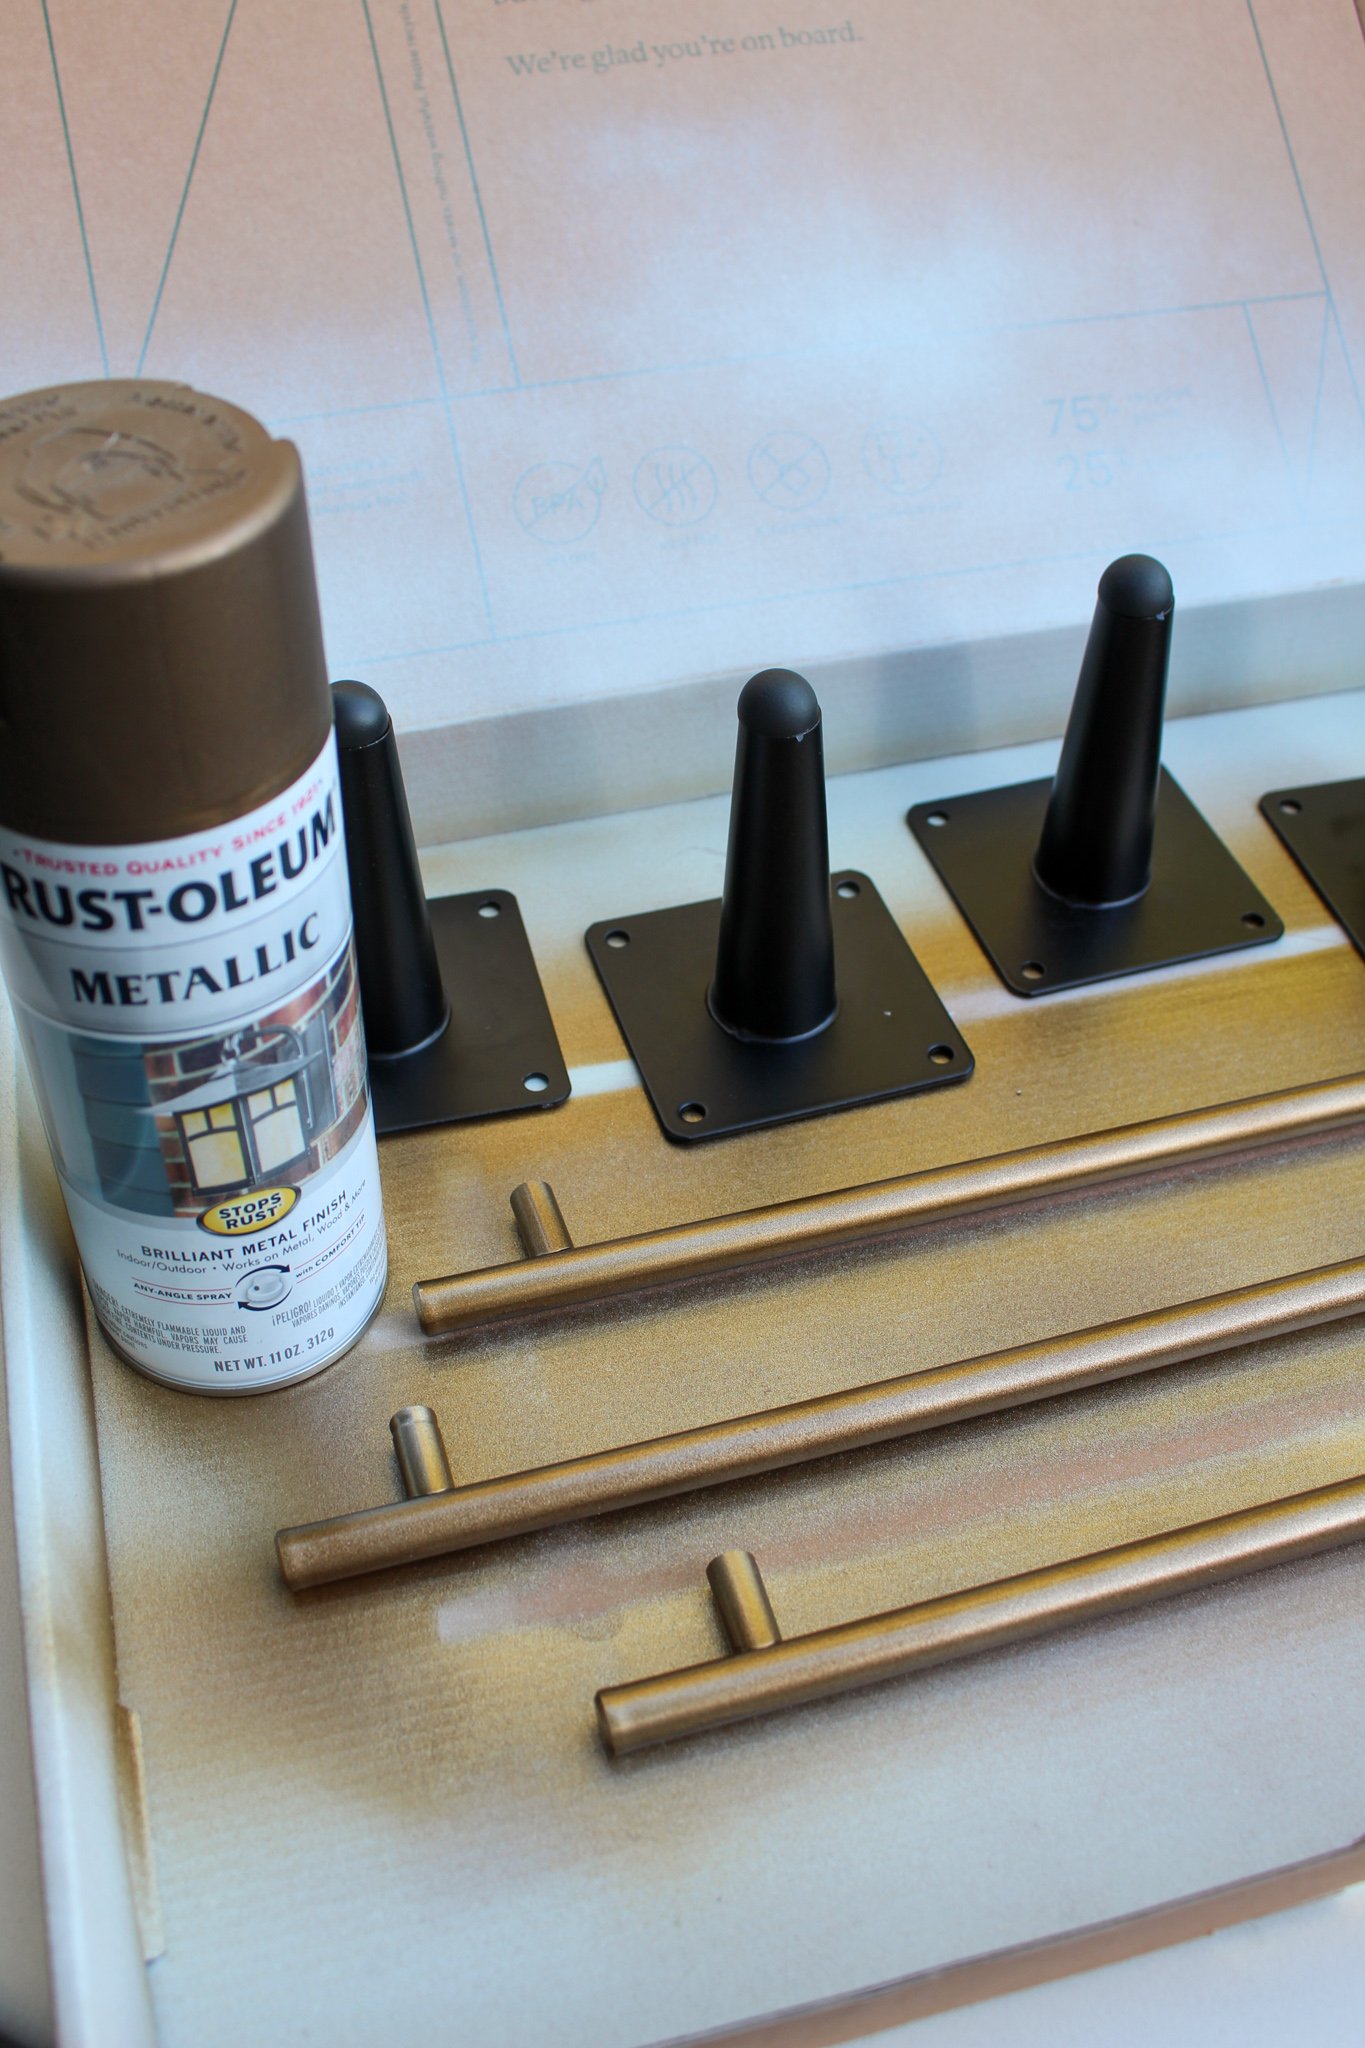
STEP 3: If you would like to give your hardware an updated look, you can spray a coat of paint over both the legs and drawer pulls. For my project, I went with a metallic antique brass color. Setup all these pieces in a cardboard box outside and give them a few even coats of spray paint. Allow to dry overnight.
STEP 4: Find all the drawer front pieces from the IKEA box (there should be 3). Lay these out on the floor. If you are going to be using a single drawer pull like I did, you will probably need to adjust where the hardware holes are located.
So to do this, measure the distance between the holes of your drawer pull (mine was 10” wide). Next measure the IKEA hole distance, which comes out to 11-5/8” wide. Find the difference between these measurements and divide by two to give you the distance inside the old holes you will need to make your new holes. For me this ended up being 21/32” so I used my ruler to make a mark at this distance from each hole.
STEP 5: Next, you will need to drill your new drawer pull holes. This is easier to do if your drawers are already built so go ahead and build all three drawers according to the IKEA instruction booklet, if you haven’t done so yet. Set the drawers on their back so the drawer face is facing up. Use your drill and a drill bit that matches the size of your drawer pull screws (I used a 9/64” drill bit) and drill a hole directly down into the drawer. Repeat for all six holes.

STEP 6: Now you will want to fill in the IKEA drawer holes. Using a putty knife, fill the outer holes you will not be using with wood filler. I found it was helpful to overfill the holes a bit and then allow the wood filler to dry overnight. Then use a fine grit sandpaper to sand over any extra wood filler to smooth out where the holes use to be.
Along with the six drawer holes you will also need to fill the two holes (one on each piece) on the lower end of the dresser side pieces. You will not be using these holes because we are going to be attaching the support beam onto the base of the dresser instead of the middle of the back, as the instructions say to do. Allow that wood filler to dry as well and sand as needed.
STEP 7: To prepare for the paint, give all outer surfaces a light sanding with a fine grit sandpaper. This includes all three drawer fronts & edges, the top of the dresser & edge, the outer faces of the dresser sides & edges, and the narrow edge of the toe kick. Wipe off any sawdust with a rag.

STEP 8: Begin painting. Lay out a plastic tarp or drop cloth on your floor surface. I found it easier to use a small paint roller to give an even coat to the wood, so open your paint and give it a stir, then pour the paint out into the roller tray. Roll off any excess paint before rolling on your wood pieces.
Start with the dresser drawer fronts. You will only need to cover the drawer front and edges, as these will be the only visible parts once it is assembled.
Next do the dresser top (make sure you are painting the correct side that will be visible from the top once assembled) and edges. And then you will also need to paint the narrow edge of the toe kick piece since this will be visible from the front. Wait to paint the two dresser sides until a later step.
I did two coats of paint on each piece, allowing each coat to dry for about 30 minutes between. Allow everything to dry overnight.

STEP 9: Once your pieces are dry, attach your two (unpainted) dresser side pieces to the dresser top piece as shown in the instructions (making sure the flat sides are facing out and holes are on the inside). You should now have a U-shaped piece.
STEP 10: Next, you will be attaching your toe kick piece (the larger of the two miscellaneous skinny pieces) face down to the bottom front of the dresser (between the two side pieces) to complete the U-shape into a square. You want the bottom face of the toe kick to be flush with the bottom of the side pieces so you can attach your legs to this flat surface.
To do this, I used the existing IKEA peg and screws but I had to create my own peg hole and screw holes in each side. Measure out where to place the screw hole and peg hole on each side of your dresser (I just used my ruler and a pencil to make marks on the side of the wood directly centered with the existing holes and then held this up to the side pieces and marked where the center of the hole should be).
Then use your drill to create the peg holes (which do not go all the way through to the outside) and the screw holes (which do go all the way through). I used a 5/16” drill bit for the peg holes and a 3/16” drill bit for the screw holes.

STEP 11: Repeat this process on the back side of the dresser as well, but using the smaller support beam piece of wood.
**NOTE: Since you are screwing right by the edge of the wood, you may have some trouble with the wood splitting. My back pieces did cause the wood to split a bit but I just patched this up with wood filler after and sanded it down before painting.
STEP 12: Turn your dresser right side up and follow the IKEA instructions for assembling the back board to the dresser and the drawer mechanisms in place.
STEP 13: Now that the frame of your dresser is complete, you can finish painting your project. Give both sides of your dresser two coats of paint along with any visible edges or any touch ups that need to be done at this point. Allow to dry.


STEP 14: Time to add your legs! Turn your dresser frame upside down and screw your furniture legs to the bottom corners of your frame. Be sure that you’re positioning the legs so that your screws do not come in contact with the screws running perpendicular to this. Because I decided to use the IKEA wood beams instead of buying my own wood base for this project, I did not have enough surface to attach all 4 screws, so I just did 3 screws per leg and it seemed to be very sturdy!

STEP 15: Put your drawers in place and then all that is left is to screw on your hardware! Since I was looking to match the look of the more expensive nightstand, I wanted to add some interest to the drawer pulls. To do this, I added a piece of wood-looking contact paper around the middle of the drawer pull. I wrapped it around the pull about two times, securing in the back (I cut each piece of contact paper to 3-1/8” x 9-3/4”). I did have some trouble with this contact paper unrolling throughout the day so I had to add some strong adhesive to the edge to keep the paper secure.
**NOTE: For safety, it is always best to attach your IKEA dressers to the wall using their included instructions!!


I’m so happy with how this nightstand turned out! And my husband is very happy to finally have some functional drawers in our room since I took over our entire dresser…hehe!
If you’ve ever hacked the IKEA RAST dresser, even with just a simple coat of paint, I would love to see how it turned out! Or share some of your favorite IKEA RAST transformations in the comments below.
Xo Rachael

