
DIY Suncatcher with Air Dry Clay
It’s no secret that I am always in the market for a fun, unique piece of home decor. And if I can make it, even better! It’s both a creative activity AND a piece of art to admire. For today’s project, I was actually inspired by a cute pair of mod drop earrings that I saw with a square cut out shape. I loved the Mid Century inspired geometric pattern and thought it would make a really fun decor piece.
And ever since making these DIY Faux Stained Glass Bookmarks, I’ve been wanting to use this glue/paint technique for another project! So this project combines the best of both worlds of crafting… painting & air dry clay. I’m new to the air dry clay world but I have been seeing so many bloggers and DIYers working with this medium lately and creating some really cool projects. So I thought I would start small with this DIY suncatcher idea. Follow along below for the steps & lemme know if you decide to try this out for yourself!
Affiliate disclosure: This post may contain affiliate links. When you buy from these links, I may earn a small commission, at no additional cost to you. As an Amazon Associate, I may earn commissions from qualifying purchases from Amazon.com. Thank you for your support!

HOW TO MAKE A DIY SUNCATCHER WITH AIR DRY CLAY
DIY Suncatcher Supplies:
Rolling pin
Sandpaper
Dremel or small drill
Clear acetate sheets (I used these that I had in my craft supplies, but you could use any clear plastic — you could cut a piece of a clear plastic take out box or any plastic packaging you have in your recycling bin)
Acrylic paint
Clear Elmer’s glue
Paint brushes
Pliers
Wire cutters
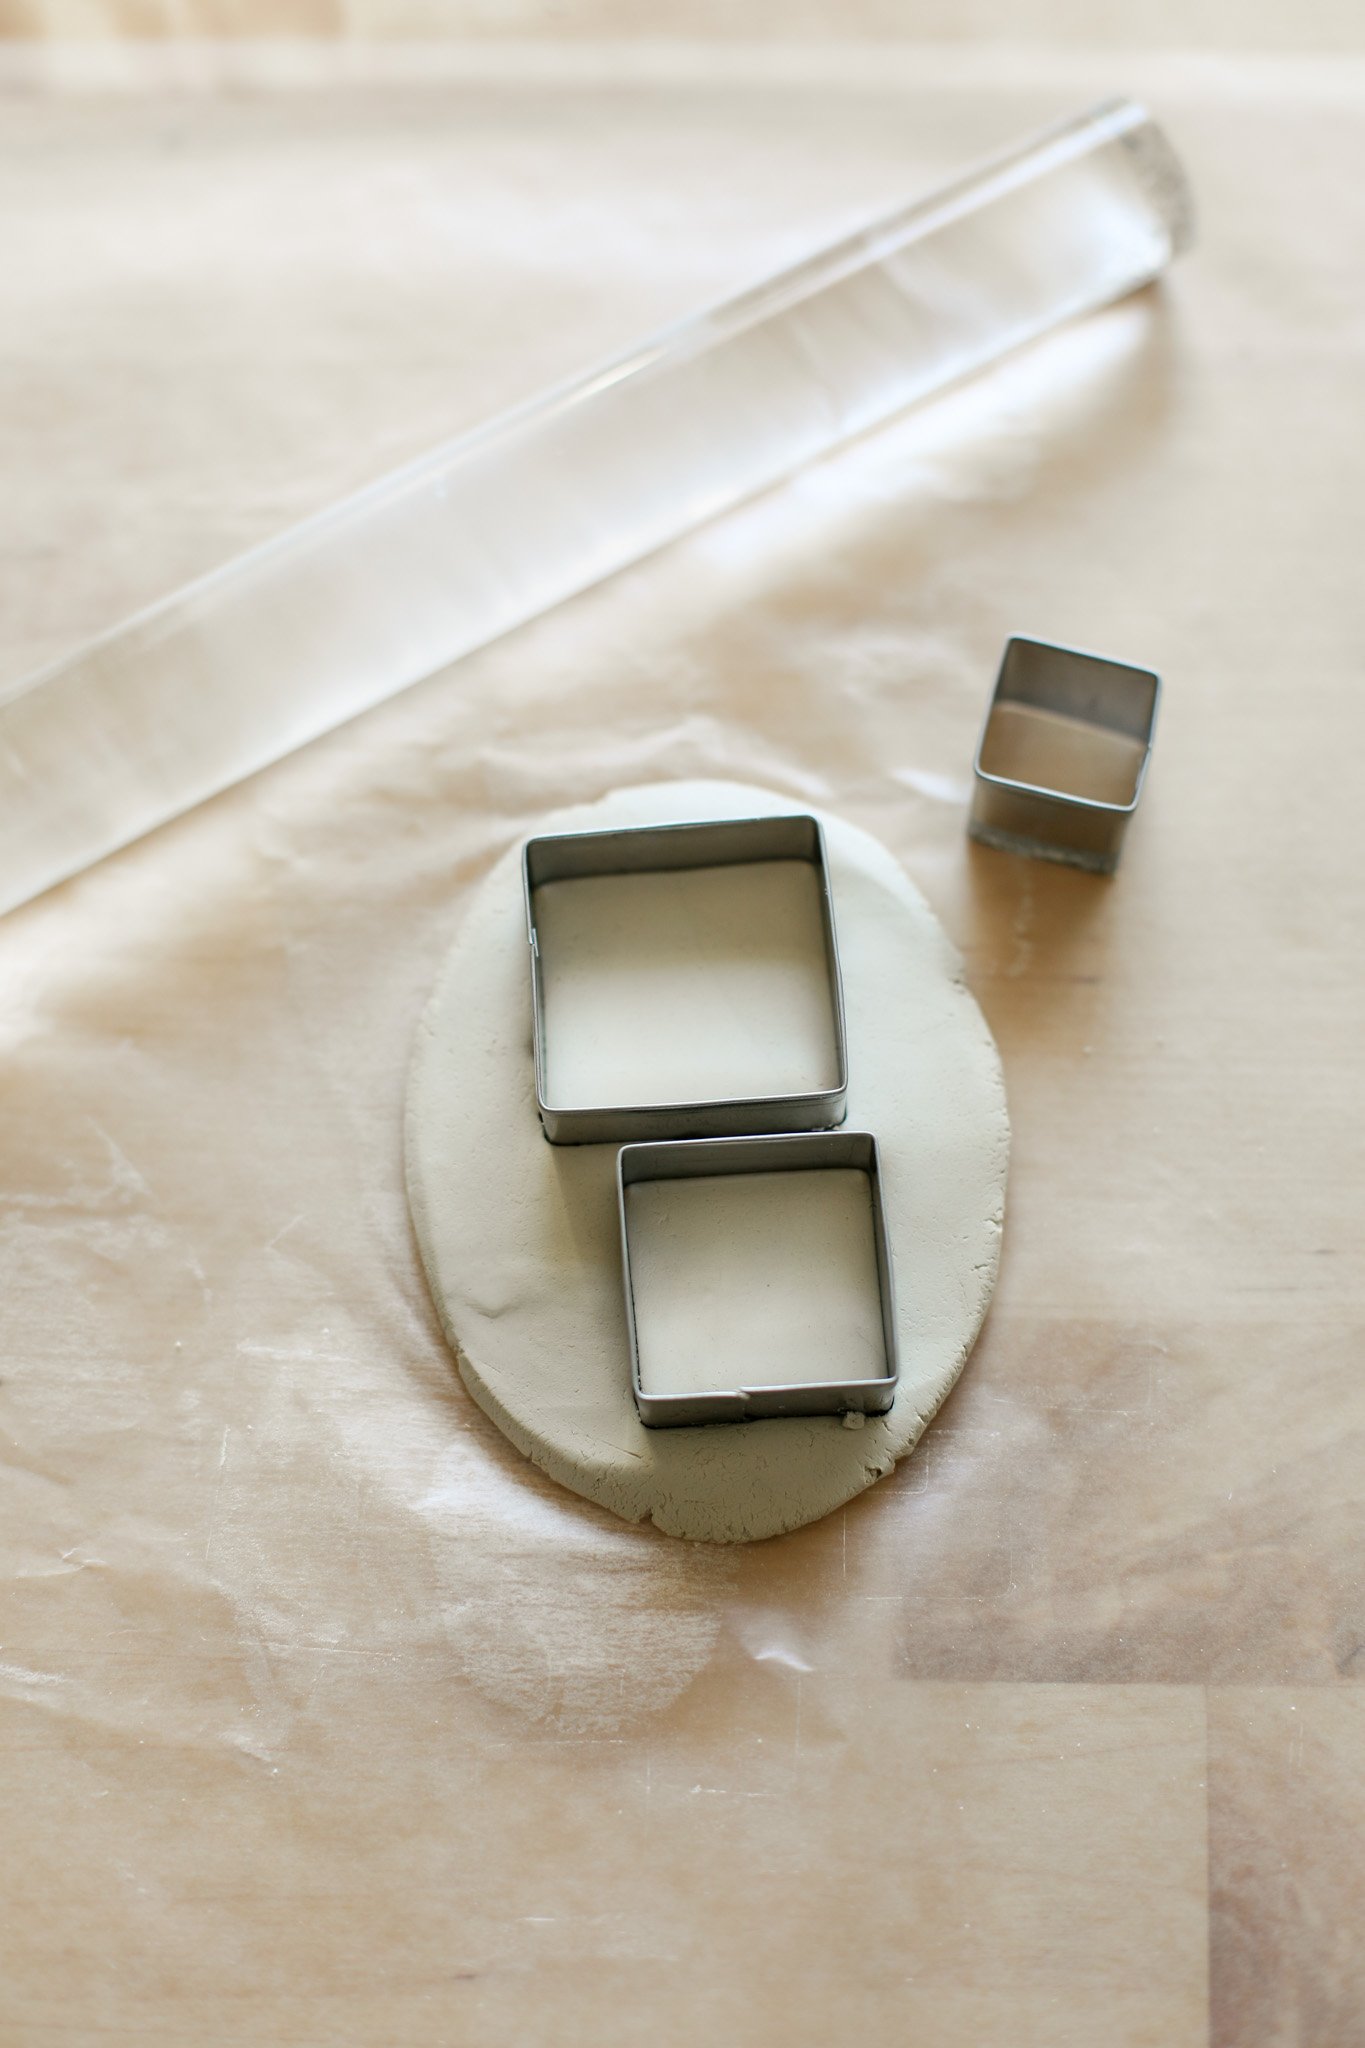

STEP 1: Begin by kneading a piece of your air dry clay with your hands until it is a softer, more pliable texture. Roll out the clay on a clean surface (I like to use wax paper for easy clean up) until you have a flat even piece that is about 3/16 inch thick.
STEP 2: Using your square mini cookie cutters, press into the clay to make a mix of both large and medium squares. Then press the small square cutter into the middle of the clay and pull out the center piece. You should be left with a mix of solid and open squares (like the image above). I ended up using 4 large, 5 medium, and 2 small solid squares for my 3 completed suncatchers, but I would recommend making a few extra of each just in case.
Dip your finger into a bowl of water and gently smooth out any rough edges and surfaces to complete your square shapes.
Allow the clay pieces to dry for about 48-72 hours.

STEP 3: Once your clay has fully dried (it should now be white in color), use a drill and a small drill bit (or I used my Dremel tool) to gently drill a small hole all the way through the clay in the middle top and bottom of each square. You want this hole to be as close to the outside edge as possible, but not too close that you risk the clay breaking.
TIP: In hindsight, I wish I would’ve planned out my designs before drilling the holes in the clay pieces. If you do this, be sure to note which clay pieces will be hanging at the end of your suncatchers and only drill one hole in the top. It’s not a big deal, but it will look more finished!


STEP 4: While your clay is drying you can start making the faux stained glass pieces. For this you are going to use clear plastic. I used a sheet of clear acetate. If you use this same product, be sure to remove the plastic protective layers from both sides of the sheet before you begin.
Mix a dollop of clear Elmer’s glue with one small drop of acrylic paint in whatever color you would like. This is going to create a more transparent paint color. Mix together with a paintbrush then paint a solid block of your glue-paint onto your plastic sheet.
STEP 5: Allow your paint to dry for a few hours. Then carefully cut out squares of your plastic that are 1”x1” in size. You will want these to be larger than the square opening in the middle of your clay squares but not bigger than the area between your two drill holes. You may need to trim the plastic as needed to fit on the backing of your squares.
STEP 6: Now it is time to seal your clay squares with mod podge. Give the front surface and all edges a coat of matte mod podge and allow to dry for a few hours. Now turn your squares over and paint a layer of mod podge on the back. Before allowing this to dry, press down your “stained glass” squares onto the backing of your clay squares to glue them down. The painted side should be face up. Paint over the colored square with a generous layer of mod podge to be sure it is secured down and sealed to the back of your clay square.
Allow the squares to fully dry before continuing.

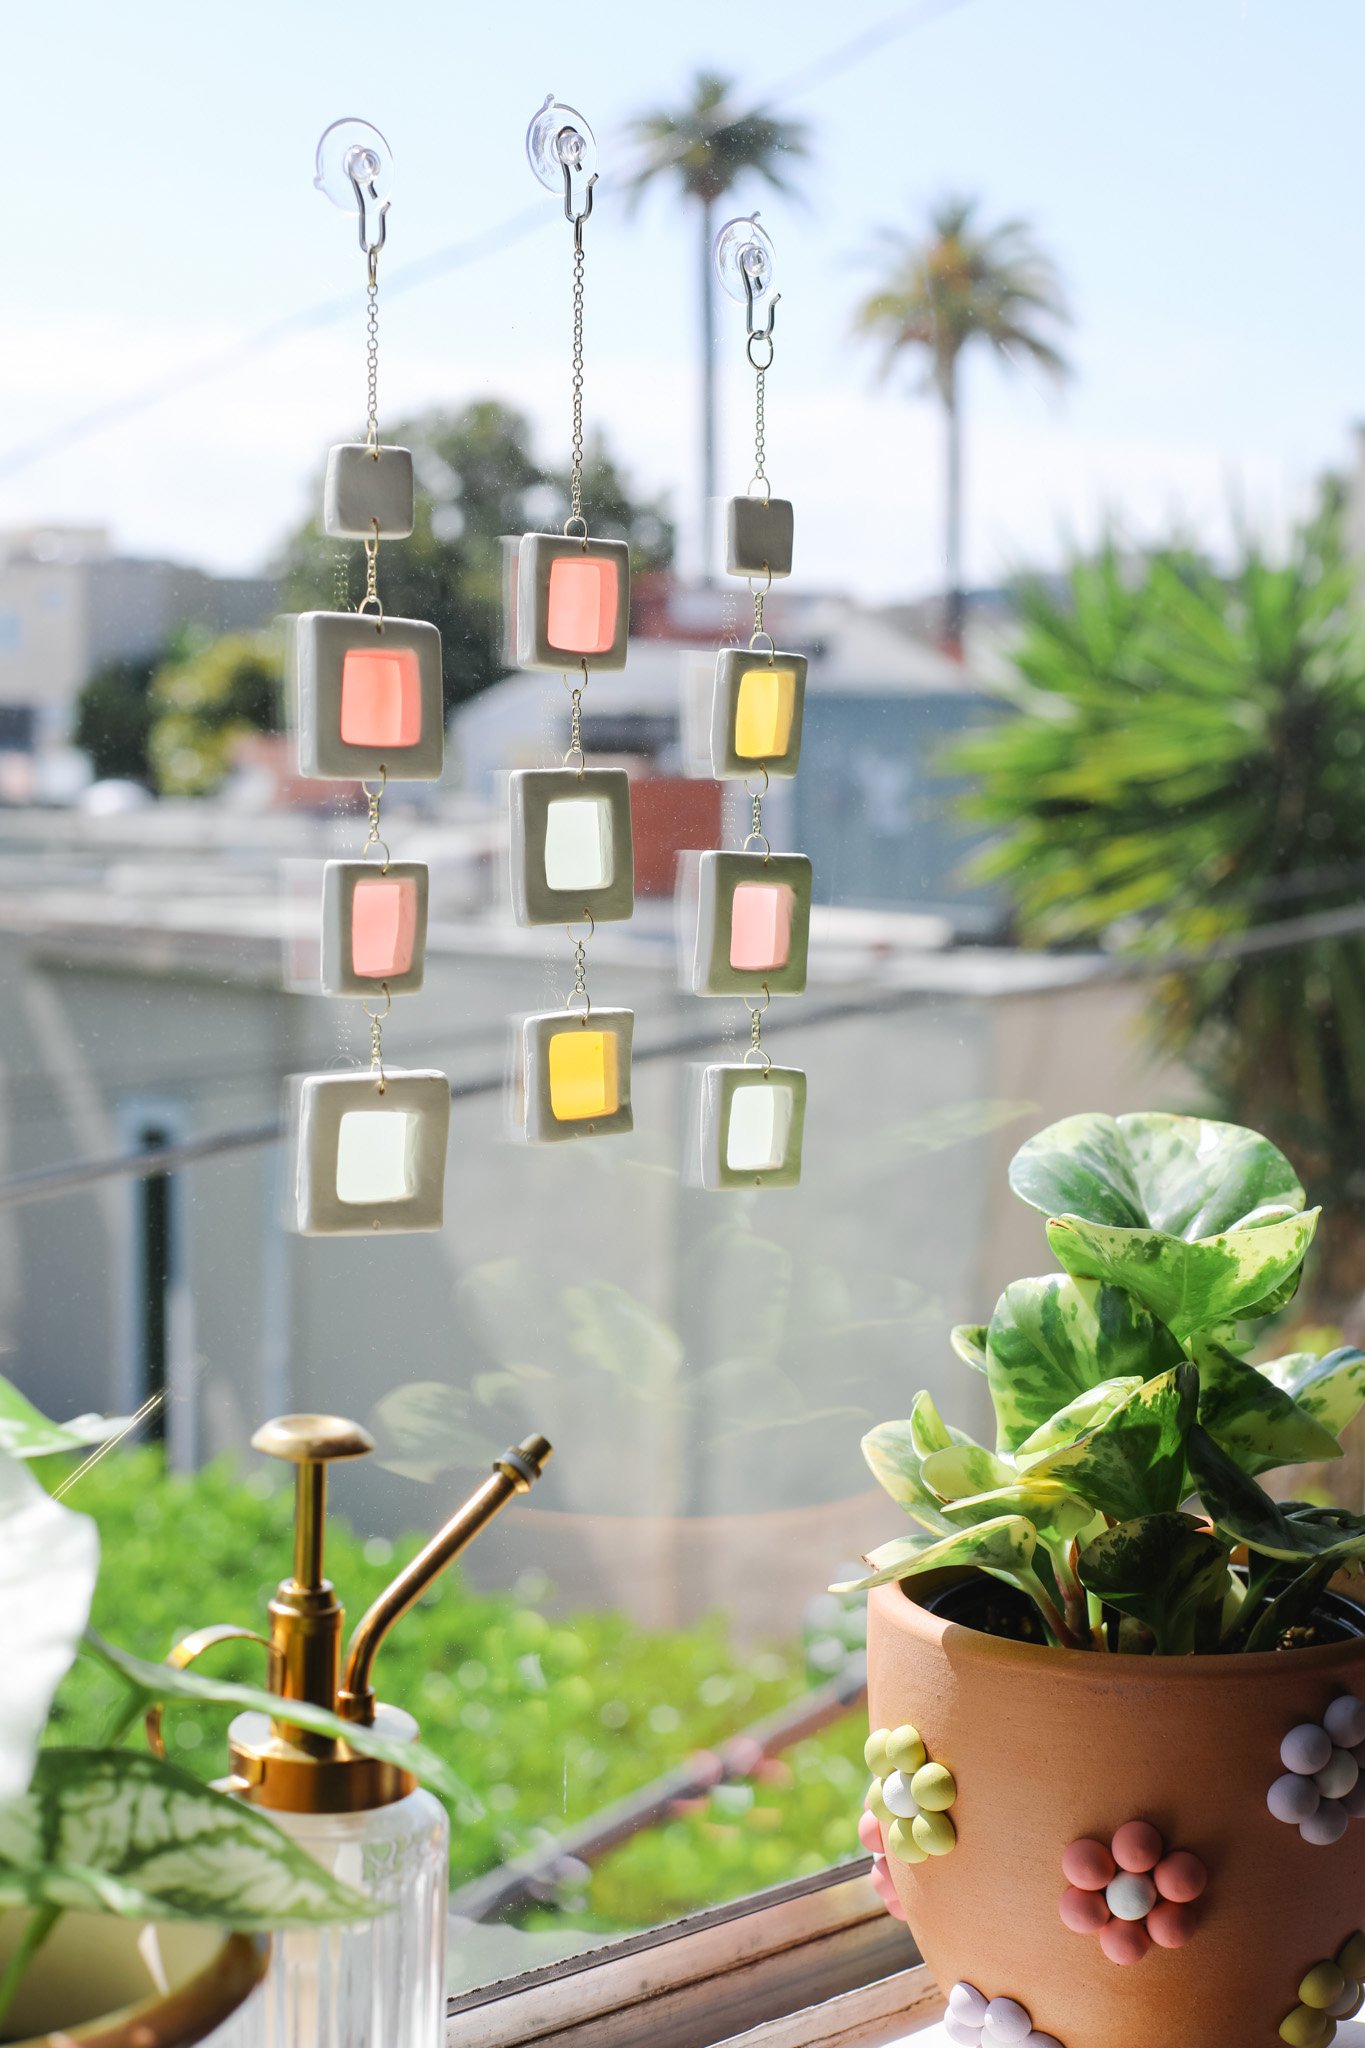
STEP 7: Now it is time to assemble! For this step you will need chain and jump rings. Open up the 8mm jump rings and carefully push them through the drill holes in your clay squares. Before closing, attach a piece of chain whatever length you would like. Then close up the jump ring with a pair of pliers so the circle is fully closed. Continue this process until your suncatcher is whatever length you would like it! I used the 10mm jump rings at the top of the chain to hang the piece.

Attach your suction cup hooks to your clean and dry window. Then hang the top loop of your suncatcher on the hook. You can hang these on their own or you can group them together. I loved how three in a row looked in my window :)

And that’s it for today’s project. Now all we need is for the dang sun to come out here in Los Angeles! I’ve recently been thinking about my summer bucket list of things I want to do this upcoming season and would love some ideas. What’s on your summer bucket list this year?
xo Rachael

