
3 DIY Projects I Made for My Apothecary Halloween Dinner Party
Every time I host a themed party I tell myself I’m not going to get in over my head. And then every time, about a week before the party, I find myself spiraling down the path of “well what if we did this, or this, or this, or this….” and this party was no different! I recently hosted a Vintage Apothecary Inspired Halloween Dinner Party to kick off the spooky season. And it turned out super cute! So today I’m sharing a few of the DIY projects that I made for the party decor.
I always feel like making your own holiday decor is so special because not only is it a fun creative project, you also end up with a super unique and personalized final product to be proud of! So if you are doing some upcoming Halloween hosting or want some inspiration for next year’s party, check out these easy DIY ideas below.

Affiliate disclosure: This post may contain affiliate links. When you buy from these links, I may earn a small commission, at no additional cost to you. As an Amazon Associate, I may earn commissions from qualifying purchases from Amazon.com. Thank you for your support!
DIY FAUX INSECT TAXIDERMY
You simply cannot have a “witchy”, “oddity”, “dark academia”, “apothecary” themed party without including some creepy insects in your decor. So I set out to make the most cutesy version of these creepy crawlies possible.
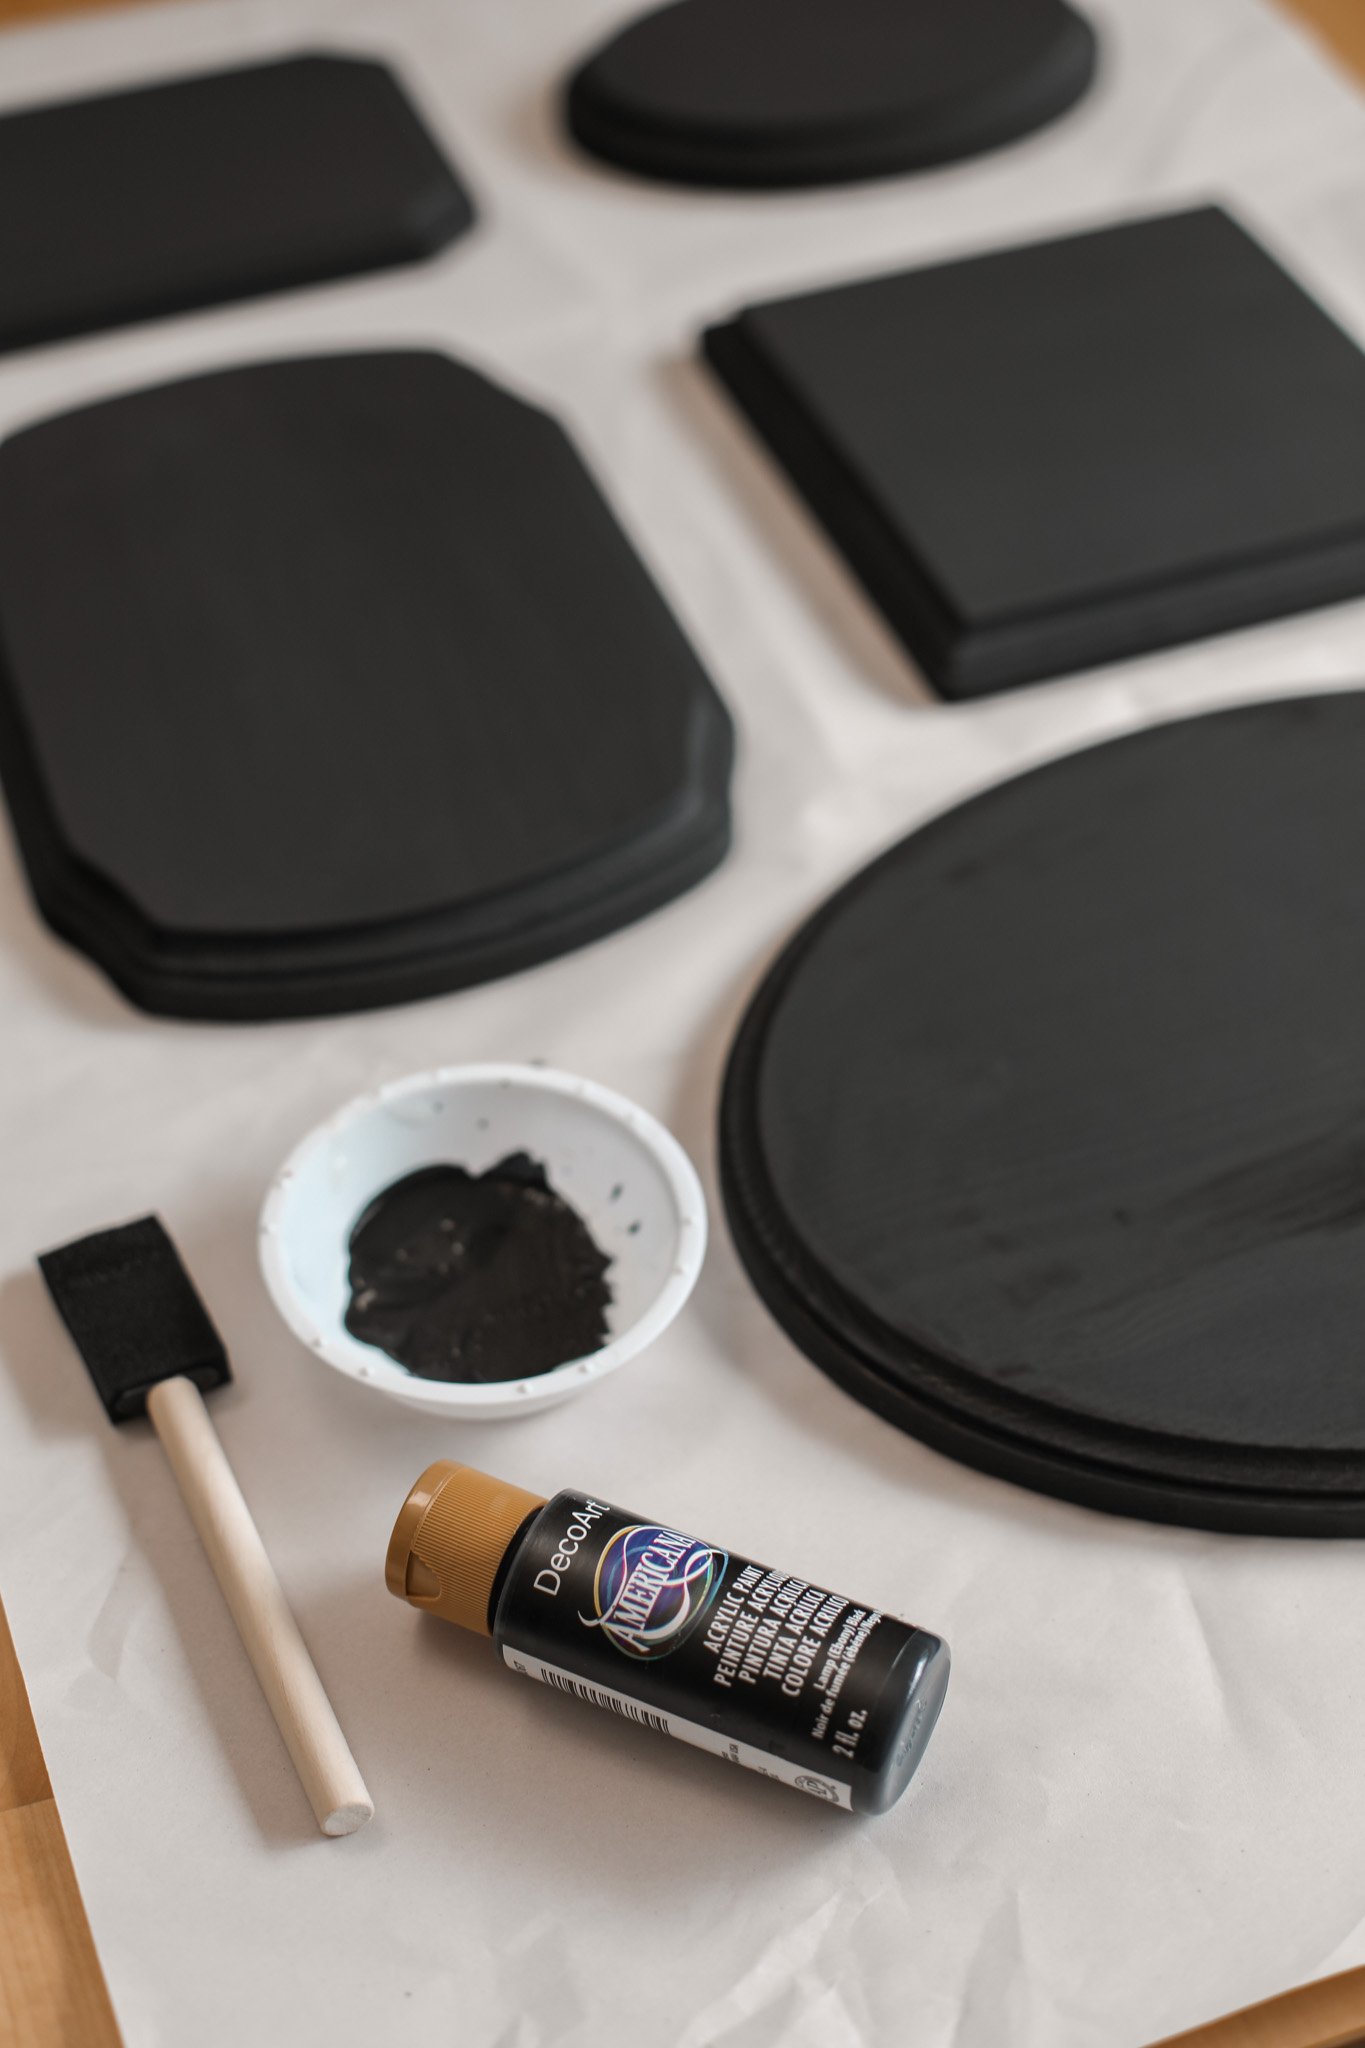
Supplies:
Butterflies (this one is similar to what I use, but you can find them in the floral supplies department of your local craft store)
Wood plaques (in assorted shapes & sizes)
Sandpaper
Black acrylic paint
Hot glue
Gold spray paint

I began by giving my wood plaques a good sanding with a piece of fine grit sand paper until the edges and surfaces were all smooth and even. Then I painted on an even coat of black acrylic paint to the entire front surface and sides of all the plaques.
While this was drying, I moved on to painting my plastic bugs. I knew I wanted the butterflies to stay their natural color, but I wanted to give the insects all a more uniform look by giving them an even coat of gold spray paint. I ended up needing to do 3-4 coats to cover all the exposed sides (I didn’t bother painting the bottom as I knew this side would be glued down to the plaque).

Next, I planned out my arrangement of which bugs would be placed on which shapes. Then I used my hot glue gun to secure the bugs in place with a generous glob of glue on whatever part of the insect would be touching the wood plaque.
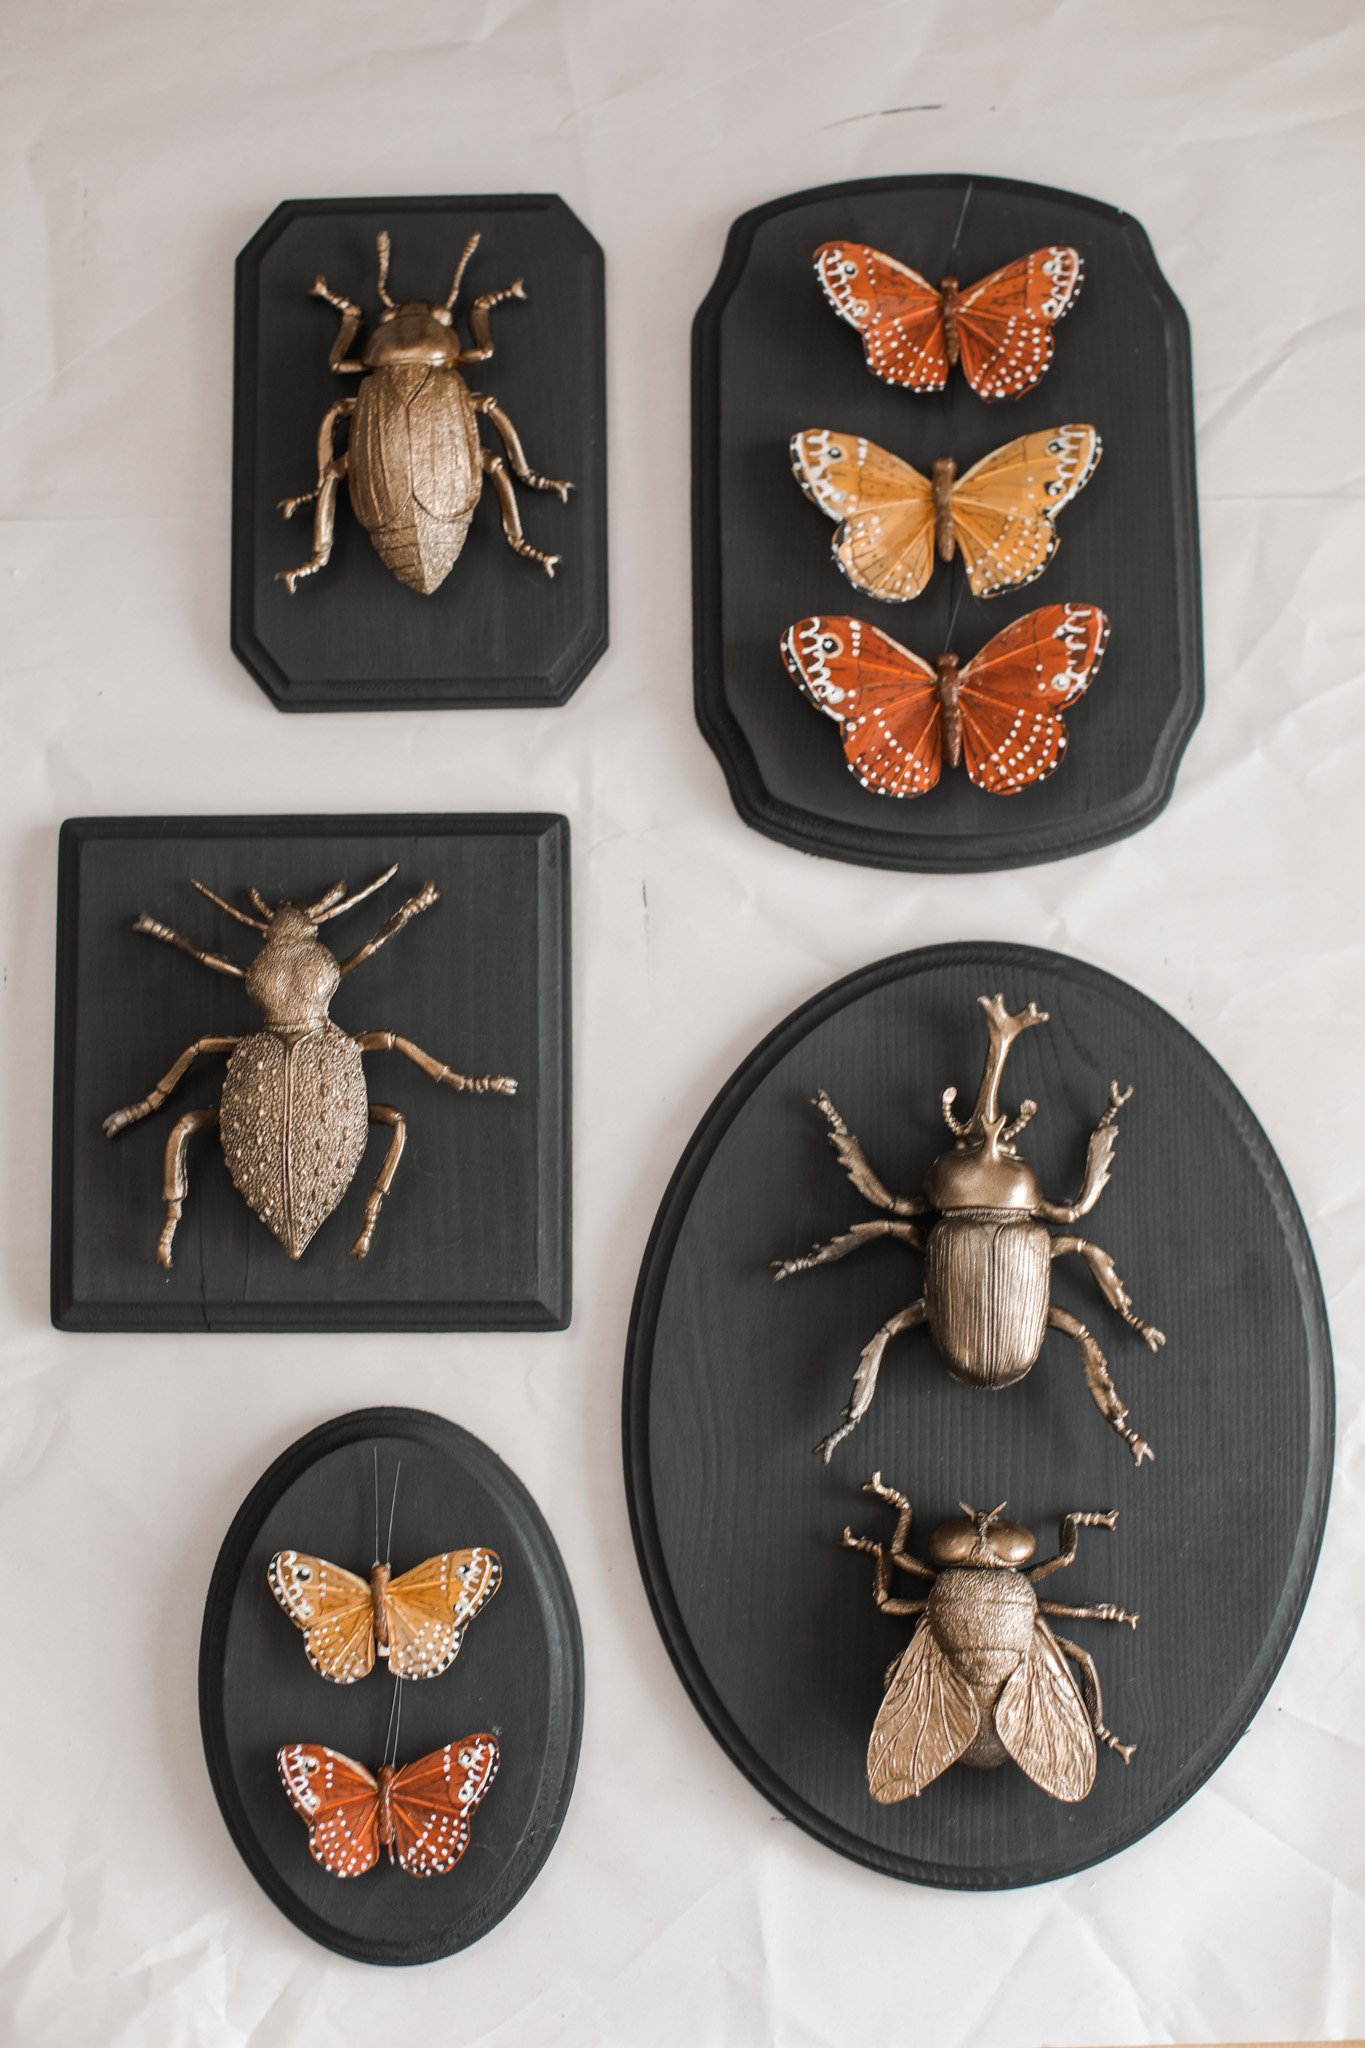
I think these ended up being a great touch and totally adding some extra DIY charm to the party theme! The butterflies are so cute too I might just have to leave those up all year.
DRIED FLORAL ARRANGEMENTS & TAPER CANDLE HOLDERS
My next project was to add a bit of whimsy to my dinner party centerpieces. Because my theme was vintage apothecary inspired, I wanted it to feel like you were inside the old workshop of a witchy herbalist or potion maker. I knew I wanted to use dried florals in autumnal tones and I ended up finding some really perfectly weird shapes and sizes that really added to the oddity feel. They looked like things that a witch maybe foraged for in the woods to brew up her latest herbal remedies and concoctions.
Supplies:
Dried florals (I found most of mine at Joanns)
Assorted glass bottles and vases
Black taper candles (I actually accidentally bought dark blue taper candles but I think it worked!)
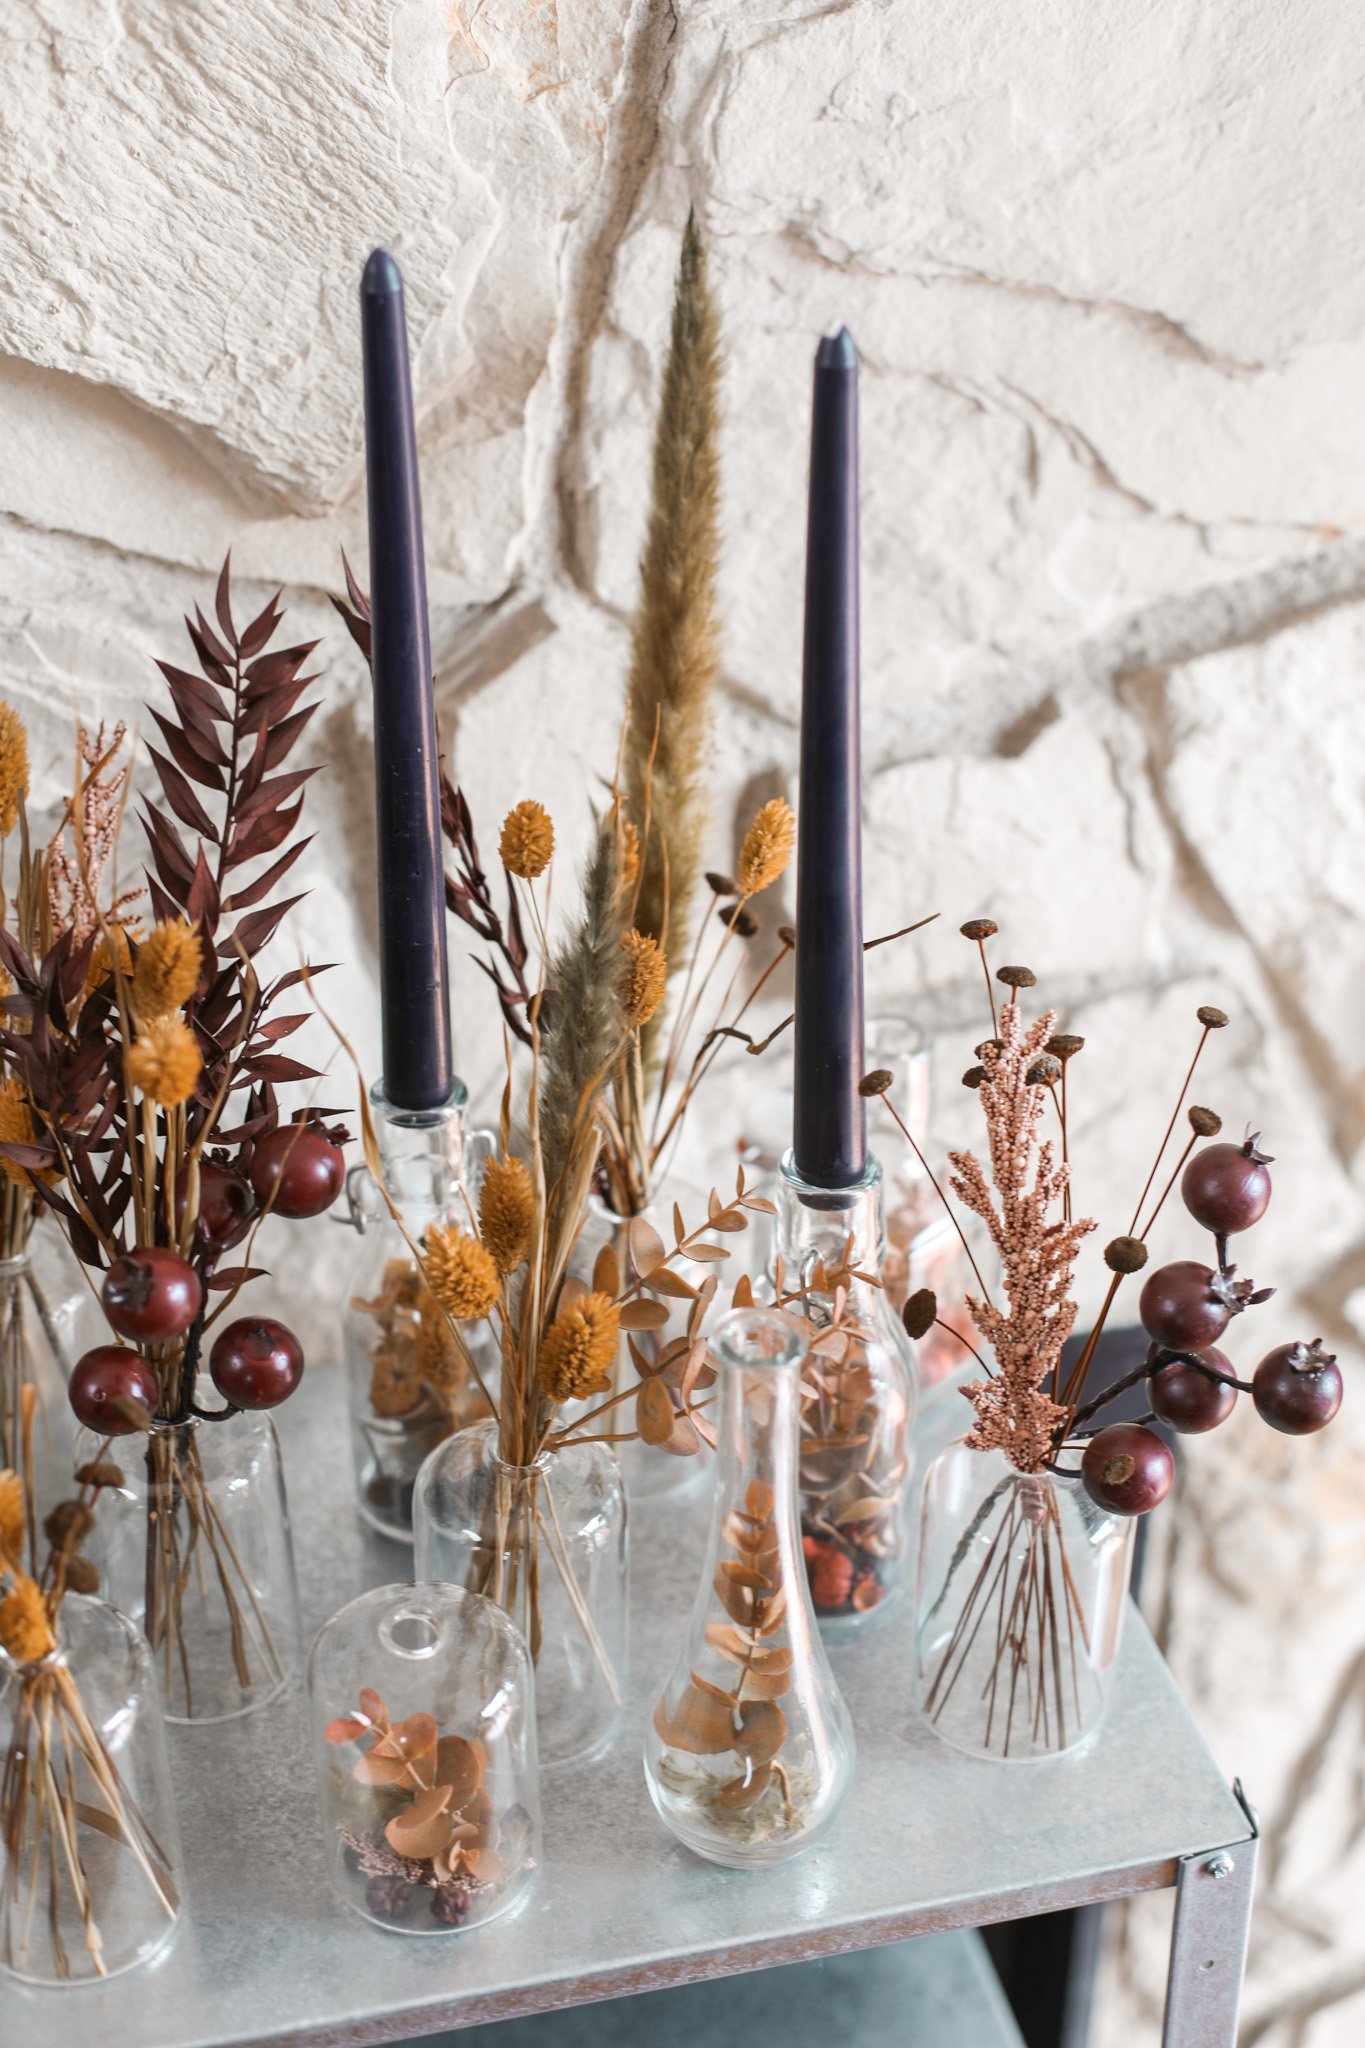
I love doing floral arranging, so this was a super fun project for me! I began by laying out all my floral supplies so that I could see what everything looked like together. Then I just began mixing and matching the dried floral pieces to fill up my glass jars and vases.

If the jar had a big enough opening to fit the taper candle on top, then I filled those glass jars with floral bits and pieces in the bottom to create my own autumnal candle holders. I just used a pair of wire cutters and scissors to cut off little pieces of leaves or stems. I also found it helpful to use a long stem (or even a wood skewer) to push the floral pieces around once they were in the bottom of the bottle until I was happy with the arrangement and placement.
Then, I gently pushed the taper candle holder into the opening of these glass jars. I found it helpful to kind of turn it as I pushed it in to secure it in place. If you need to, you can also shave off a bit of the candle wax to make the end fit into the opening.

For the vases that had too small of an opening for a candle, I simply used as a mini bud vase with a mix of these dried and artificial florals.
These candle holders and vases turned out so great! I used some in my centerpieces and others I simply placed around the room as extra decor! They can totally be left out all autumn long too so this would also be a great idea if you are doing any Thanksgiving entertaining this year, as well.

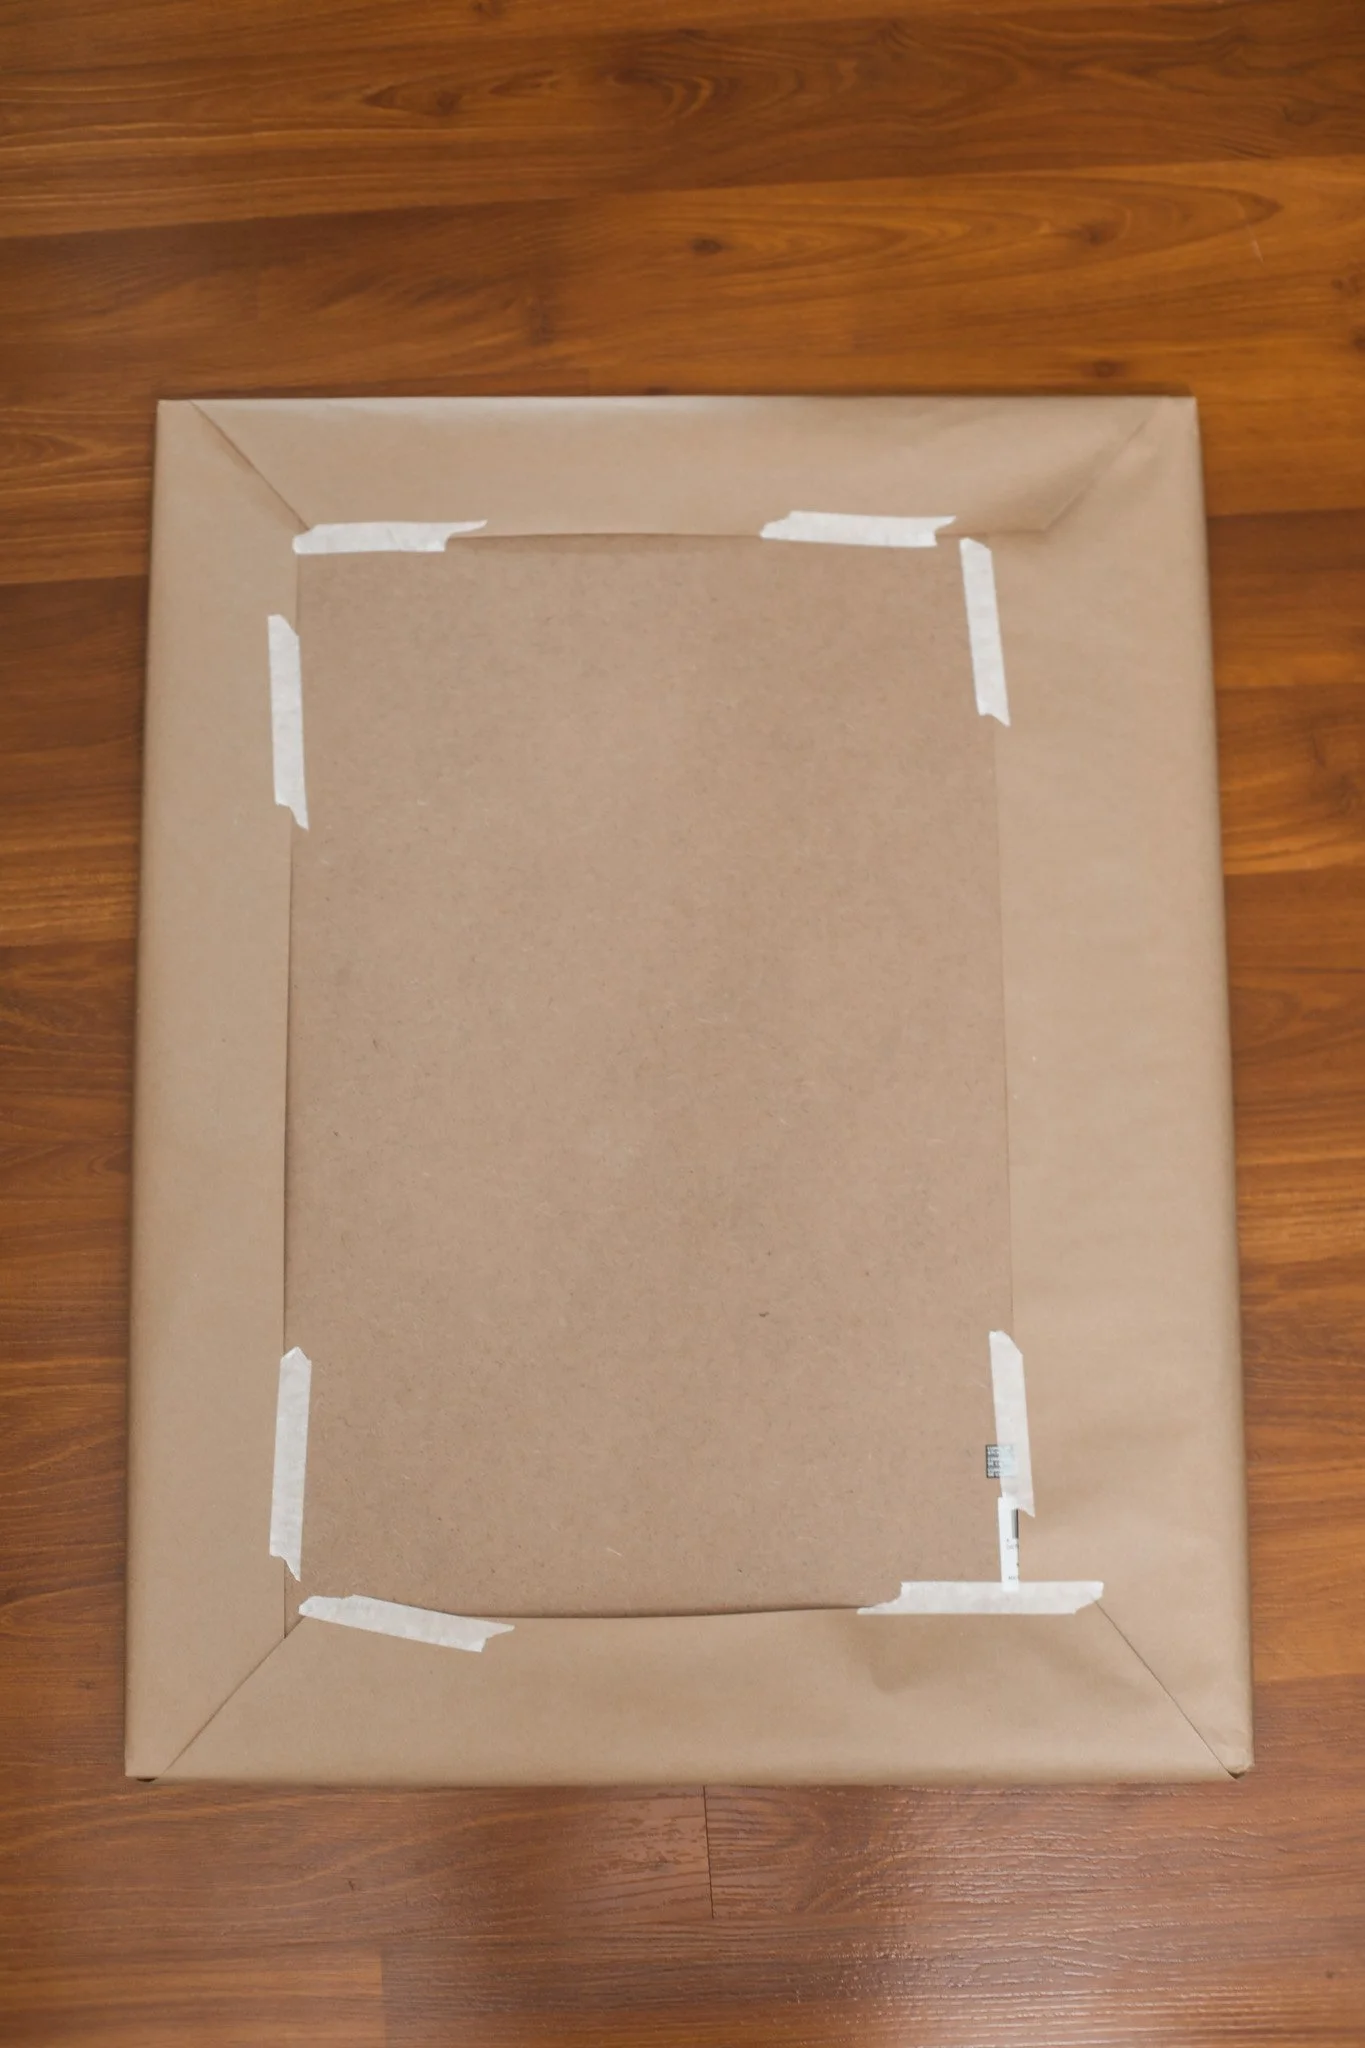
MEMO BOARDS WITH HALLOWEEN EPHEMERA
When I was planning My Updated Halloween Gallery Wall 2023 this year, I wanted a way to save a bit of money on art and to tie in the theme of the Apothecary Halloween dinner party to the design of the gallery wall. So my solution to both problems was to just cover up a few of my picture frames to create these cool “oddity” memo boards.
Supplies:
Picture frames (I used frames I already had, but you could thrift random frames or you could even just use large pieces of cardboard or foam board)
Masking tape
Scissors
Printable Halloween Ephemera (I used these Halloween Ephemera Sheets and then I mixed in some of these Vintage French Ephemera pieces to add in some other colors and shapes)
White cardstock paper
Old coffee grounds
Paint brush

So I started this project by planning out which frames I wanted to cover with the kraft paper. I wanted to make sure they were evenly mixed on the gallery wall between art prints.
I cut a piece of kraft paper just a bit larger than each frame. There was a more shiny side and a more matte side of the paper, so I positioned the paper so that the matte side was facing the floor. Then I placed my picture frame face side down on the paper. I folded the sides in the same way you would a present, and I used masking tape to tape the edges down to the back of the frame.

Next, I downloaded these Halloween Ephemera Sheets from Etsy, printed them out on white cardstock paper, and cut out each individual image. These images were the perfect fit for the apothecary theme. They have a lot of images and diagrams that you would imagine in a creepy lab or oddity shop. Then it was time to work on aging the ephemera pieces.
To give these pieces a vintage look, like they have been posted up on the memo boards over the centuries, we painted the paper pieces with old coffee grounds in water, making sure to even get a bit of coffee grounds on the paper for a dirty and dusty look.

As the pages were drying, we crumbled them up with our hands a bit and then let them fully dry overnight.
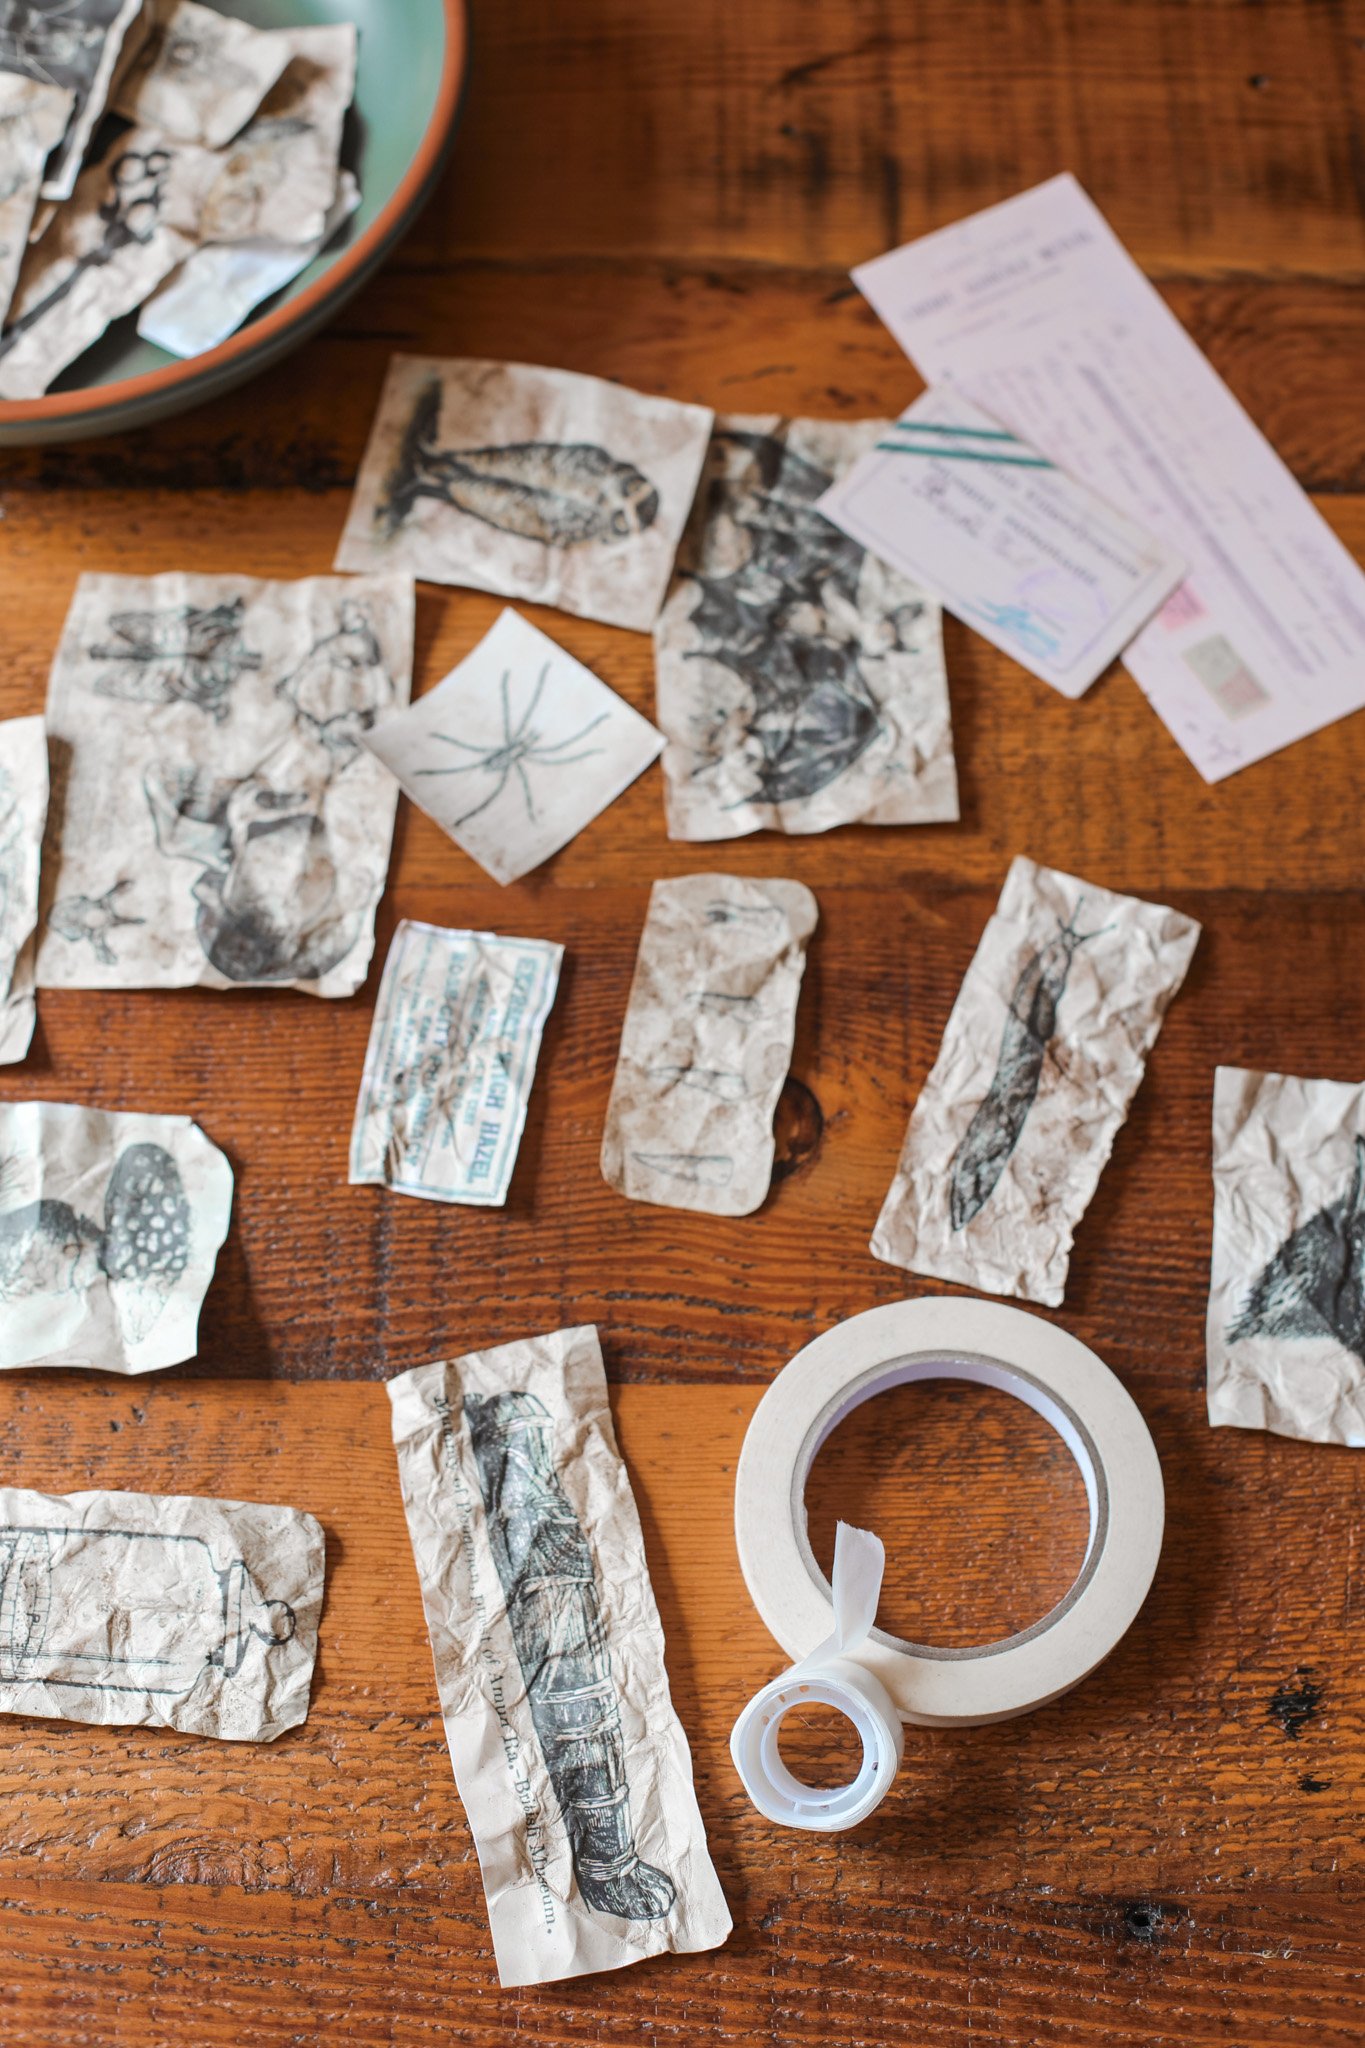
The next day, I used some adhesive glue dots on the back of each piece to secure them in place on the kraft paper memo boards. I tried to do a mix of sizes and types of ephemera. I also mixed in some of these Vintage French Ephemera pieces (that I downloaded and printed on cardstock) just to get some more variation in colors and types of memos/paperwork.
I added a small piece of masking tape on the top or corners of each document to look like it was haphazardly taped up onto the board over the years. I love how these turned out and I think it was a great, inexpensive solution for extra wall art/decor for the party.

I had so much fun putting together all these DIY projects for my dinner party. And a special shout out to my friend Cindy for all her help with these craft projects! Let me know which was your favorite or which one you are going to try out for your next Halloween festivities!
xo Rachael

