
Make Your Own Checkers Beach Towel
We love a DIY project around here that is both useful and fun. We also equally love a DIY project that does NOT involve a sewing machine or sewing of any kind! :P
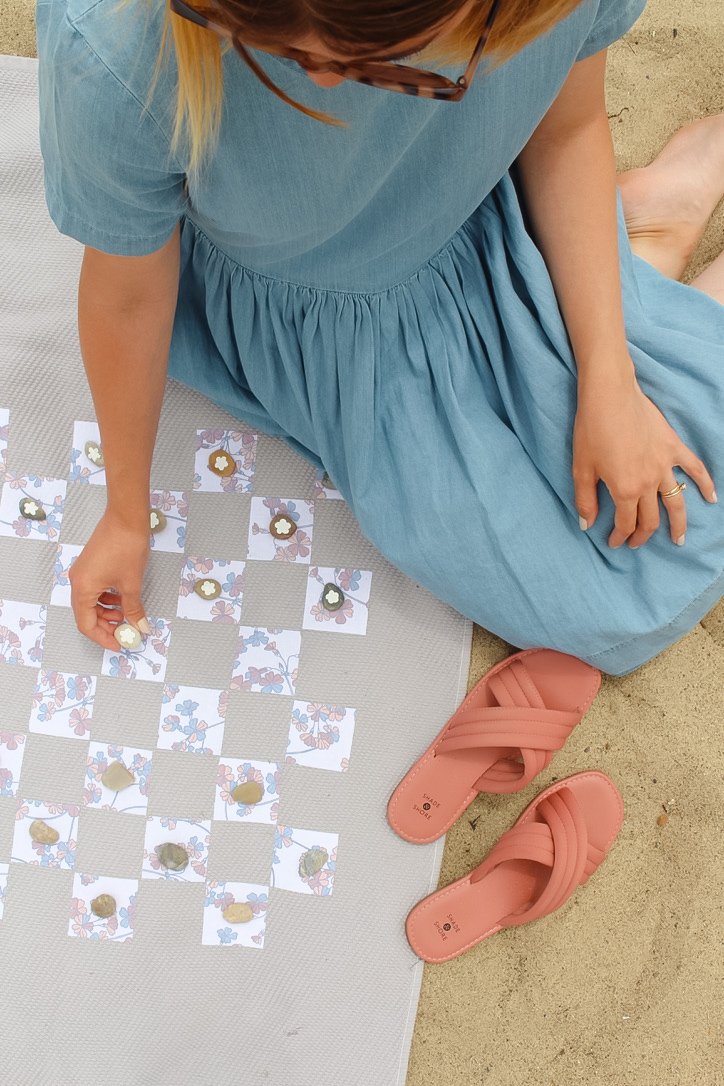
So today I bring you… a no-sew DIY checkers beach towel!

You are going to need a beach towel for your next trip to the pool, park, or beach this summer, so you might as well add a bit of pizzazz! This beach towel project involves using Heat-n-Bond to attach fabric squares to a beach towel to create a checkerboard pattern that you can use to play a game of checkers or chess.


HOW TO MAKE A DIY CHECKERS GAME BEACH TOWEL
You will need:
Beach towel or bathing towel (I got mine for about $8 at Home Goods but you could use something you have or find something cheap!) — (*I would recommend picking a fabric with a low pile texture so it is easier to bond the surface with your fabric squares)
Cotton fabric in a color/pattern of your choice — I would buy about 1 yard to be safe
Fabric scissors (*use these when cutting fabric ONLY — once the Heat n Bond is attached to the fabric, be sure to use regular craft scissors to avoid damaging your fabric scissors)
Craft scissors
Cutting mat
Rotary cutter
Iron & ironing board
Metal ruler
Tape measure
Masking tape
Heat n Bond Ultrahold Adhesive Sheet (1 yard package)
STEP 1: Wash & dry your fabric and towel before you begin this DIY. This will ensure any shrinkage will happen prior to adding your fabric appliqués.
STEP 2: Iron your fabric & towel so they are both free of wrinkles.

STEP 3: Now use your fabric scissors to cut a piece of fabric that is about the size of your cutting mat (so that it is easier to work with) — I cut mine down to about 12” x 17”.

STEP 4: Using regular craft scissors, cut a piece of your Heat n Bond sheet just a bit smaller than your piece of fabric.

STEP 5: Set the fabric pattern side down on your ironing board, then place your sheet of Heat n Bond in the center of your fabric with the rough side down (the smooth paper side should be facing up).
On medium heat (with no steam), gently move your iron over the Heat n Bond paper evenly until the Heat n Bond paper is adhered to your fabric. It should only take a few passes.

STEP 6: Allow the fabric to cool for a few minutes, then place it fabric side down on your cutting mat. You are now going to draw your square shapes on the back of the Heat n Bond paper to give you a guide for cutting out your fabric square shapes.
Use the lines on the cutting board as a guide to draw out a rectangle that is about 10” x 15”. Now use your ruler to mark every 2.5” across the top, bottom, and down the sides. Draw lines from one point directly across to the other. You are creating 24 boxes that should each be 2.5” x 2.5” in size.
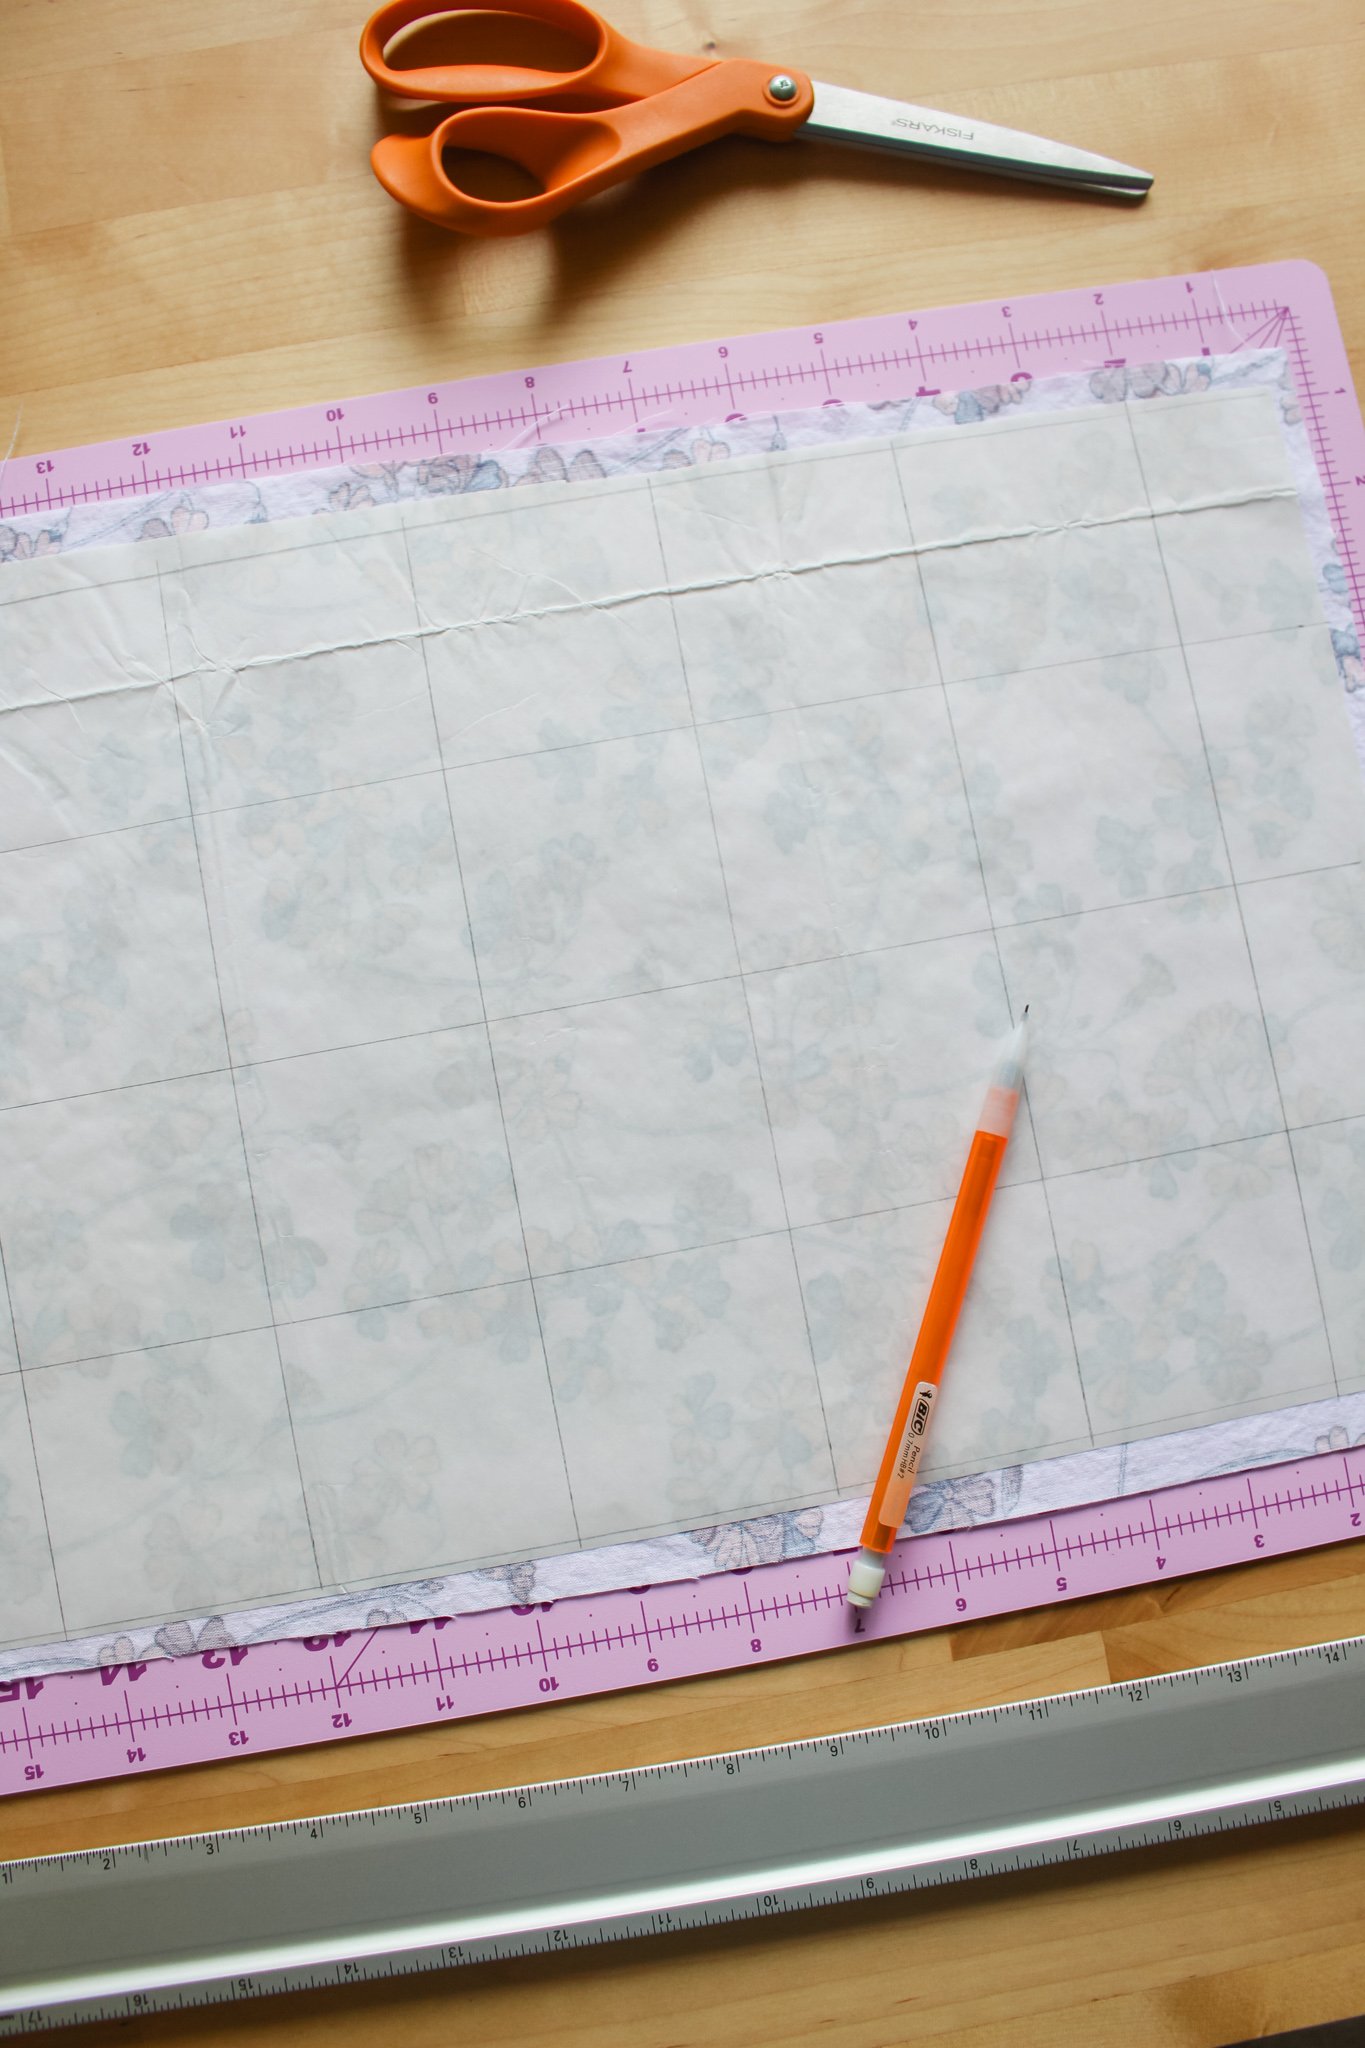
STEP 7: I found it easiest to use a rotary cutter and a metal ruler as a guide to cut down the long lines. Then you can go in with your craft scissors to individually cut out each square. You will end up with 24 squares of fabric.

STEP 8: Repeat steps 3-7 to create another set of 24 squares. You will now have 48 squares total — You will only need 32 total for this project, but it is good to have some extra in case your cutting ends up not being straight on some or in case you like the pattern better on certain pieces.
STEP 9: Now it is time to setup a guide for your checkerboard surface on your beach towel. Lay out the towel on a flat surface and find the center of both long sides. I found it helpful to place a piece of masking tape at the center on each side.
Measure the total width of your towel. Your checkerboard will take up exactly a 20” x 20” square. My towel was 29” in width, so I subtracted 20 from 29 for a total of 9” extra, that is a 4.5” margin needed on each side of the towel. Use a ruler to come in 4.5” from each side in multiple places. Use a piece of masking tape to create a straight line down each side.

Now starting from the center point on the left side of the towel, measure up 10” and make a mark on your masking tape. Then measure down 10” from the center and make another mark. Repeat this on the right side as well. Then add two pieces of tape at the 10” mark on the top and bottom to complete your perfect 20” x 20” square.
STEP 10: Now that you have the confines of your checkerboard, you can begin laying out your fabric squares. Start in one corner and lay out a full column of 8 squares, then remove every other one to give you your first checkerboard column. Start the next column by placing a fabric square in between each square from the column before. And so on!

You are creating a checkerboard pattern using your patterned fabric squares as one color and the blank spaces as the other. So in total you should be placing 32 fabric squares. A checkerboard is 8x8 squares for a total of 64 but half of these are the spaces that you are leaving blank.
STEP 11: Once your fabric pieces are in place and it looks like everything is going to lay out correctly to fill your masking tape square, transfer your towel to your ironing board. **TIP: I used a small apartment size ironing board so I found it easier to just do a few rows at a time.
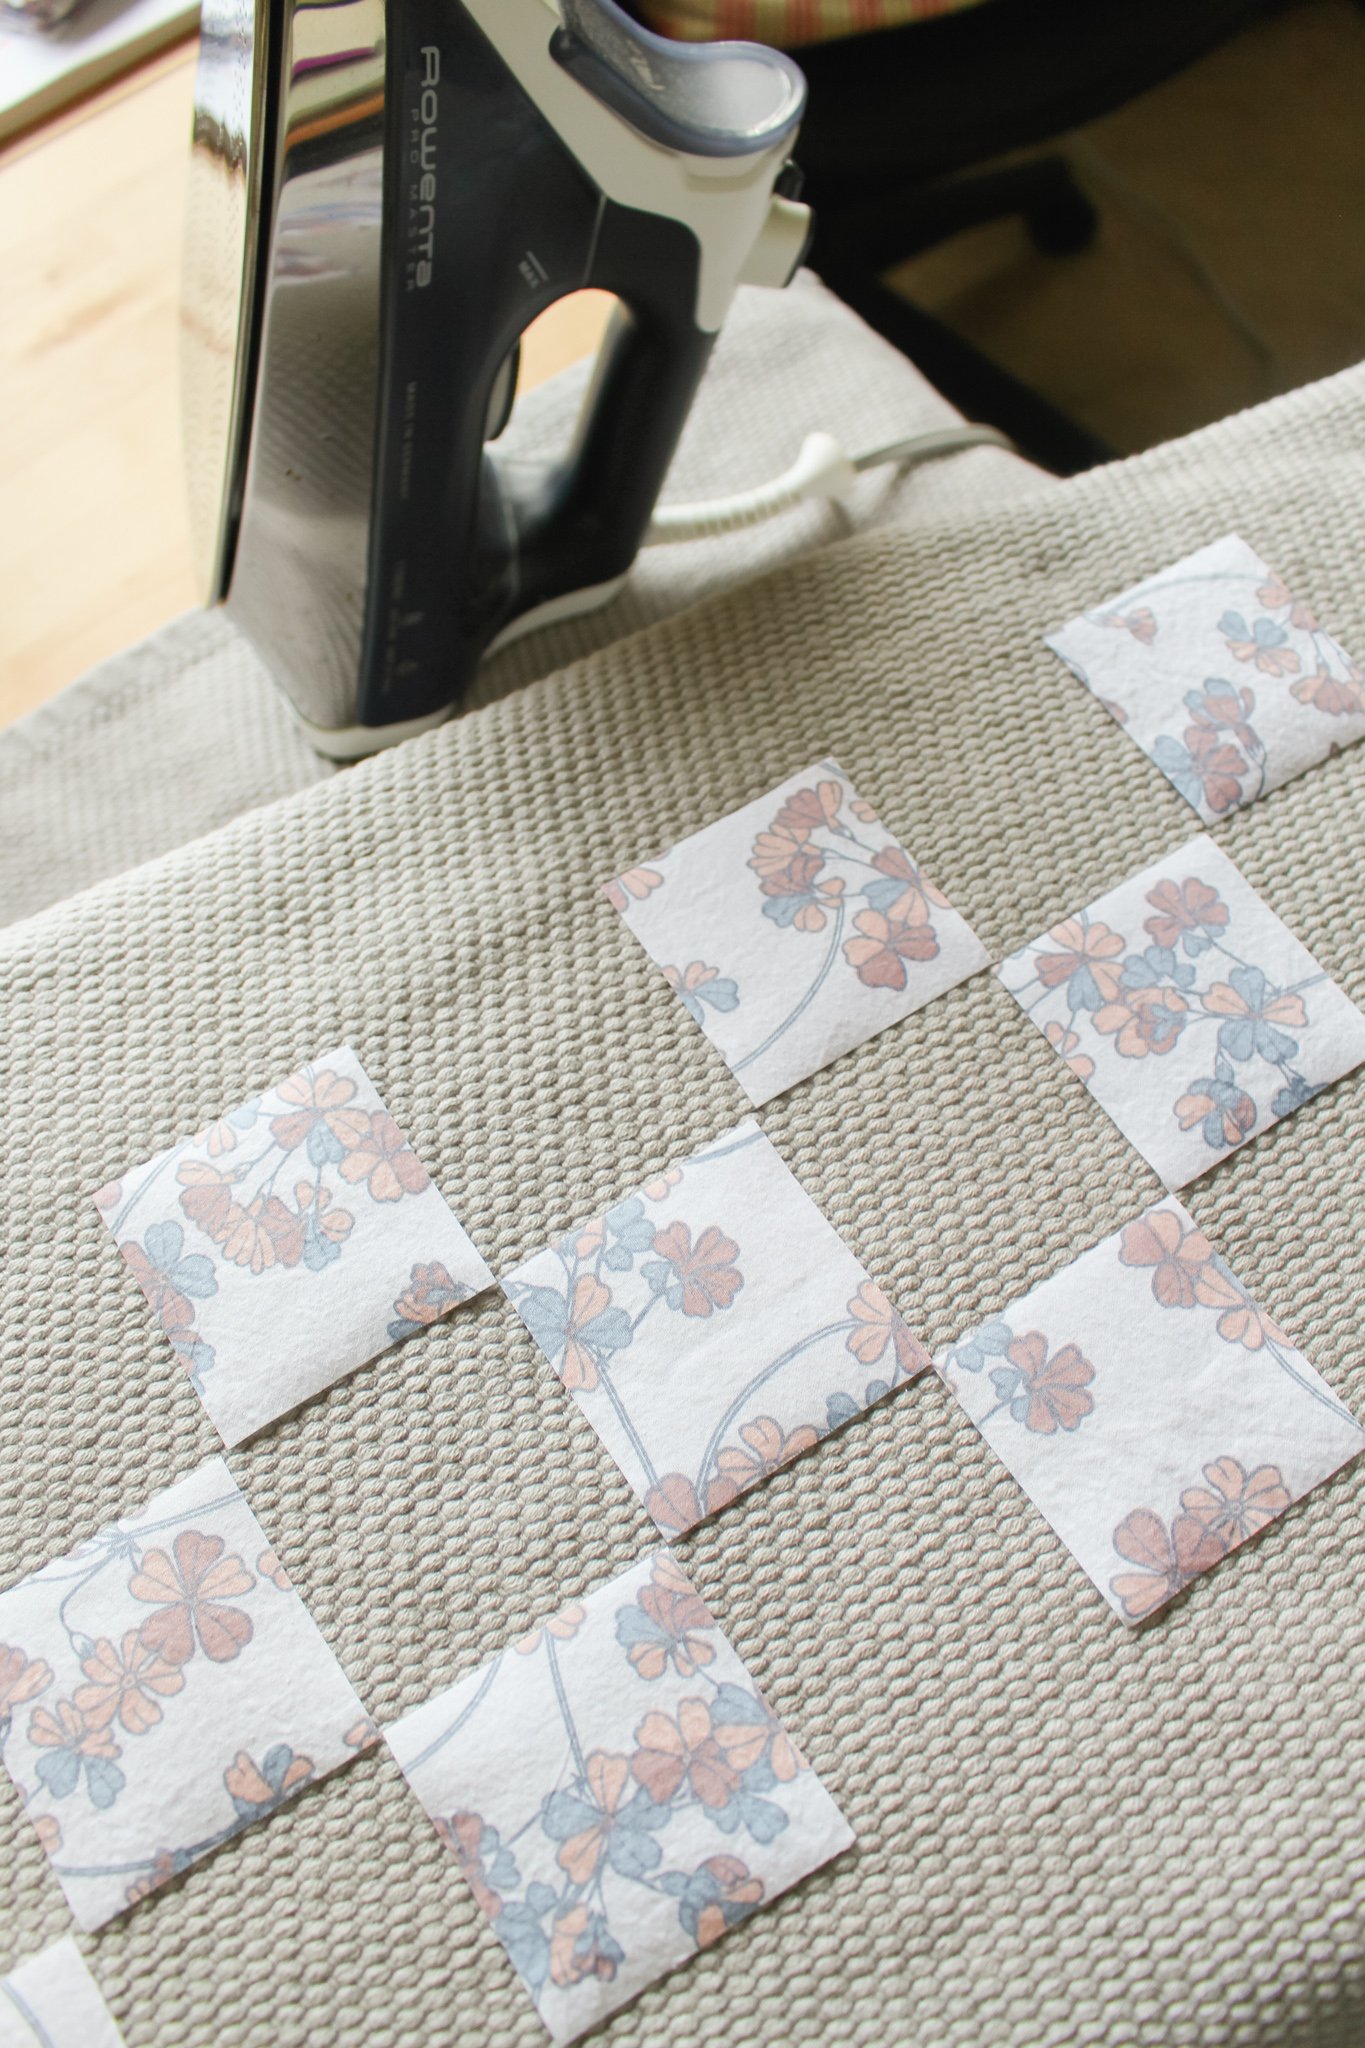
You will now begin pulling off the paper backing on each of your fabric squares. Gently use your finger nail to separate the paper from the adhesive in one corner. Pull off the paper to reveal your fabric now has a shiny adhesive backing. Put the fabric squares back into place for your checkerboard pattern with the shiny side down and the patterned fabric side up.

STEP 12: Using your iron on medium heat again, gently set the iron on top of the fabric pieces. Hold the iron on top of each piece for about 10 seconds and then lift up the iron and set it on the next piece. Continue this step until all the pieces are securely in place. It is important that you just set the iron on the pieces first so that they do not move around. Once everything is in place you can go back with the iron and move it around to make sure all the edges are nicely adhered.

Give the checkerboard a few passes with the iron to make sure everything is attached and in place and your towel is all set!
STEP 13: If you have an extra set of checkers laying around, feel free to use those (I found these on amazon if you want to purchase your own) — otherwise, I collected a total of 24 similarly sized rocks and I painted half with a white paint pen to differentiate the two teams. This is an easy & free option for an impromptu game at the beach! (You could also use bottle caps, buttons, snack foods, whatever you have).
And you are ready to play!


You can totally customize this project in so many ways — choose your favorite fabric pattern, create a backgammon or tic-tac-toe pattern, etc.
Hope this DIY makes your next day the beach a bit more fun! Tag us if you try out this project yourself #entertaintheidea!
xo Rachael

