
Make an Embroidered Felt Kindle Sleeve
Happy New Year!! I hope your New Year is off to a positive and refreshing start! I love the feeling of a clean slate at the start of the year and I’ve always been a big fan of setting resolutions or goals, just because I think it’s fun to look back and see what all you have accomplished! And this year I’m very into the trend of the IN/OUT lists that I’m seeing everywhere online.

One thing that is consistently on my resolution list is my yearly reading goal. I’m a big fan of my Kindle Paperwhite and always like having a book on hand to read when I’m out and about. And while I do have a standard cover for my kindle, I don’t like the idea of it just rolling around in my bag. So I’m starting off this January with my first DIY project of the year — an embroidered felt kindle sleeve!
Another goal of mine for the year is to use as many of the craft supplies I currently have before buying more. So I’m excited to say that I made this project completely with extra supplies I had on hand! If you are new to sewing or embroidering, this is a very simple project perfect for a beginner. So follow along below to make your own simple Kindle sleeve.

Affiliate disclosure: This post may contain affiliate links. When you buy from these links, I may earn a small commission, at no additional cost to you. As an Amazon Associate, I may earn commissions from qualifying purchases from Amazon.com. Thank you for your support!
HOW TO MAKE A FELT KINDLE SLEEVE

Supplies:
Felt sheets - you will need to cut two pieces that are 6” x 8” in size
Ruler
Scissors
Pen or marker (I used a white gel pen for writing on dark colored felt)
Binder clips (optional but helpful!)
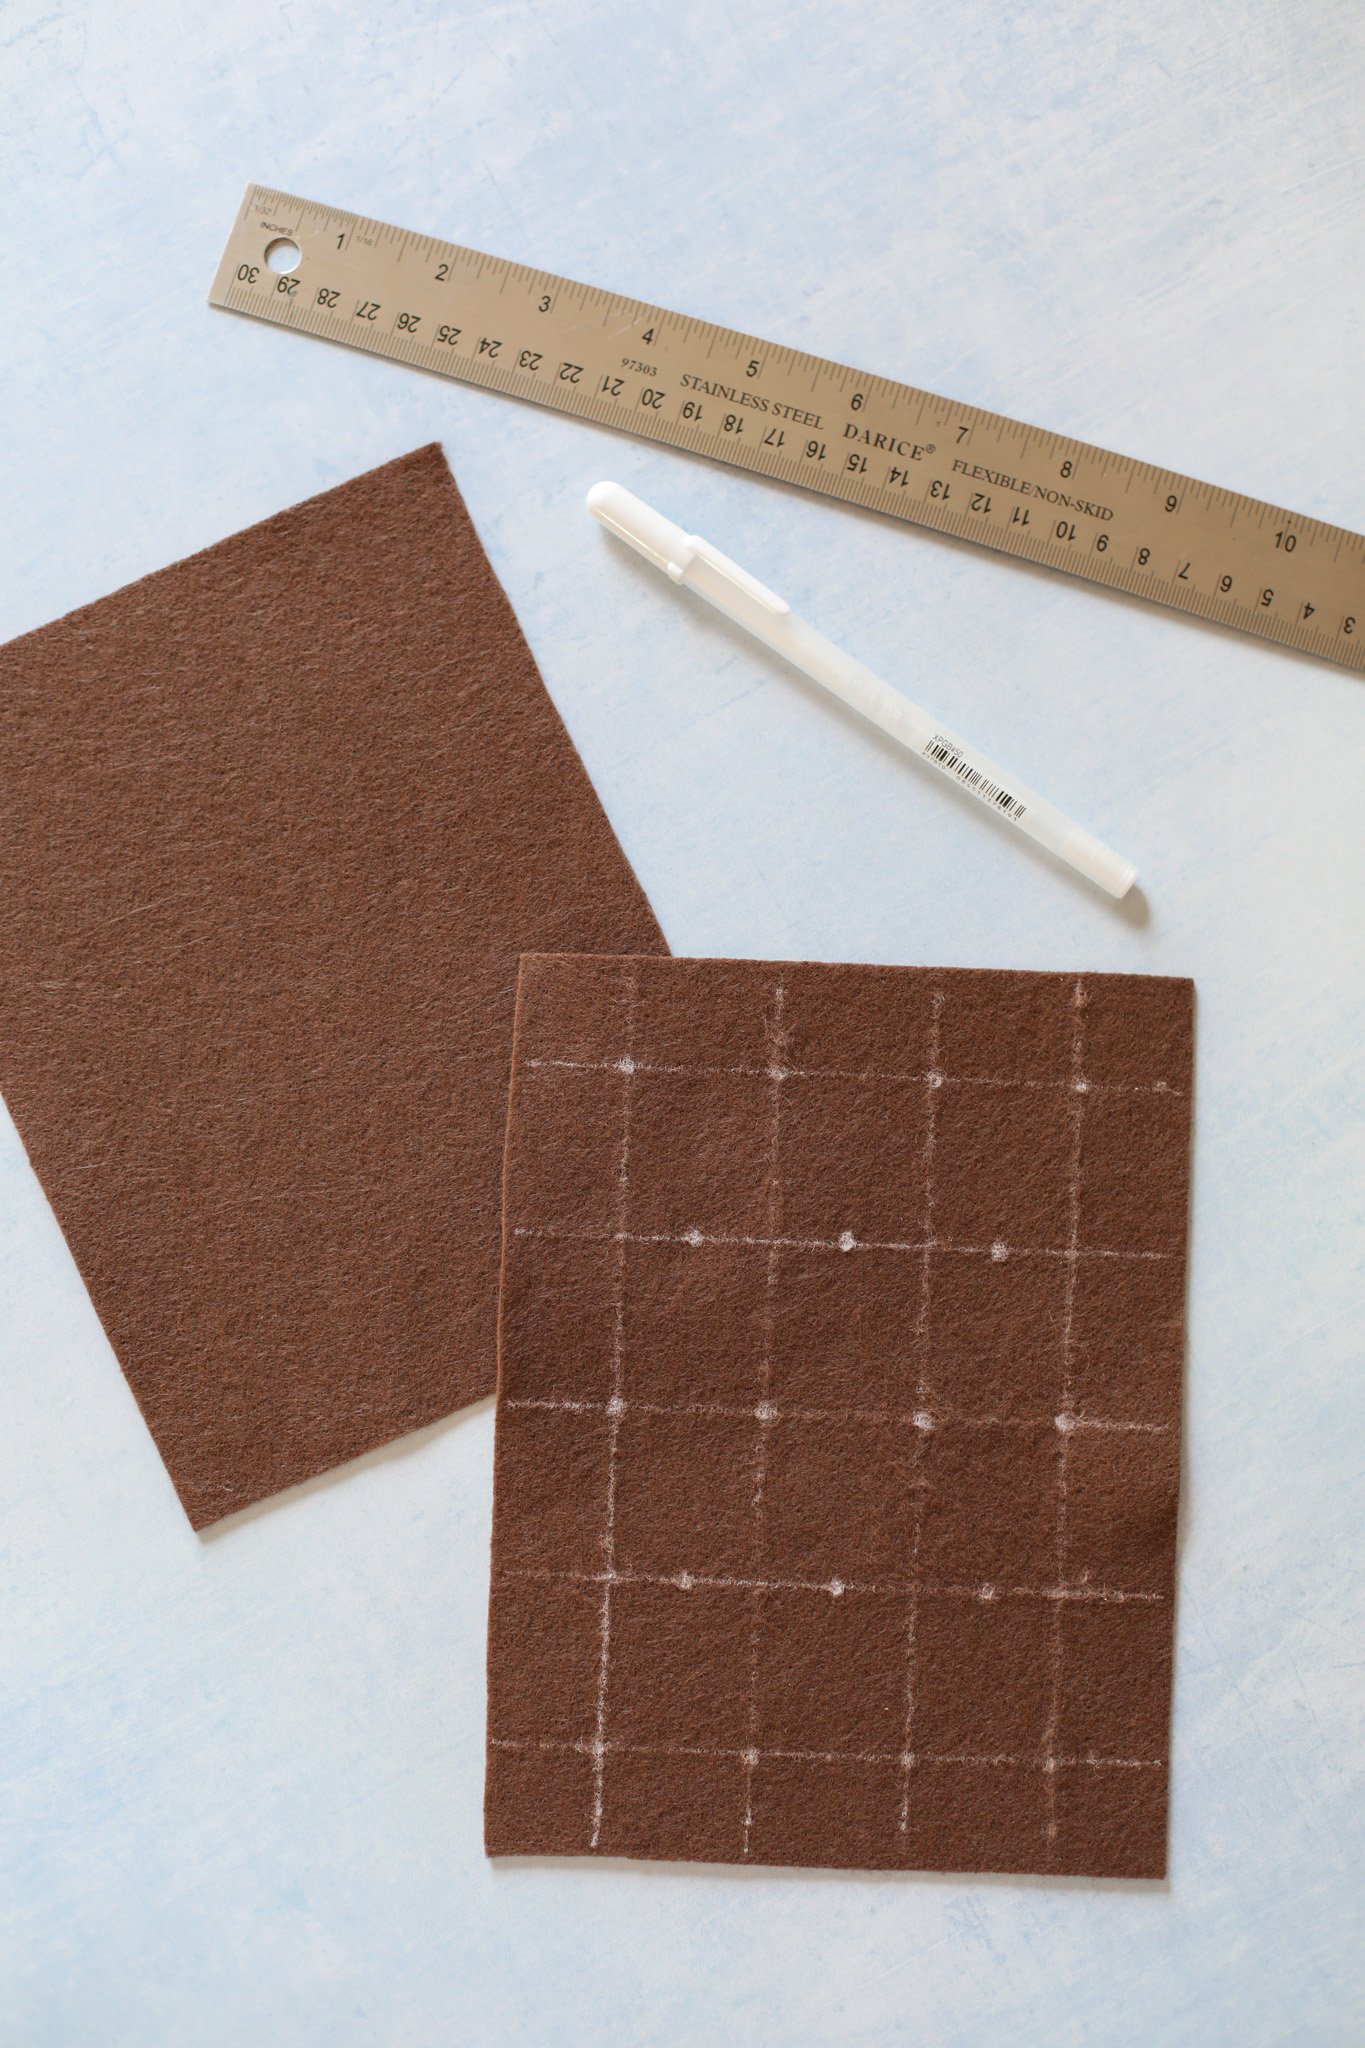
STEP 1: Begin by cutting out the two sides of your felt sleeve. Each piece should be 6” x 8”.
STEP 2: Next, you are going to mark out where each of the embroidered flowers are going to be placed on the back of one piece of felt using a ruler and some kind of marker or pen (you won’t see these lines/dots since they will be on the inside of the project). Start by drawing out the lines according to the measurements below and then use these line guides to determine where all 18 of your flower centers will be located.

STEP 3: Now, to make it easier while embroidering, you will need to mark these dots on the front side of the same fabric, so to do this just stick your embroidery needle into the center of each dot and then use your marker to mark another dot on the front exactly where your needle popped through.

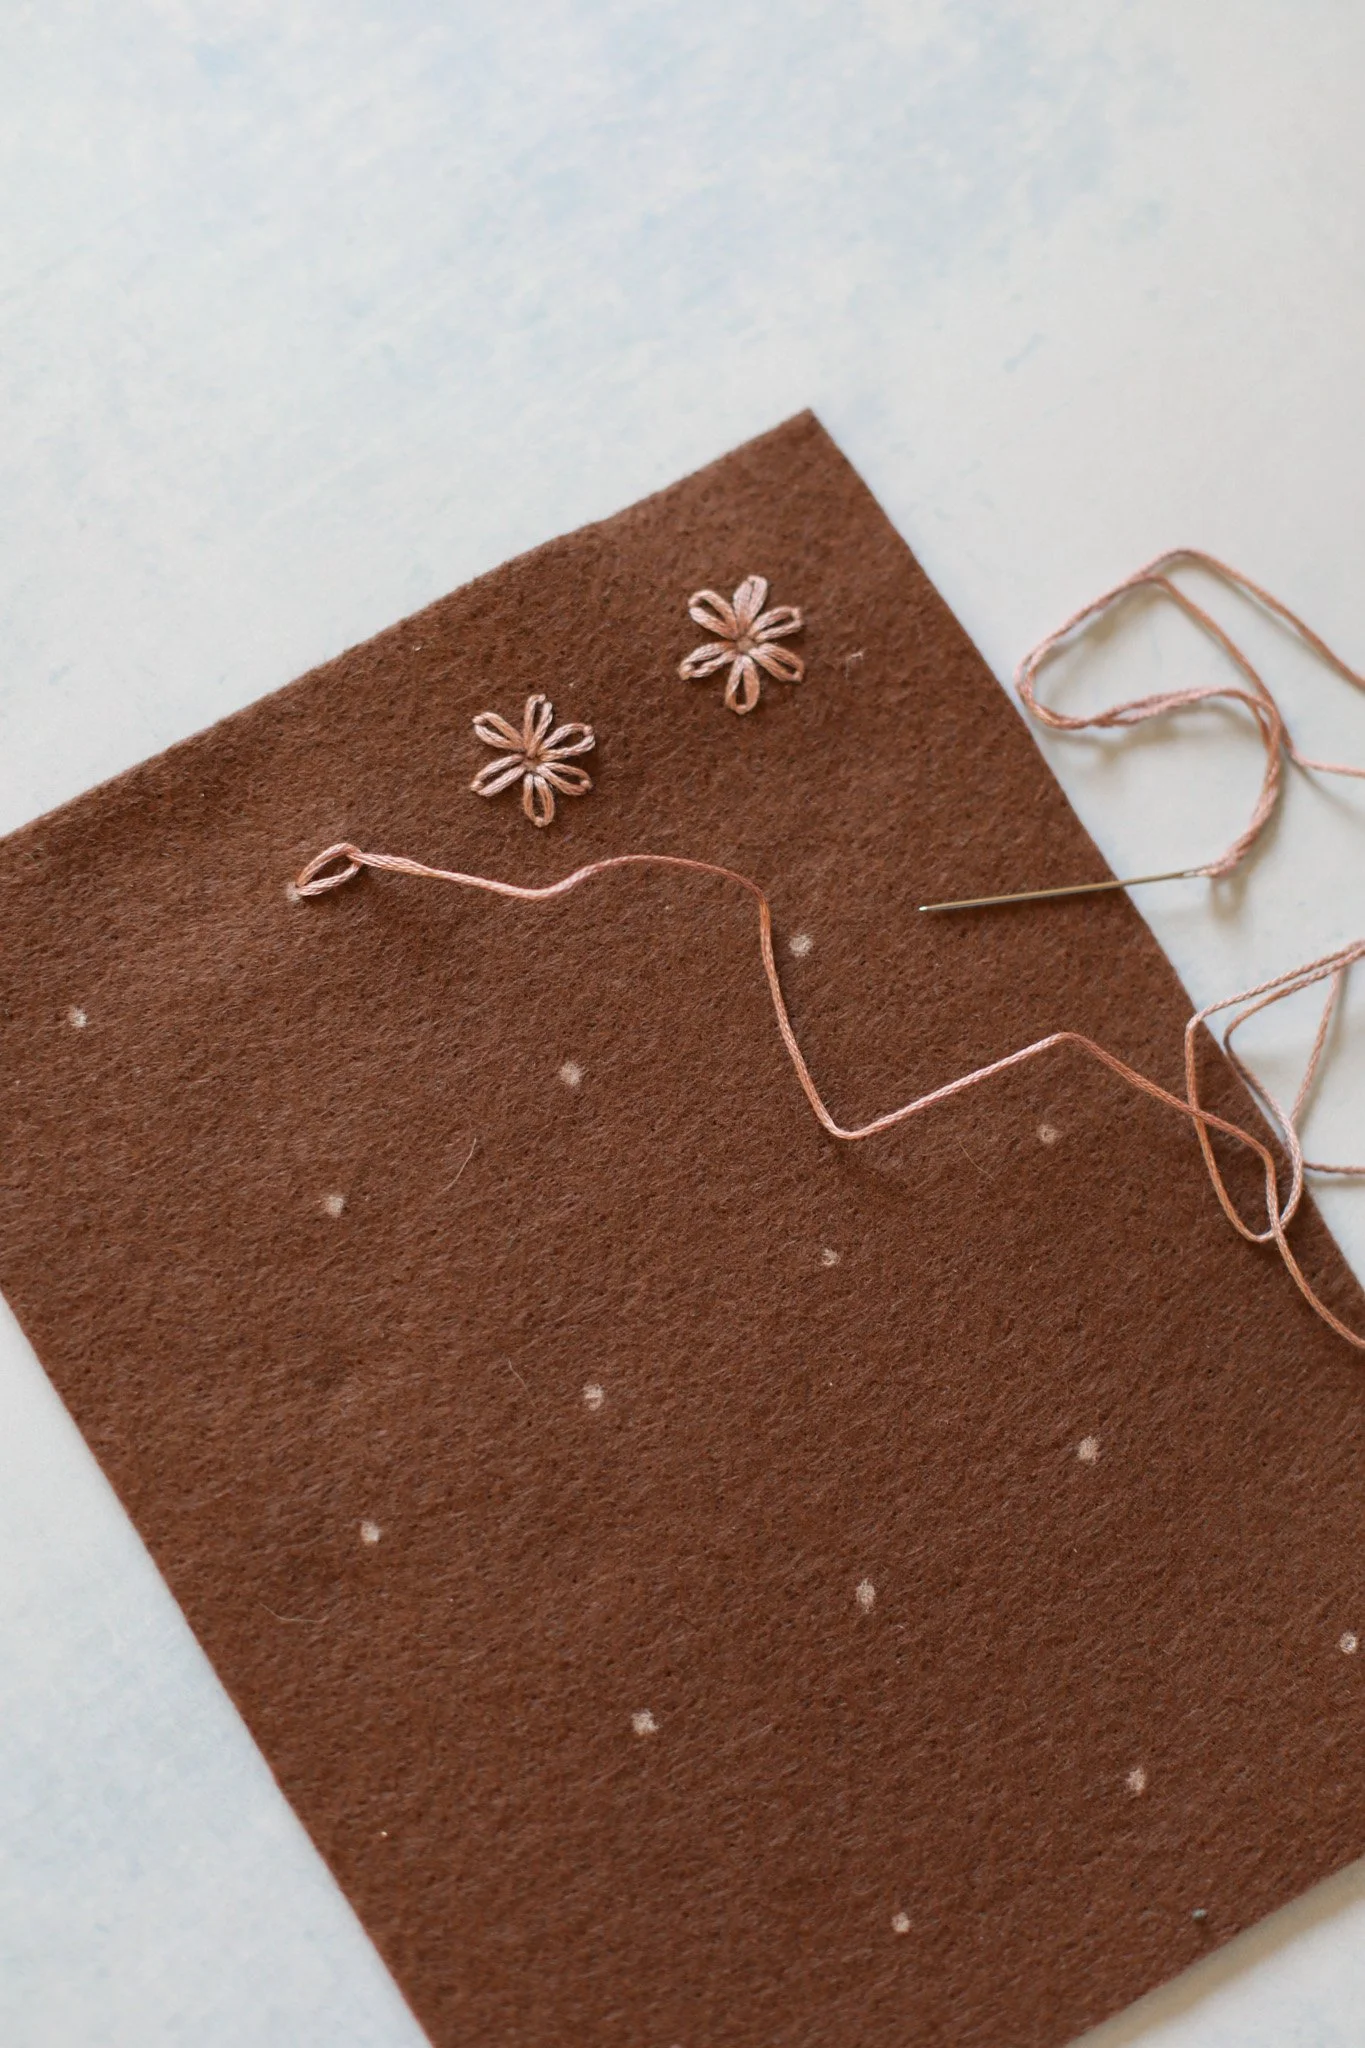
STEP 4: Choose your embroidery floss color for the petals of your flowers and thread this piece of floss onto your needle. Tie a double knot at the end of your floss strand.
Now you are going to begin embroidering your flowers onto this front piece of felt. For this project, you are going to be doing 3 simple embroidery stitches. The first is the Lazy Daisy stitch.
Here is a link to a good tutorial for this stitch if you are a beginner, but basically you are going to be pulling your thread up through the back of the felt at the edge of your center dot and pull through until the knot catches on the back. Then you are going to immediately push your needle back down through the felt right next to the hole where you came up. Pull your floss through but not all the way so that there is a small loop sticking out. Pull your needle back up through the felt about a 1/4in from the center, making sure the needle is coming up in the middle of the loop you previously created. Pull the floss to tighten the loop. Then tack the loop down by making a small stitch over the loop.
Repeat this on all sides of your center circle, making 6 petals per flower. Then tie a double knot on the back when your flower is complete. Trim any extra floss.
Then repeat this step with all 18 of the dots on your felt cover.

STEP 5: Once you have completed all your flower petals, it is time to create the center of each flower. I used a different color of embroidery floss for this part. So pick out your embroidery floss color, thread your needle, double knot the end. And for this step, you are going to use the French Knot stitch.
Here is another good video tutorial to teach you how to do a french knot. You are going to bring your needle up through the side of your center dot. Once the thread has been pulled through entirely, use one hand to hold the thread away from the felt and hold the needle in your other hand. Carefully twist the needle around the floss — I did three loops for my project. Then point the needle back toward the felt and stick it through on the other side of your center dot. But before pushing the needle though, pull the strand of embroidery floss to the left so that the loops are tightly pulled together up against the felt. Then slowly pull your needle through the felt, keeping those loops secured up against the felt surface.
Once you have completed your first french knot, just move your needle back up through the next flower center and repeat this process on each flower. If your thread runs out you can tie a double knot on the back and begin a new piece of thread, but since the back is not going to be visible, don’t worry about thread running along the back of your project.


STEP 6: Now that your front cover embroidery design is complete, you are going to begin the process of creating a blanket stitch along all the edges of your kindle sleeve.
If you want to practice this stitch before beginning on your project, here is a great tutorial of how to do the blanket stitch. I would recommend watching this tutorial to explain how to do this stitch instead of me explaining, because it requires a visual. You are going to separately do a blanket stitch across the top of your front cover (the piece of felt with the embroidered flowers) and your blank back cover.
To begin this, take a ruler and some binder clips and clip your ruler in place along the top edge of your felt, so that only about 1/4in of your felt is visible. The ruler will help guide you to keep your blanket stitches a consistent distance apart (I did every 1/4in) and it will also keep the stitch line as straight as possible. Start the first stitch 1/4in from the left side of the felt and continue stitching every 1/4in along the edge, pulling the needle up and through your floss loop each time — again, I would recommend watching this video tutorial to explain how this is done.
Make sure that all your start and end knots are on the back side of the felt.
Now both pieces of felt should have a finished top edge.
STEP 7: Next, you are going to attach the two pieces of felt together using the blanket stitch on the other 3 sides. So repeat the last step, but this time clip the two pieces of fabric together, carefully lining up the edges.
Instead of having all your start and end knots on the back side, try to hide them all on the inside seam between the two pieces of felt. So to begin, pull your needle up through your first hole from between the felt instead of from the back. And when you do your final stitch on each side, come back up through the center seam between the two pieces of felt and hide your knot in this seam.
Repeat the blanket stitch all around the remaining 3 sides of your felt and your completed product should look something like this!
NOTE: You’ll see my corner stitches are a little thicker than the regular blanket stitches, I just went over those a few times to clean up some mistakes and make sure the corners were extra secure.

This was my first time ever doing the blanket stitch, so I’m definitely not an expert by any means and there are PLENTY of imperfections. But I kind of love the handmade look of this project!

This is such a cozy project to do this winter while curled up on the sofa watching your favorite shows. And I love that the end product is something super useful to have if you are an avid Kindle reader like myself!
I have the Kindle Paperwhite, and I absolutely LOVE IT! I have a hard time going back to reading physical books because the Kindle is just so convenient, lightweight, you can read in the dark, and you can always have a ton of books with you while traveling. I am also a big fan of the Libby app which is where I download all of my ebooks for free from my local library, so I don’t know what I would do without my Kindle!
But if you want to try this project with a different e-reader, you totally could. You would probably just need to adjust the dimensions of the felt and the measurements of where to place your embroidered flowers.

I’m currently finishing up a book I started at the end of 2023, Love & Other Words (by Christina Lauren) and then I’m eager to start my adventure into the world of Crescent City (by Sarah J. Maas) after that.
What are you currently reading? Or what are you most excited for on your TBR?
xo Rachael

