
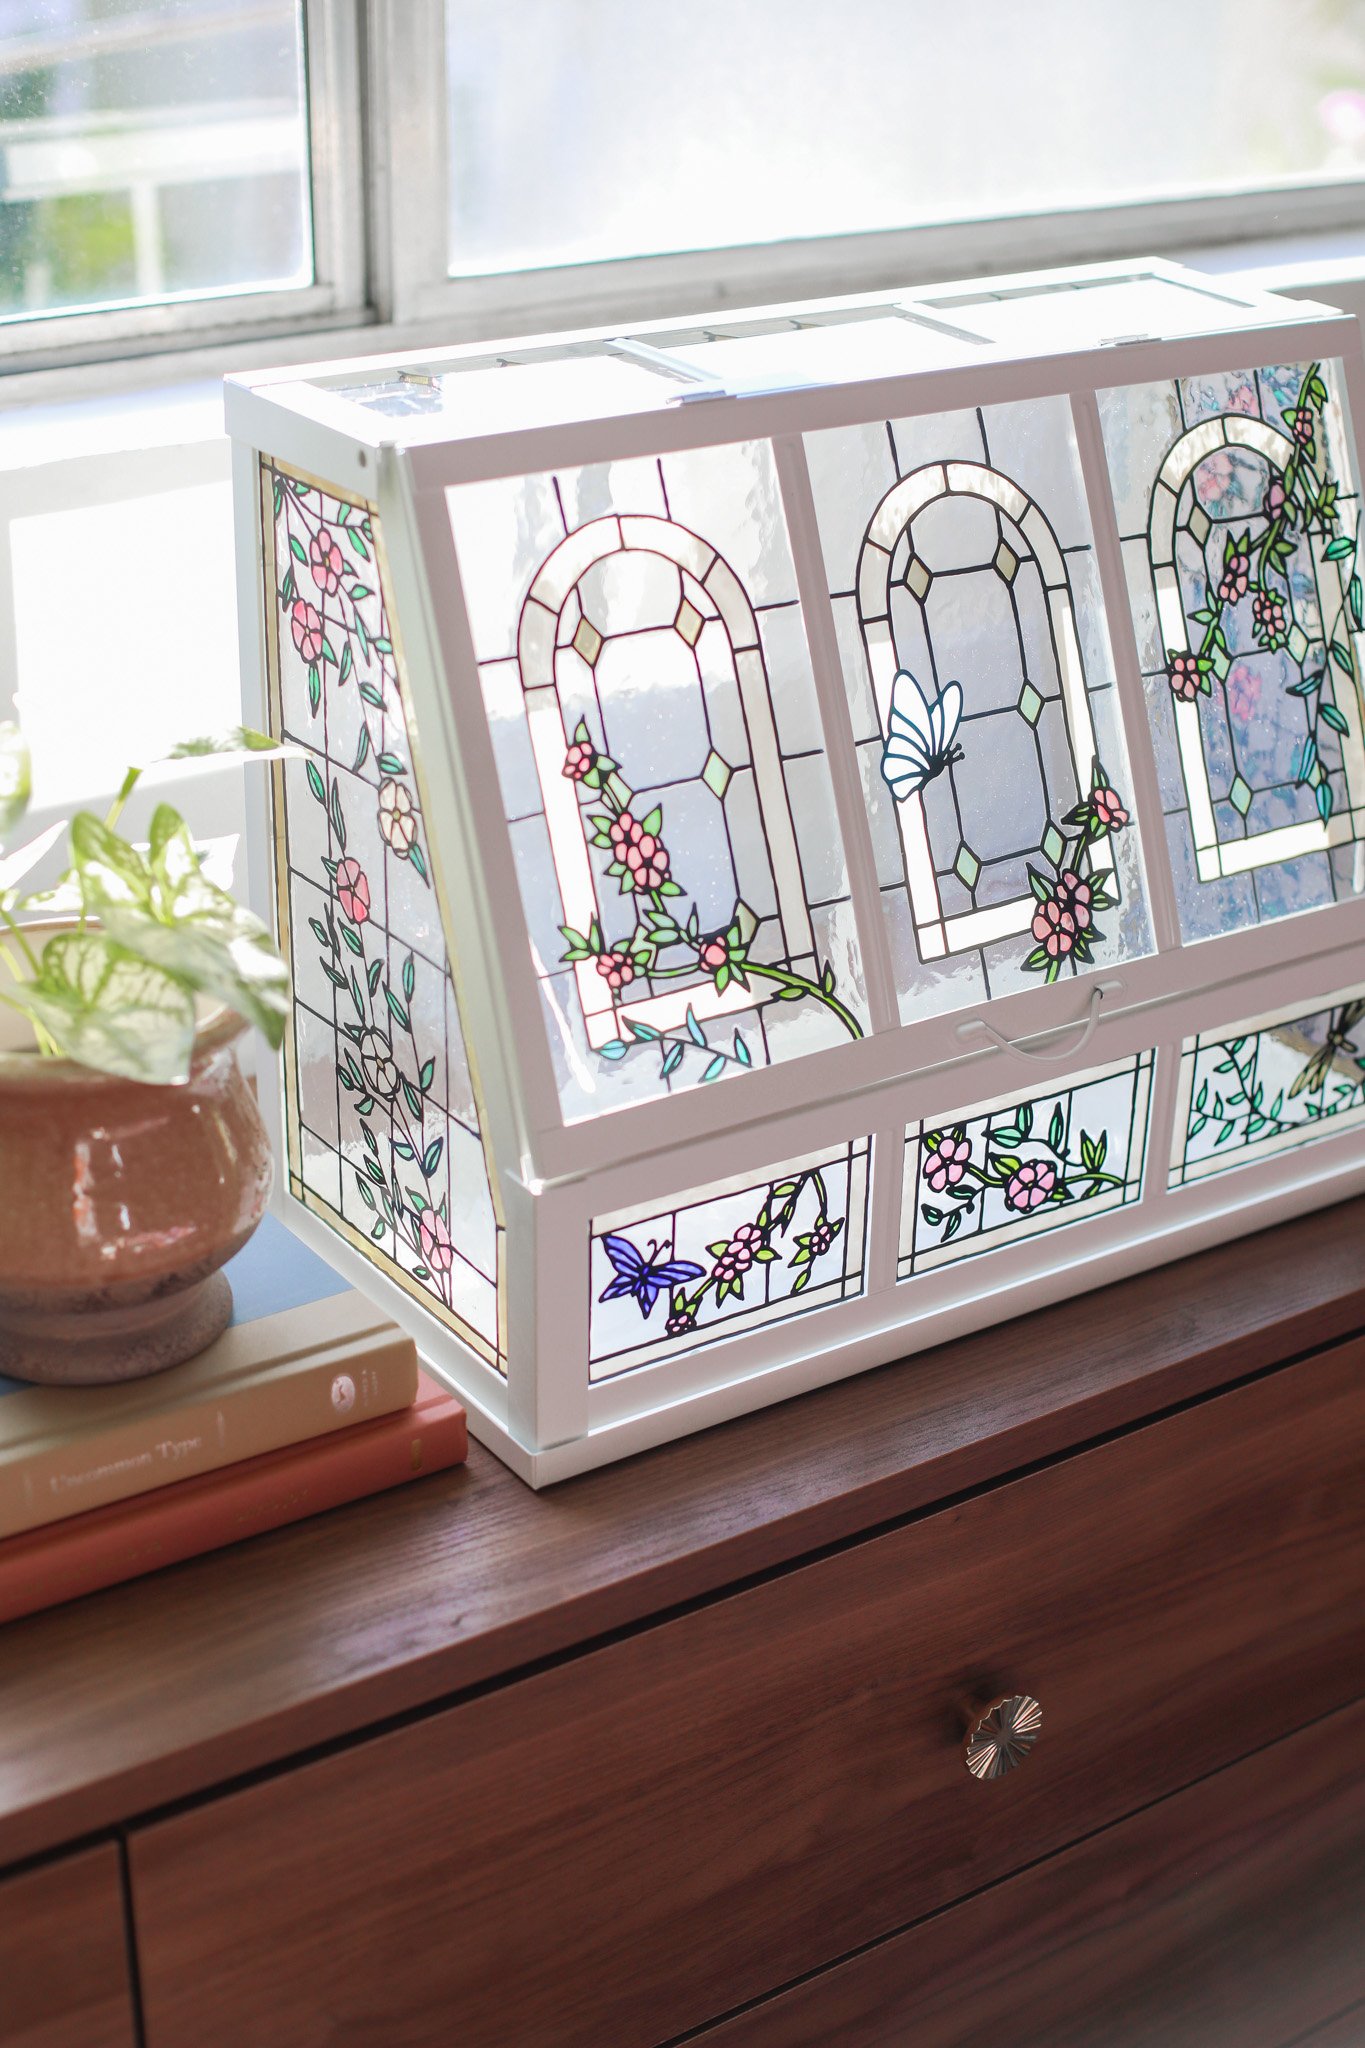
Make a Stained Glass Greenhouse with the IKEA AKERBAR
I’m so excited about today’s DIY project, because it is one that I’ve been planning and working on for a while now. You all know I’m a huge fan of IKEA hacks, and you have seen quite a few on the blog recently. But I couldn’t resist another project idea when I saw the ÅKERBÄR tabletop greenhouses. And while I’m admittedly not known for my green thumb, I thought it would be cute to turn this piece into a work of art to display as home decor!
Like most of the BookTok world, I recently got very into the ACOTAR book series, like obsession level. And while I am, obviously, a Night Court stan, I was very inspired by the way the Spring Court and Tamlin’s palace was described in the first book. And I wanted to channel the very cottage-core vibes of the Spring Court into a piece of home decor.

Affiliate disclosure: This post may contain affiliate links. When you buy from these links, I may earn a small commission, at no additional cost to you. As an Amazon Associate, I may earn commissions from qualifying purchases from Amazon.com. Thank you for your support!
HOW TO MAKE A STAINED GLASS GREENHOUSE WITH THE IKEA AKERBAR

(PHOTO VIA IKEA.COM)
Supplies you will need:
IKEA ÅKERBÄR Greenhouse (I used the white color in the smaller size 17 3/4”)
ETI’s Stained Glass Greenhouse Templates (Printable PDF available to download below!)
Tape
Gallery Glass paint in assorted colors (this link is for a set of lots of colors but you can also buy individual colors at Michael’s craft store for cheaper) — the colors that I used for my greenhouse were kelly green, lime green, amber, peach tea, rosy pink, violet, and aqua.
Gallery Glass crystal clear window color (I would recommend purchasing the larger 8 oz bottle of this since you will use this paint the most to fill in all the blank spaces)
Toothpicks

STEP 1: Begin by downloading our PDF templates above that you will use as your guide in drawing your leading lines. Cut out each template. There will be 3 large templates for the top front panels of your greenhouse. 3 small templates for the bottom front panels. 3 small template to be used on the top panels. And 2 large templates for the side panels — these ones are bigger than a standard piece of computer paper so you will have to cut out two pieces and tape together.
STEP 2: Once you have printed and assembled all your templates, you will begin to take out your greenhouse parts from the IKEA packaging. You will find that everything has a protective layer of plastic on either side that you will need to remove.
For this project, we will be painting our design on the inside of the greenhouse, so you are going to tape all your templates on the outside of each piece so that you can see the template through the plastic while painting.
Match up all the pieces with your templates and tape them in place. You will find that the only pieces you will not use in this step are the bottom white tray and the large back wall.
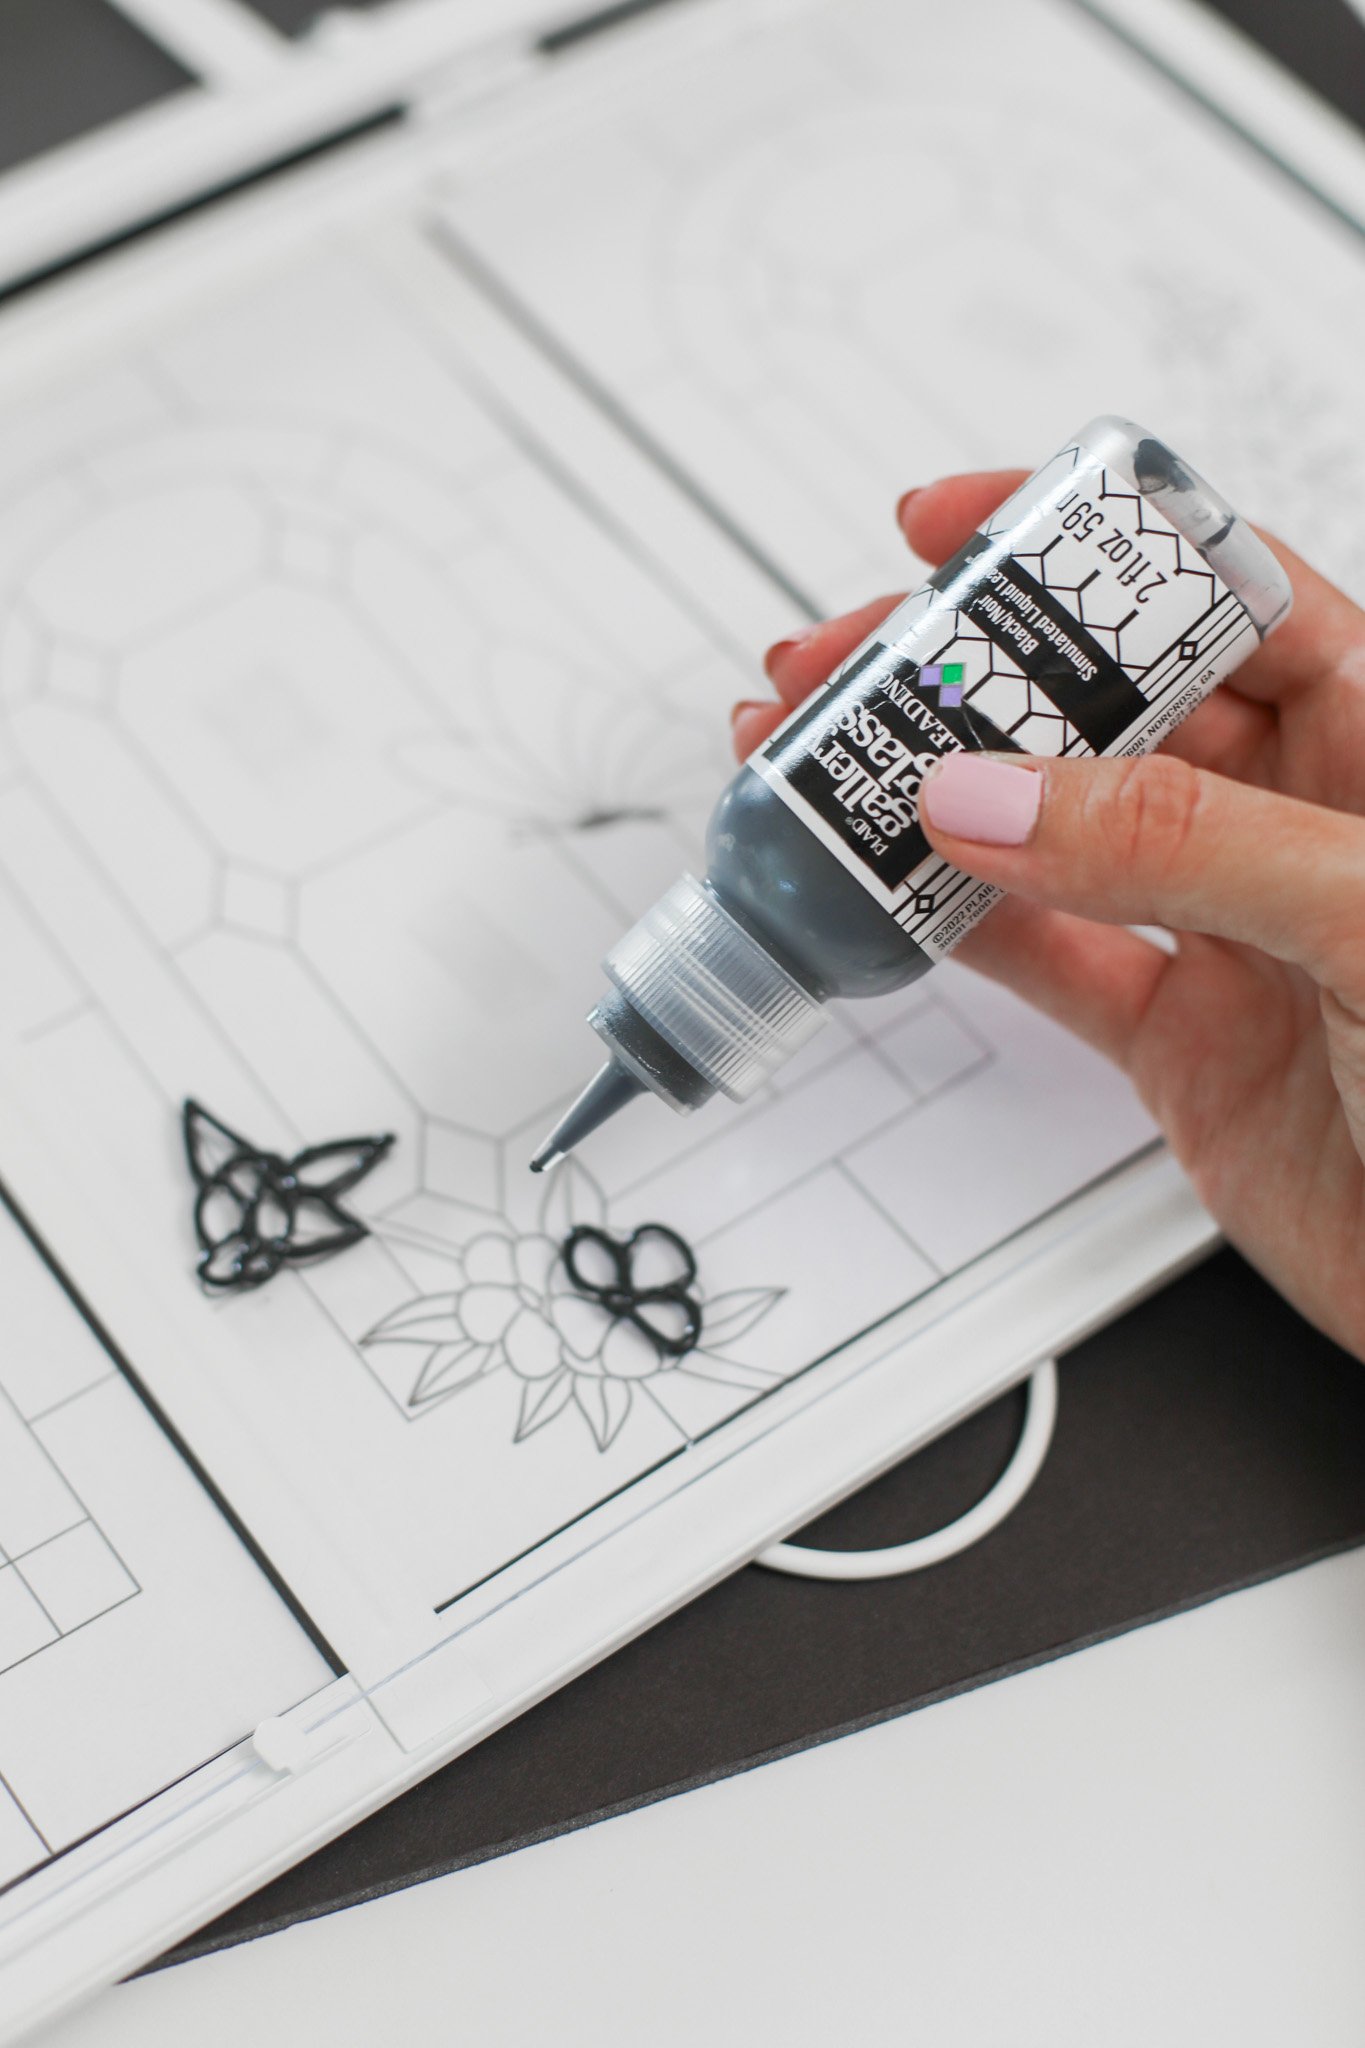
STEP 3: Now it is time to start painting! The leading part of this project is definitely the most challenging and frustrating. So just go very slow and be patient. You are going to trace all the template lines with the black leading paint.
I found that this bottle of paint is easiest to work with if you keep the tip of the bottle up in the air above the plastic surface. Lightly squeeze the bottle to get the paint flowing and then pull the line of paint in the direction you want to go with your hand. So instead of dragging the paint tip on the surface you are guiding the stream of paint in the air. Be aware, it is a different consistency than normal paint so it will keep it’s shape better than normal acrylic paint.
**TIP: Using a scrap piece of plastic from the recycling bin, try out the technique of tracing with the leading paint a few times before you begin on the actual project. Also keep a piece of paper towel nearby to wipe off the tip of the paint frequently throughout your painting.
Slowly make your way across the whole pattern of the template. I found it best to work with the more intricate details first like the flowers, stems, vines, and leaves, and then move onto the bigger grid lines. It is easier to clean up any mistakes once the black leading paint has had time to dry for a bit so if you make any small mistakes, just keep going and go back with a toothpick or cotton swab at the end to clean up any misshapen lines or mistakes.
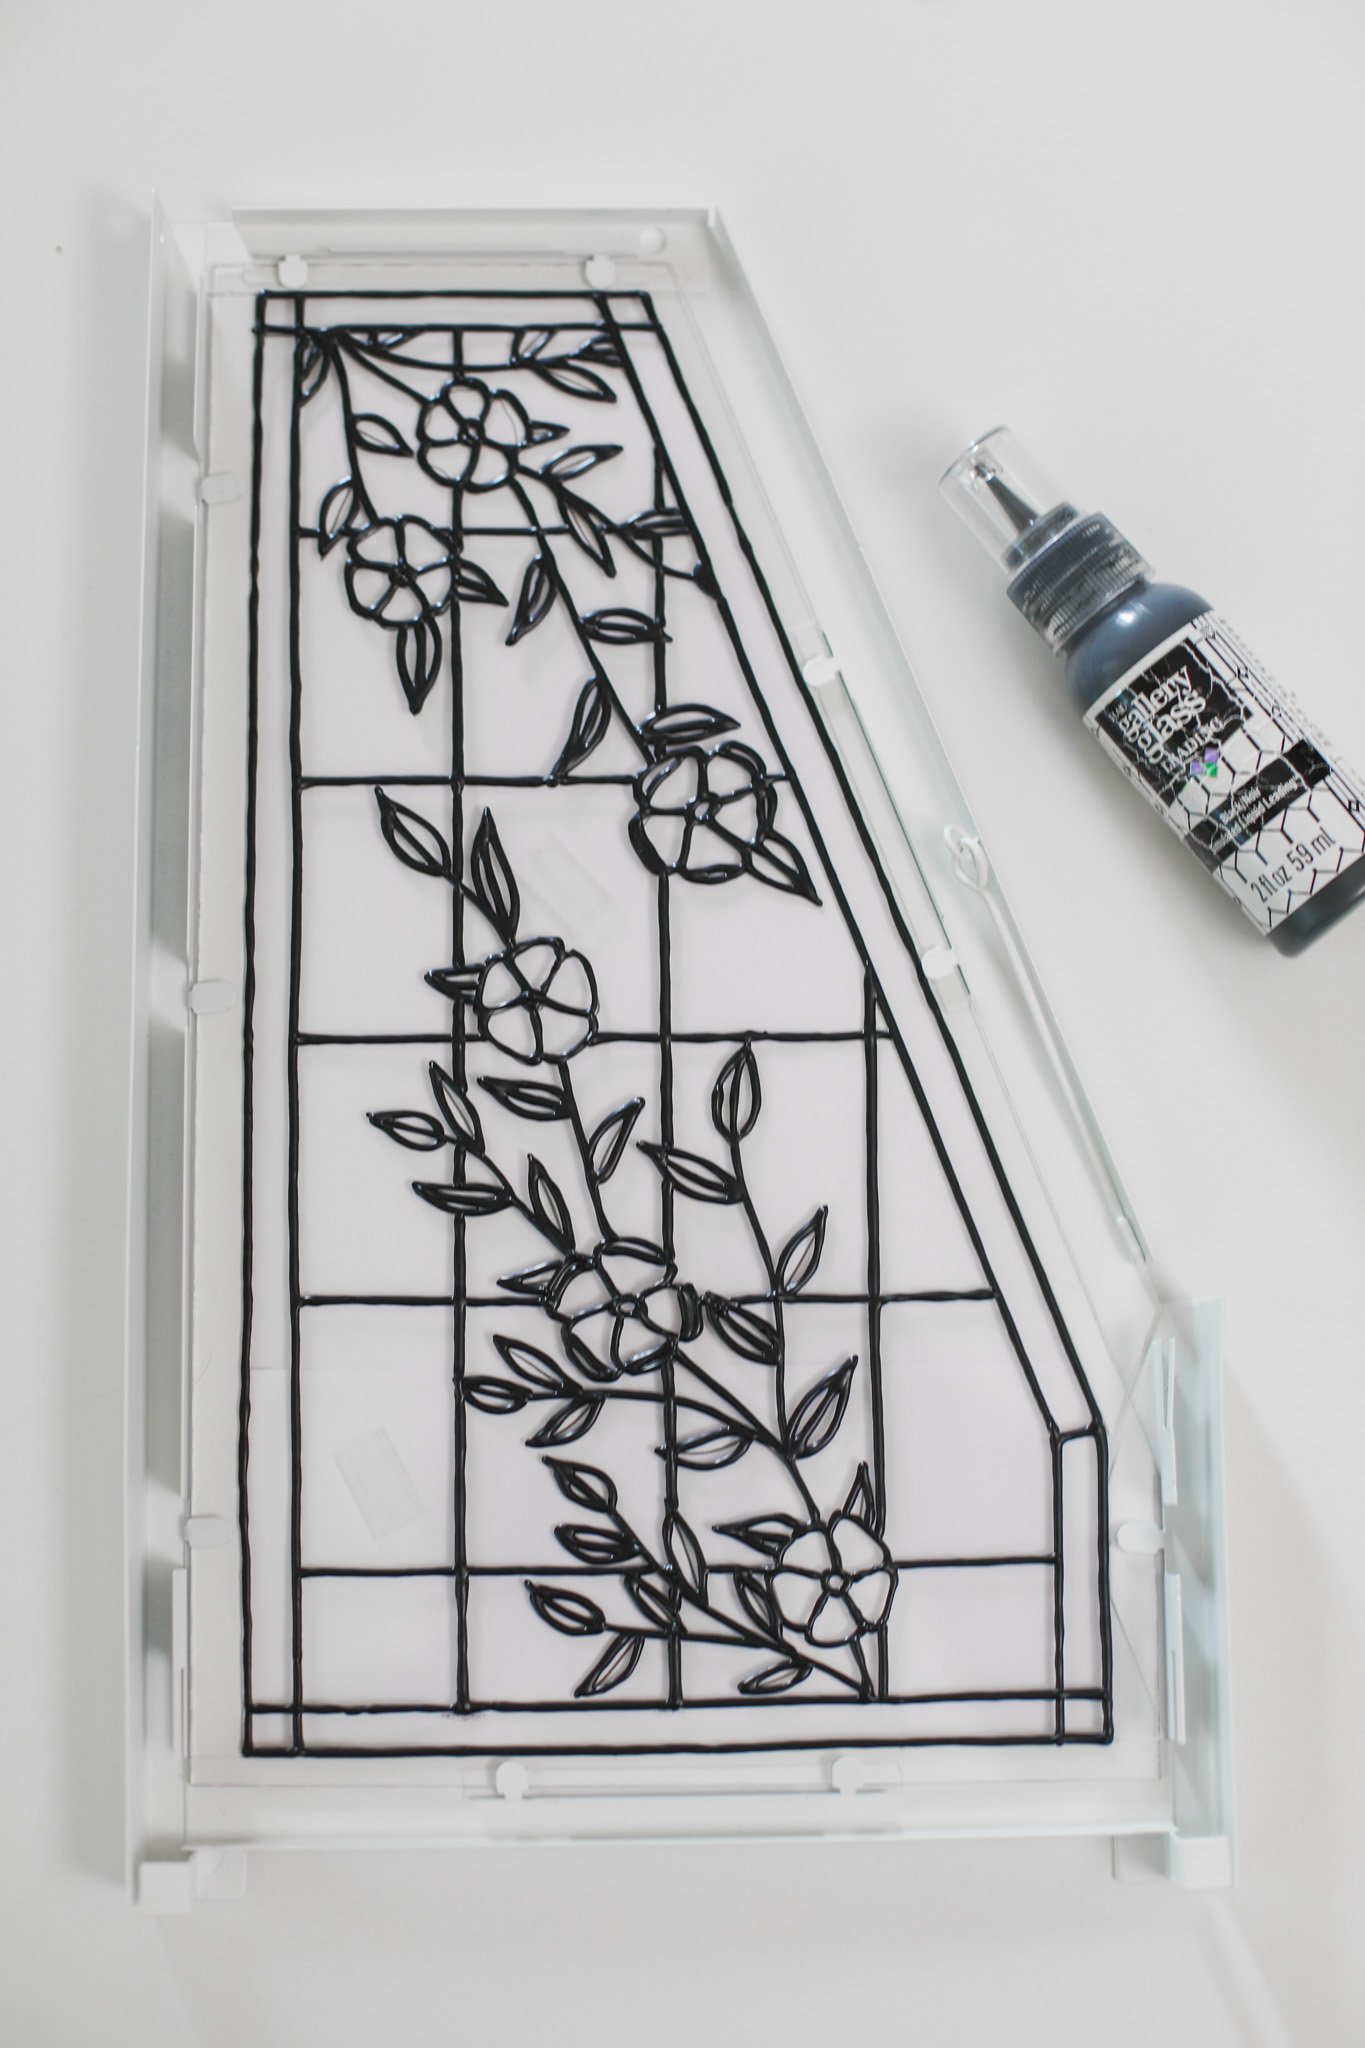

Here is how one of your side panels will look when the leading is complete! Allow the black leading paint to dry overnight before continuing with the colors.
STEP 4: Next, you are going to begin coloring in your shapes. This is the most fun part in my opinion! Using the gallery glass paint is a little different than regular acrylic paint because you do not need to paint it on with a brush. Instead you are just going to squeeze the bottle so the space you are coloring fills with a bit of paint. Then use a toothpick to push the paint around to fill in the space entirely to the leading lines.

If you have ever worked with royal icing cookie decorating, it is a similar process. You are flooding the area with the color and pushing it around until it settles in the contained space. Push the paint back and forth with the tip of the toothpick until the whole area is covered. Don’t worry if the colored paint gets on top of your black leading paint lines. It will dry translucent and you will not see it.
Try to pop any large bubbles you see in the paint with the tip of your toothpick. Otherwise it will dry with these bubbles showing. You will see the color becoming more and more translucent as it dries.
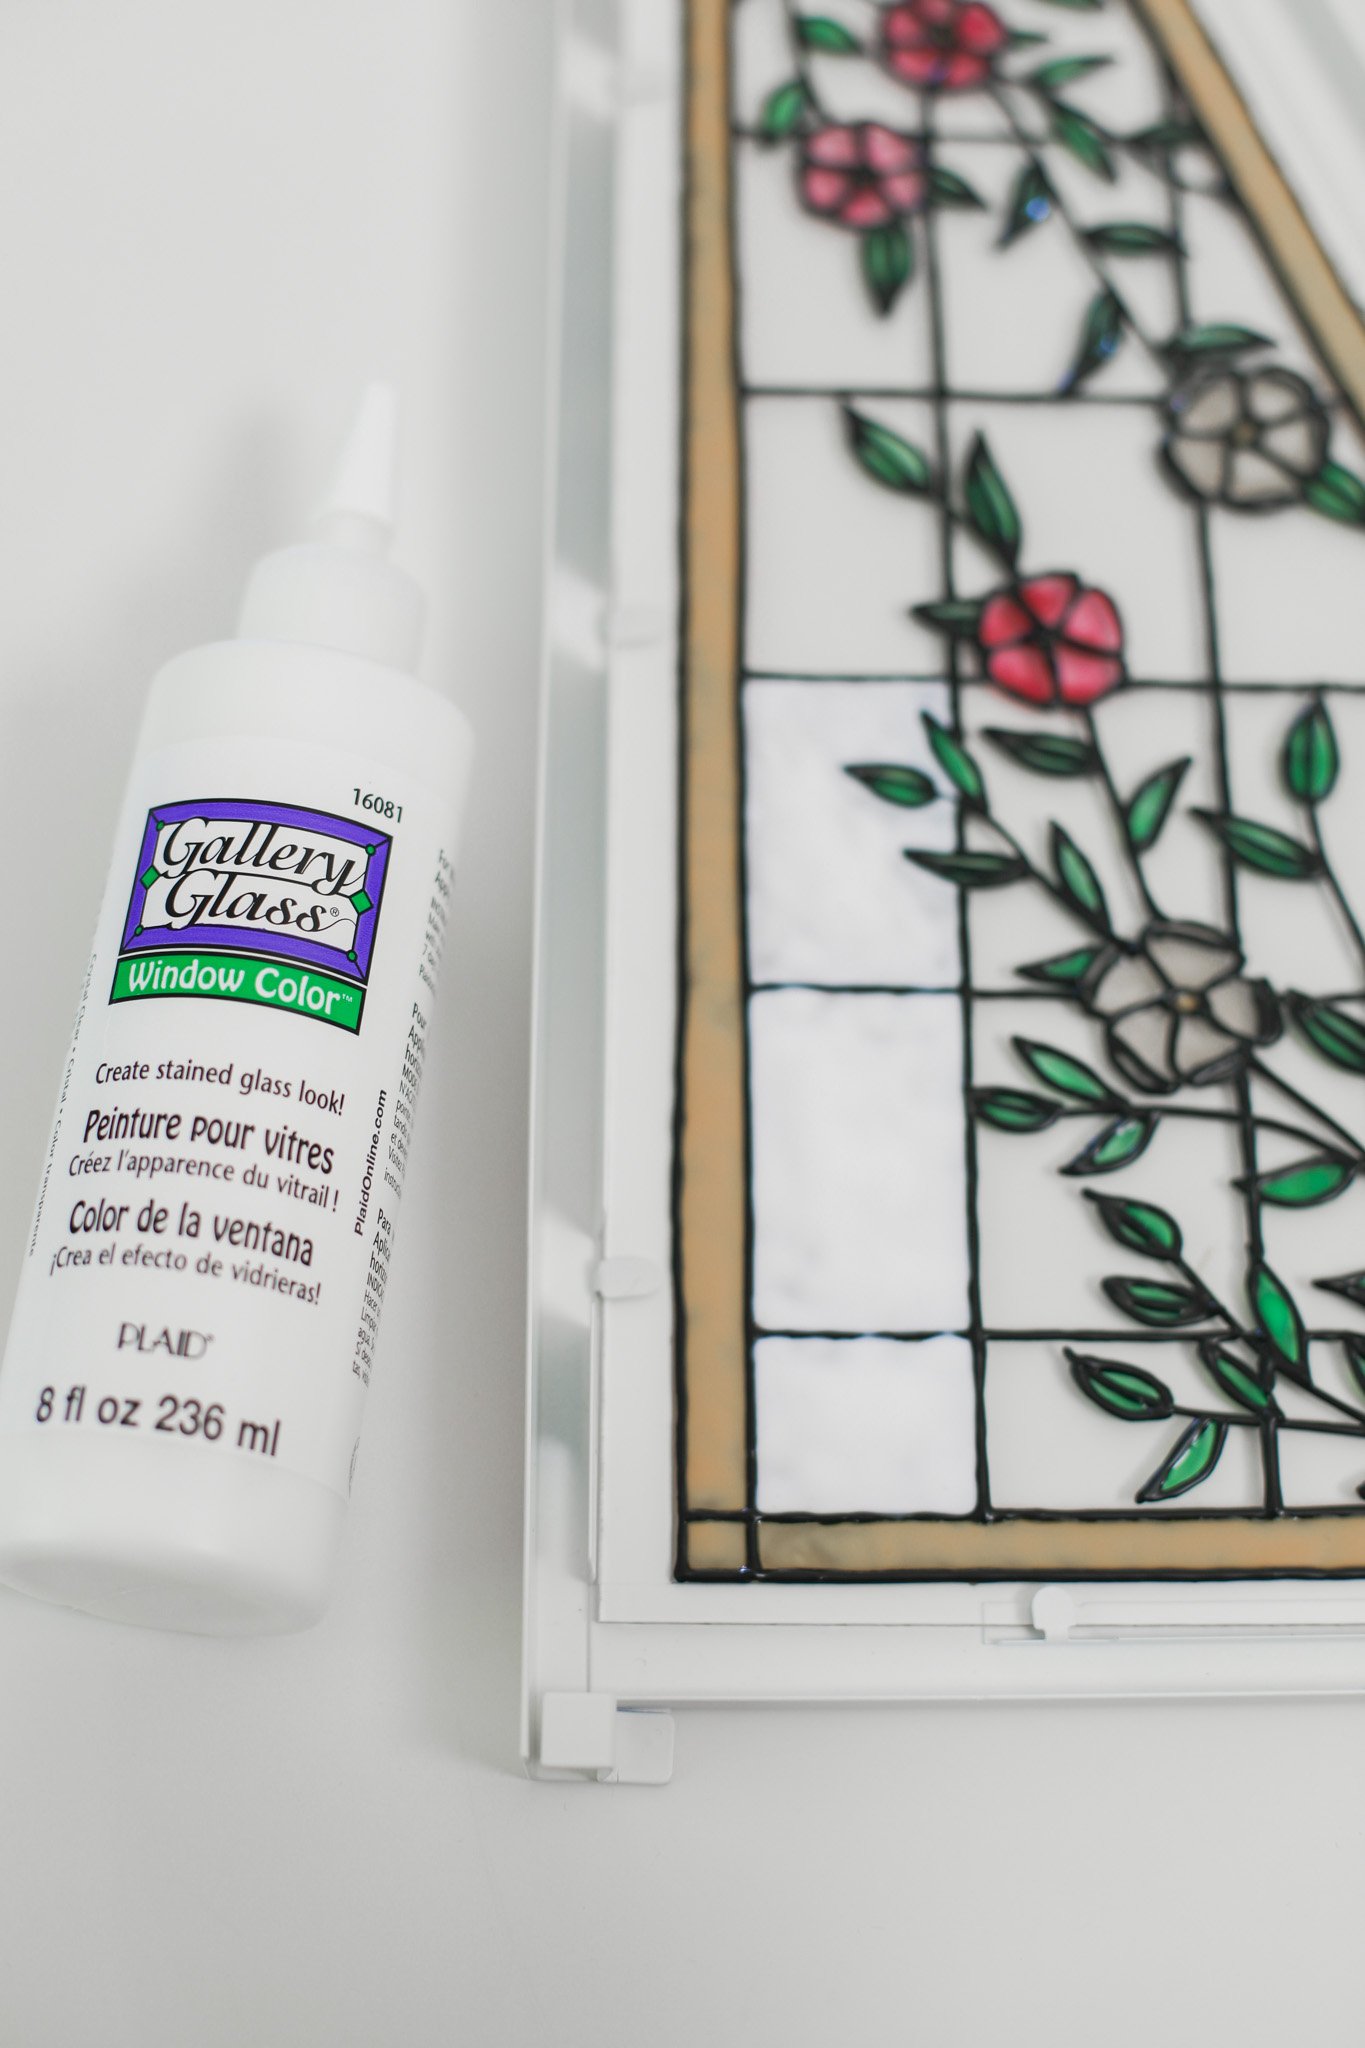

STEP 5: Next you are going to go in with the clear gallery glass paint to fill in all the blank spaces that you want to remain clear. The point of this step is to give the remaining spaces that stained glass textured look. It may seem silly to paint all these spaces clear, but I promise that it will totally transform the piece!
Do this the same way you did the colored paint. Just squeeze the bottle while pushing the paint around the empty spaces. And use a toothpick or Popsicle stick to push it into the corners and to pop any bubbles you see. It goes on white but will dry clear with a slight wavy texture. This paint will dry in about 8 hours and become translucent. But if it looks a little cloudy after drying, keep in mind that it takes 7 days for the paint to actually cure fully and will look much clearer then.

STEP 6: Repeat these steps with all the surfaces of the greenhouse (front, top, and sides — I left the back blank so that the light could shine through better). Once the pieces have dried, assemble the greenhouse fully according to the IKEA directions included in the box. And display your piece in a sunny spot for maximum stained glass beauty!
And you can totally still use this as a greenhouse if you would like! Fill it with plants or even a cute little herb garden in your kitchen. Or store all your faux plants, if you’re anything like me, no judgement lol! Or simply display this as a lovely piece of home decor.

I’m not gonna lie, this process is not fast. It took me probably a week or two to complete the whole greenhouse. But put on a good audiobook while you work and the painting process will actually become very therapeutic. And it is so worth the effort in my opinion, I love how it turned out!
If you try out this project for yourself, be sure to tag me on instagram @entertainidea or #entertaintheidea! Can’t wait to see your final products! And if plants are not your thing, lemme know what creative way you would use this little tabletop greenhouse?
xo Rachael

