
Etched Glass Perfume Bottles (& How To Create a Vinyl Stencil)
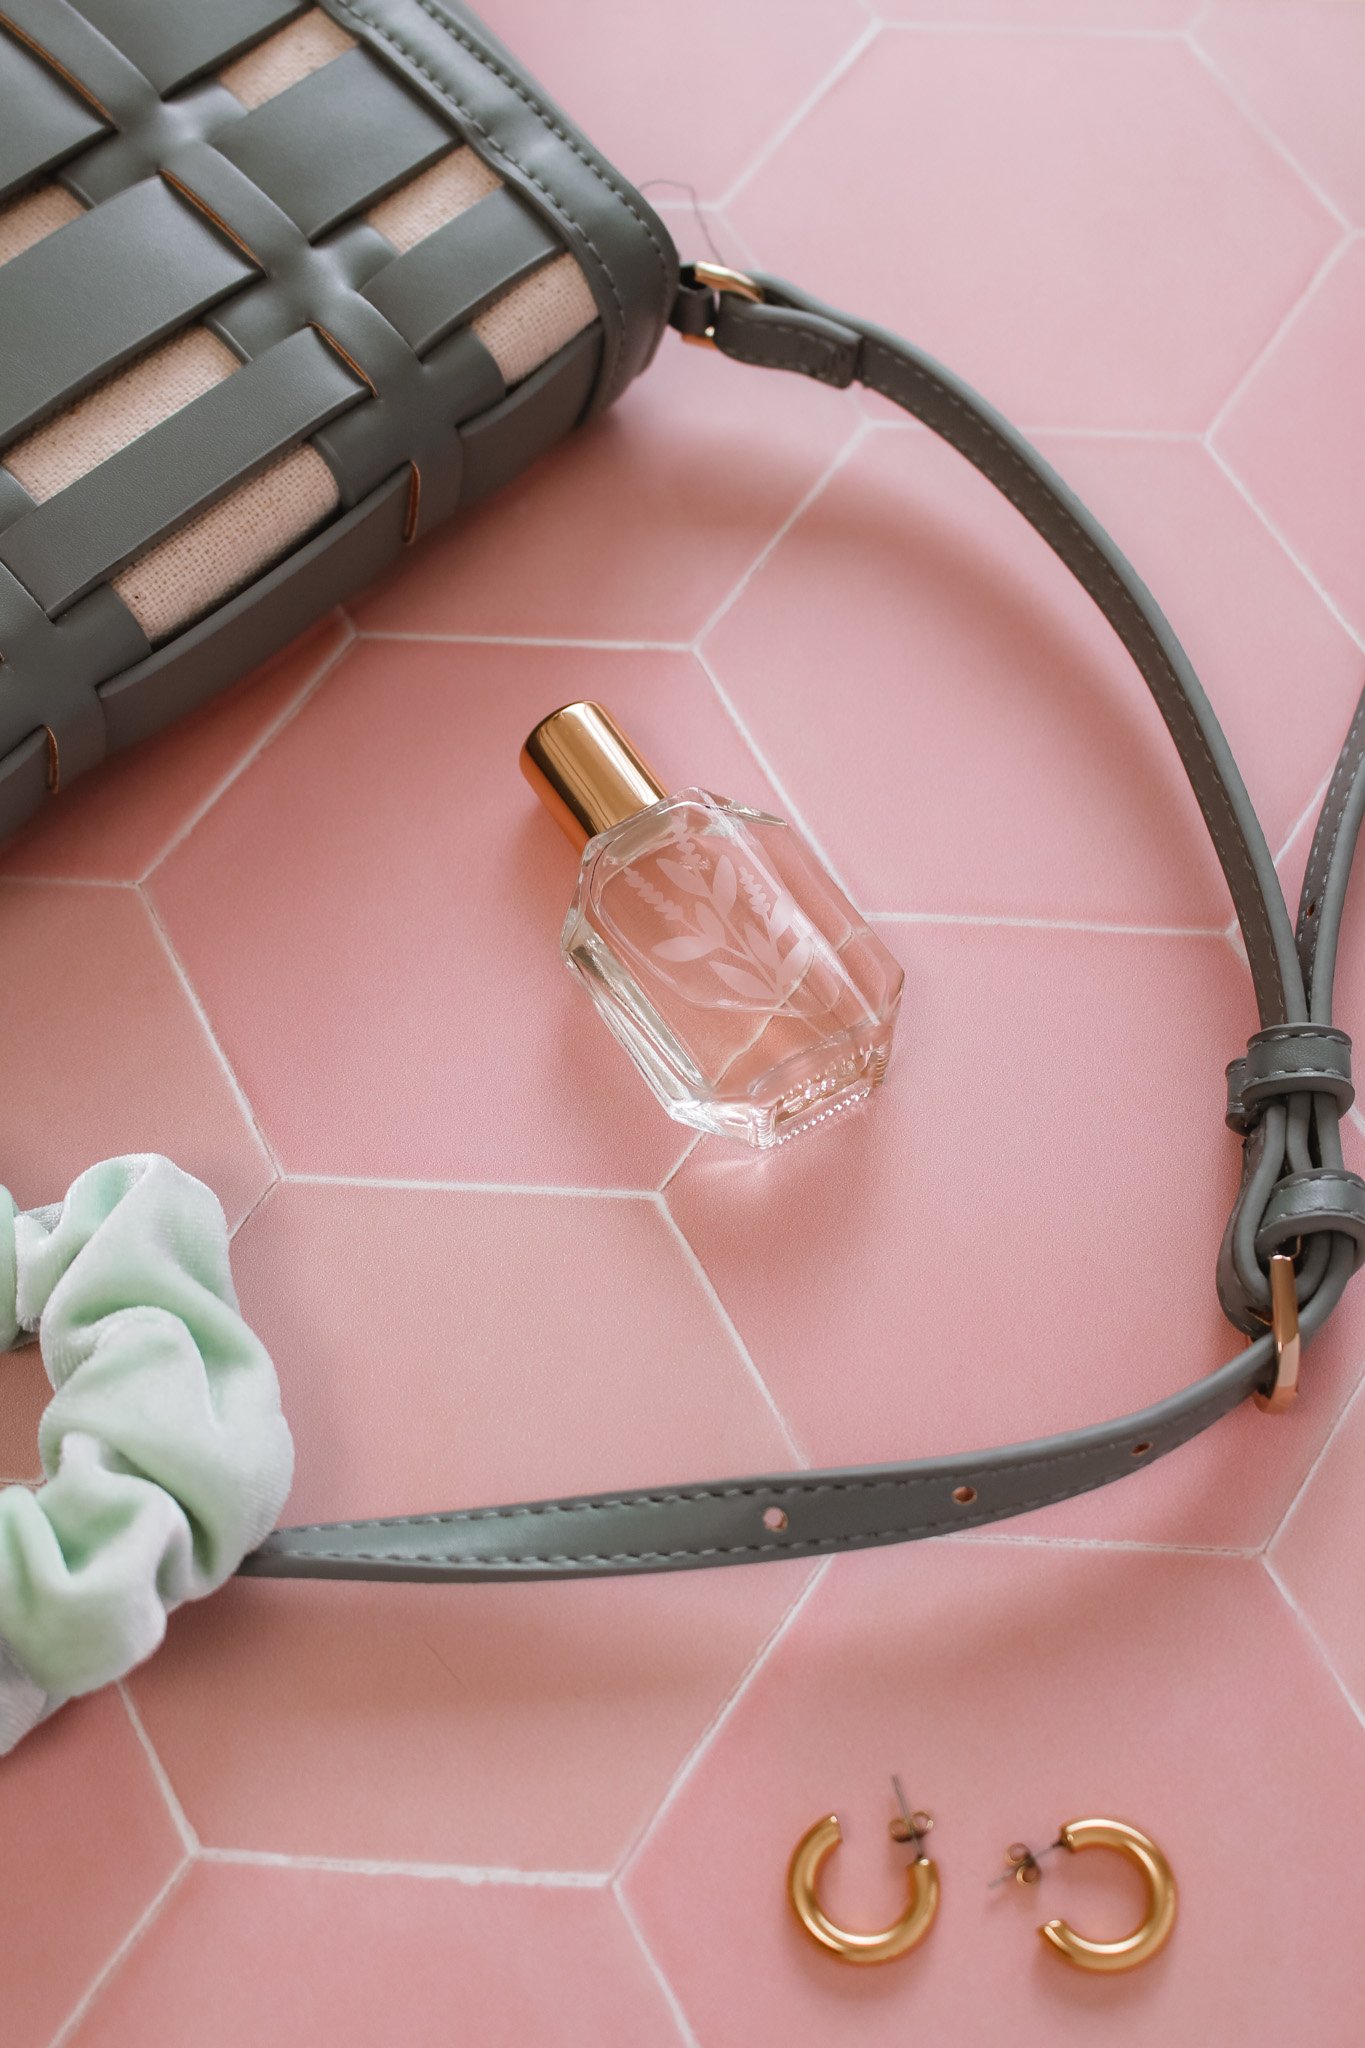
Today I am blending my love of tiny versions of things with my love of DIY projects to bring you these customized travel perfume bottles! I recently came across these super cute mini travel perfume bottles that I thought would be perfect for taking my favorite perfumes with me on the go. But I thought they needed a little extra style!
I had seen other DIYers use glass etching cream in the past to permanently etch a frosted appearance to any kind of glass surface. So I thought it would be fun to try out a new craft technique and try my hand at glass etching! Follow along below to see how I created my own vinyl stencils (using a Silhouette machine) and how I etched these lovely glass perfume bottles.
Affiliate disclosure: This post contains several affiliate links. As an Amazon Associate, I may earn commissions from qualifying purchases from Amazon.com. Thank you for your support!
DIY ETCHED GLASS PERFUME BOTTLES (& HOW TO CREATE A STENCIL WITH THE SILHOUETTE MACHINE)
Supplies:
Silhouette Cameo Machine (or other die cut machine like a Cricut)
Silhouette sticky cutting mat
Silhouette Studio software
Removable matte vinyl (I used this type)
Scissors
Weeder tool
Scraper tool
Transfer tape (I used this type)
Protective gloves
Paint brush
Mini glass rollerball travel perfume bottles
STEP 1: Clean the surface of the glass bottles with rubbing alcohol.
STEP 2: Design a pattern or shape for your perfume bottle or download a digital file from Etsy. I used this Wildflowers svg bundle from Etsy! But there are a ton of options on Etsy if you are looking for a different theme or style.

STEP 3: Import the designs you are using into your Silhouette Studio (or Cricut Design Space). You are going to want to resize the shapes you will be using. The glass bottles that I purchased only have a surface area for a 1.75” image height so I reduced the size of all my flower images to just below 1.75”. Next, position the images where you want them on the grid (this is the spot they will cut on your cutting mat). I put all of my images in a row in the top left corner.
STEP 4: Connect your Silhouette machine to power & to your computer. Attach a piece of removable matte vinyl (backing side down) to your gridded sticky mat that is large enough for the images you will be cutting. Use the square grids to count to make sure your vinyl piece is large enough. Line up the left edge of the mat to the line on your machine and click “Load cut mat”.
STEP 5: Back in Silhouette Studio, go to the butterfly shape on the right side. Click “Select Trace Area” and then highlight all the images you will be cutting out. Once there is a highlighted box around your shapes, click “trace”. Now you can click on your original images and press delete. There should be a red outline of the image you will be cutting leftover.

STEP 6: Go up to the “SEND” tab at the top of the Silhouette Studio and make sure your correct material is selected. For me, I had to use the drop down menu to change the material to “Vinyl, Matte”. Now you are ready to click “Send” and your machine should start cutting.
STEP 7: Once the cutting has stopped and you can see your design imprinted into the vinyl, click “unload” on your machine. Pull off the whole piece of vinyl from your sticky mat. Individually cut each of your images so they are separate.
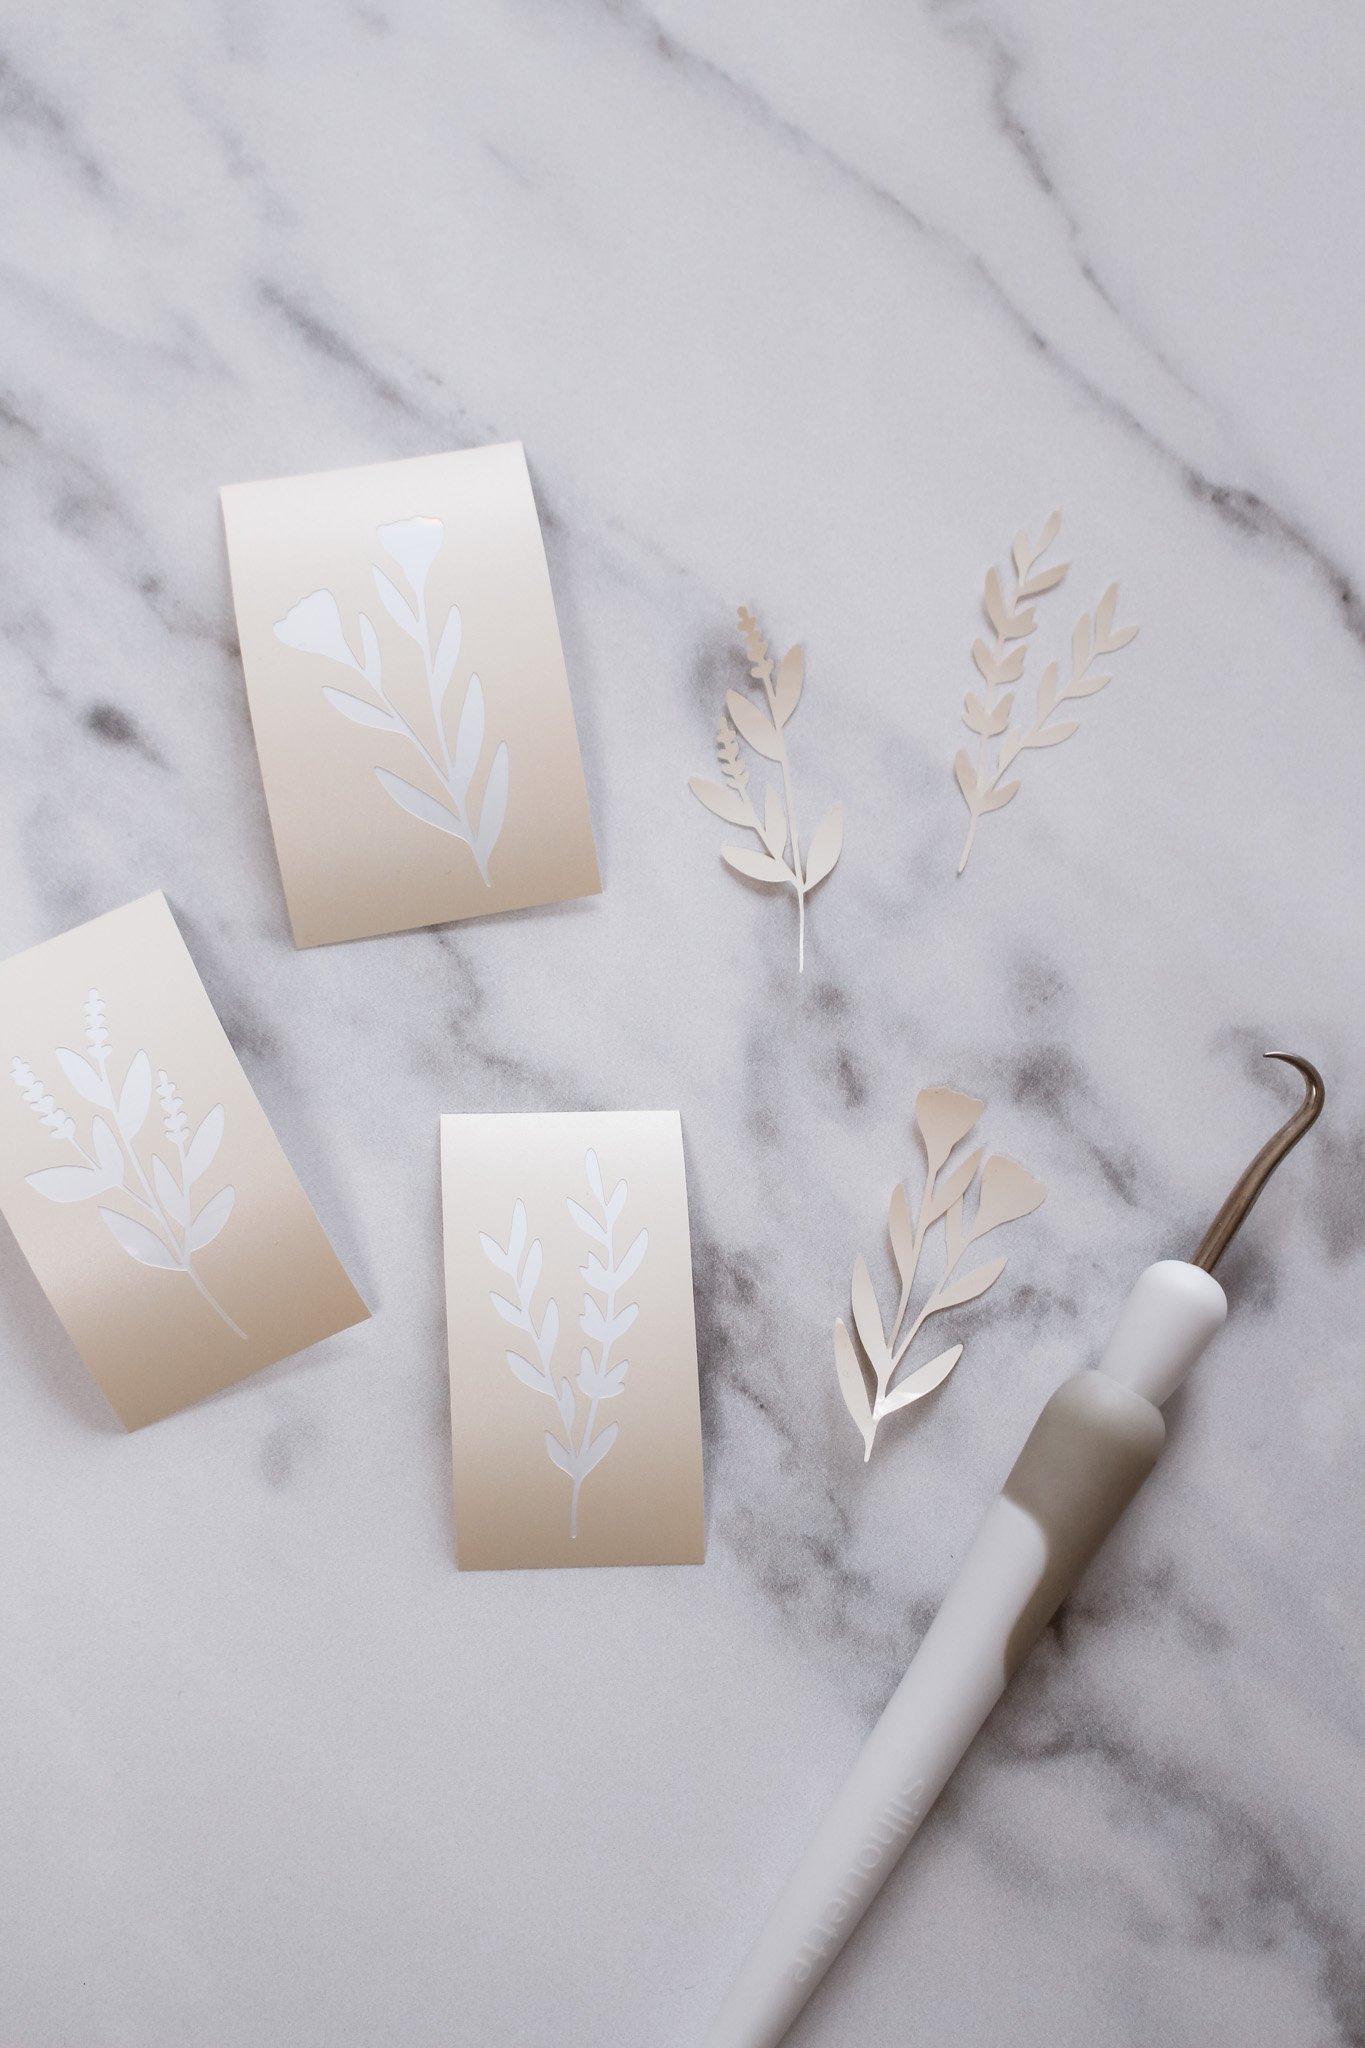
STEP 8: Use your weeding tool to carefully pull out the interior vinyl pieces of your flowers. You should be left with just a stencil of the flowers now.

STEP 9: Cut a piece of transfer tape that is just a bit bigger than each of your vinyl stencils. Remove the backing on the transfer tape and press your vinyl stencil face first down onto the sticky clear tape. You can now remove the white backing on your vinyl.

STEP 10: Now it is time to line up your image onto your glass perfume bottle. Press the transfer tape with your vinyl stencil in place on the glass. Use a scraper tool to make sure it is fully adhered. Then gently pull of the transfer tape, leaving just the vinyl stencil attached to the glass. Go over the vinyl again with your scraper tool just to be sure all the tiny edges are adhered well.
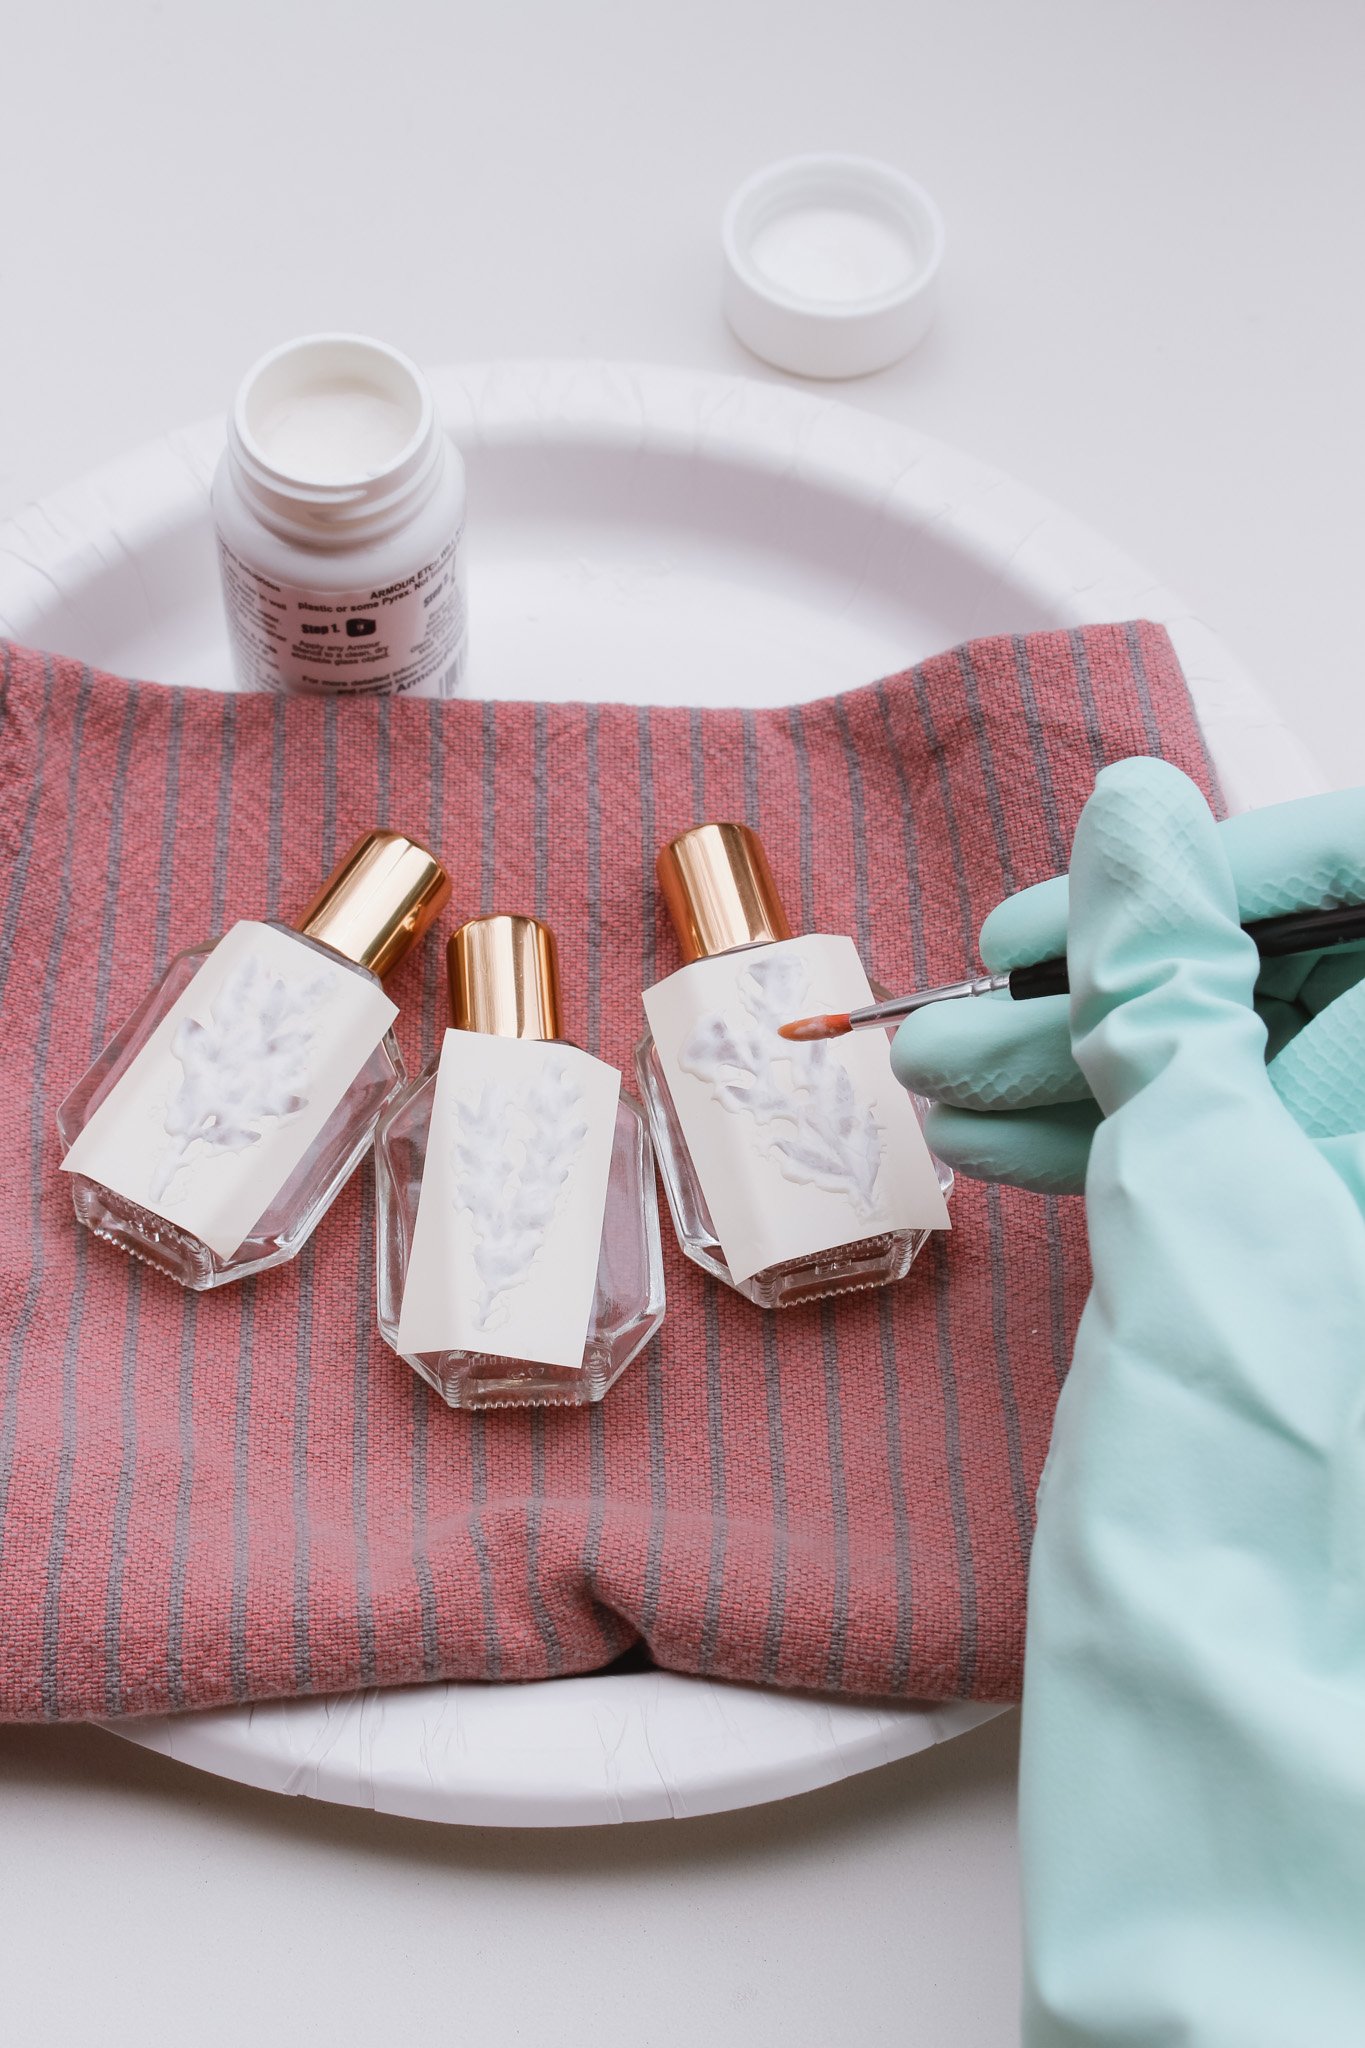
STEP 11: Put on a pair of protective gloves before you begin using the etching cream. Use a paint brush to spread the etching cream over the stencil. Be sure to cover all the exposed areas within your stencil and do not go outside of the stencil area. You should be covering the stencil with a generous even coat of the etching cream. Let the cream remain on the glass for 15 minutes but throughout that 15 minutes I would recommend using your paint brush to move around the cream every so often to make sure you get an even etched image.
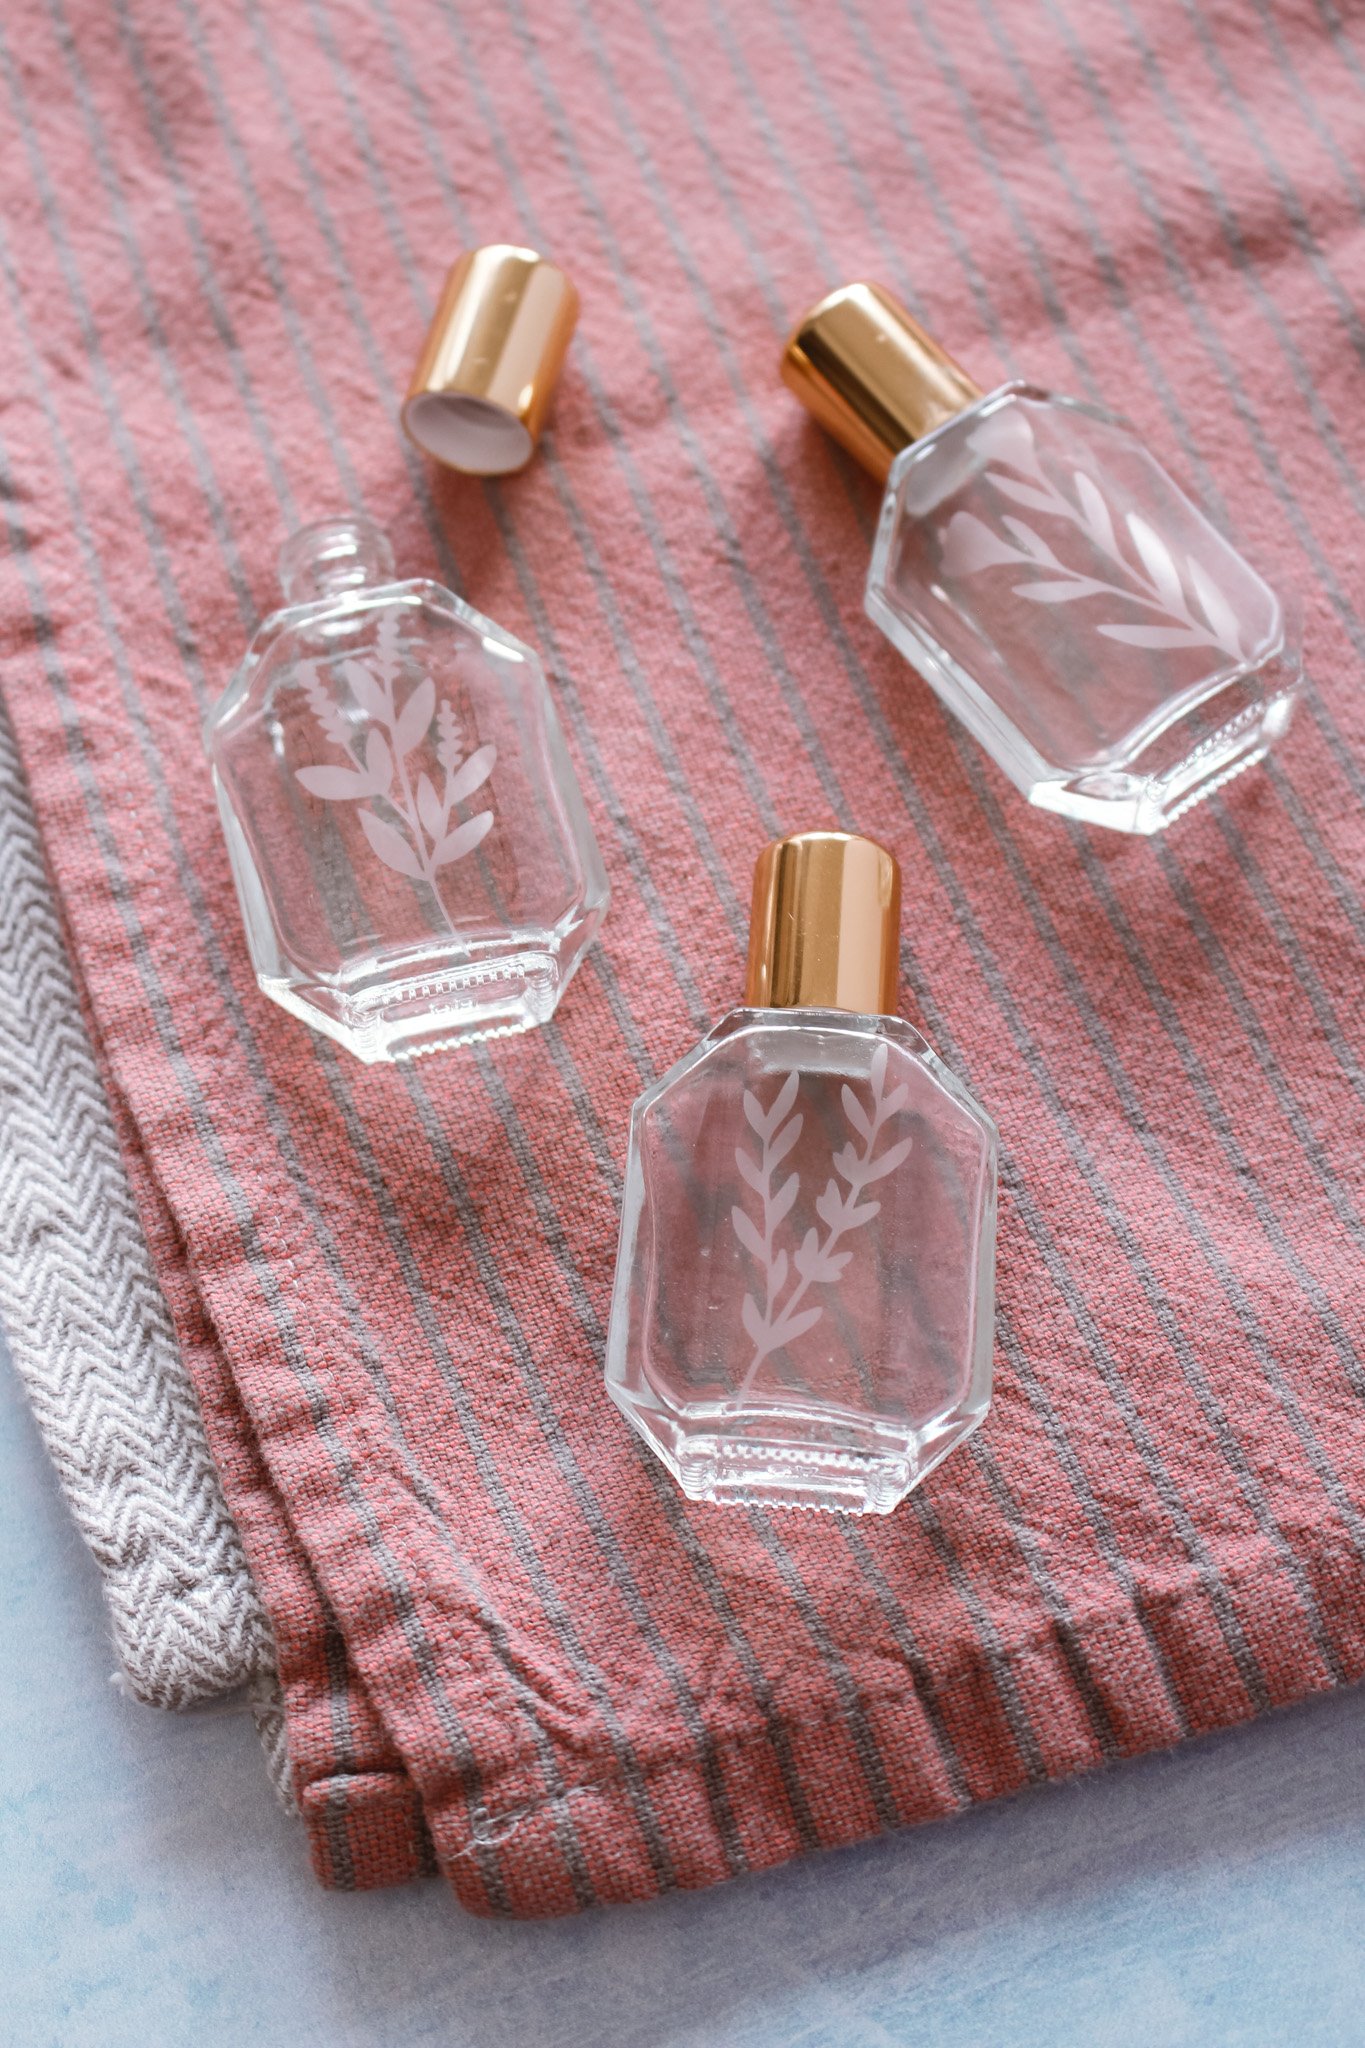
STEP 12: After 15 minutes, rinse the piece under running water to get off all remaining etching cream. Pull off your vinyl stencil and then use a clean cloth to dry off the glass. And your perfume bottle is ready to fill!
I have filled one of the bottles with one of my favorite perfumes so that I now have a travel size for my purse! Perfect for on the go! But you could also totally make your own perfume with a carrier oil and your favorite essential oil blend. I will be sharing a DIY essential oil spring perfume on my instagram so check it out @entertainidea.
HOW TO DECANT PERFUME
If you’re wondering how to transfer your favorite perfume into these mini glass rollerball bottles, you’re not alone, I was wondering the same thing! If you’re lucky, your perfume bottle may just have an easy screw off lid that allows you to open the perfume bottle top and just pour the liquid into the rollerball bottle with a small funnel. But I found that most perfume bottle atomizers are actually crimped closed permanently, so you would have to damage the perfume bottle top with a pair of pliers to force it open.
I found the easiest method to fill the travel bottle without damaging my perfume bottle was just to hold the perfume atomizer top with the hole directly over the opening of the roller bottle. And then spray the bottle a bunch of times. You’ll be surprised how fast these little bottles fill up. Another option is you can also buy these handy perfume dispenser pumps from amazon, which you can connect to the top of the perfume bottle for a quicker fill — this allows the perfume to come out in more of a stream instead of a light spray.

These mini perfume bottles are so customizable and make a great DIY gift idea. I think these would be a fun DIY project to make for your bridesmaid gifts. You could design each bridesmaid a custom bottle. Then purchase a full bottle of whatever perfume you want everyone to wear on your wedding day and pour it into each of these little perfume bottles! I also want to buy some small glass spray bottles and make some DIY refillable hand sanitizers.
Let me know if there are any other ways you would use these cute bottles!
xo Rachael

